Operating Manual For FED-1, Zorki-1,
and Related Cameras
Copyright 2000, Kevin Kalsbeek
The models generically covered in this manual are:
- Fed-1 "FEDKA"
- FED-1a
through FED-1g
- FED "Red Flag"
- the rare FED-S and V models
- FED-KMZ
- FED- Zorki
- Zorki-1a through Zorki-1g
- Zorki-2
- Zorki-2C
- Zorki-C
- Zorki-5
Introduction:
There are very few major differences between the cameras, as far as the
user is concerned, but an attempt will be made to provide instructions
for the variants where appropriate.
A Word of Warning:
The Shutter speeds on these cameras must never be adjusted unless the
shutter is cocked. Failure to observe this may cause the shutter to
malfunction for several frames, or cause damage to the shutter.
A very good rule of thumb with older cameras is, that if the shutter
speed dial rotates when the shutter is fired, ALWAYS adjust the shutter
speed AFTER cocking the shutter. This applies to many Zenit 35mm SLR
cameras also.
Another important thing to keep in mind is that you should never try to
rotate the shutter speed dial past the stop between the "Z"
(zeit-"time", or "bulb") and the 1/500 position, as doing so will
damage the shutter.
Camera Controls
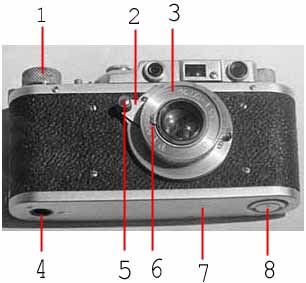
| 1. Film Advance/Cocking Knob |
5. Infinity Lock |
| 2. Focusing Lever |
6. F-stop Adjustment |
| 3. Collapsible Lens |
7. Baseplate |
| 4. 3/8" Tripod Socket |
8. Baseplate Locking Key |
|
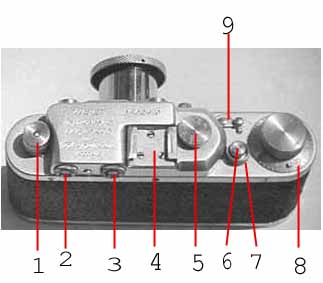
| 1. Rewind Knob |
6. Shutter Release |
2. Rangefinder Eyepiece |
7. Threaded Collar for Cable Release |
| 3. Viewfinder |
8. Film Counter |
| 4. Accessory Shoe |
9. Rewind Selector |
| 5, Shutter Speed Dial |
|
Note: A self timer cocking lever will be found on the Zorki-2 to the
left of the lens when viewed from the front.
Lenses
Your camera may be equipped with either a rigid, or a collapsible lens.
The rigid lens is pretty much self explanatory, though it should be
mentioned that very few Russian RF lenses have click stops for the
aperture. Many people are concerned when they see oil on the diaphragm blades, but this does no harm at all, because unlike your modern 35mm SLR, the apertures are manually controlled by a ring surrounding the lens barrel. Oil on the diaphragm blades will foul up the automatic diaphragm
operation on an SLR, but can be an advantage on an RF lens, as it
prevents the diaphragm ring from moving too easily, helping to prevent
the setting from being changed while you are walking around, etc.
Collapsible Lenses
If your lens is the older style collapsible lens, it is necessary to
pull out and lock the lens in the extended position prior to use. To do
this, pull out the lens, and keeping some tension on it, rotate it to
the left or right, until you feel the locking flanges drop into their
recesses, then rotate the lens to the right as far as it will go to lock
it in the extended position. Press in on the lens to assure that the
lens cannot be pushed back into the mount. It is now ready for use.
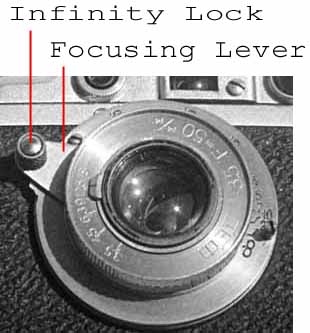
The collapsible lens has a focusing lever with an infinity lock that
must be disengaged before the lens can be focused. Earlier lenses have a
spring loaded push button lock, while later lenses have a spring detent
that allows the lever to be pushed off the infinity stop.
Mounting and dismounting lenses
Mounting and dismounting lenses on Russian RF cameras requires care, as
the later lenses have mounts that are made of rather soft aluminum, and
are easily damaged. This also means that the lenses are susceptible to
damage from hard bumps or being dropped, as this can cause misalignment
of the lens elements. Beware of any lens that appears to have been
dropped.
When dismounting the collapsible lens, disengage the infinity lock, and
rotate the focusing lever to it opposite stop and press firmly, but
gently to break the lens loose, and then unscrew it from the camera
body.
To remount the collapsible lens, set the focus to the minimum focus
distance of the lens, to avoid the RF coupler on the back of the lens
from pressing heavily on the Rf cam in the lens mount. This helps avoid
cross threading the lens mount. Carefully start the threads, and screw
the lens into the body using the focusing lever until the lens bottoms
firmly, but not tightly.
The rigid lenses are mounted as above, but as they have no focusing
lever, a knurled grip area is often provided near the mounting threads.
Use great care in mounting the 135mm Jupiter lens, as the RF coupler
protrudes from the rear of the lens even at minimum focus distance,
making cross threading very easy. Never force anything!
Rangefinder and Viewfinder
The rangefinder and viewfinder on these cameras can be difficult to use
as they are small, not very bright, and must be kept clean to
maintain what useability they have. Looking into the rangefinder eyepiece, you should see a spot of light in
the center of the window, and the image within the spot will probably be
a slightly fuzzy double image. Point the camera at an object some
distance away, and turn the focus lever until the images merge in the
center spot, and become a sharp single image. With some subjects you may
find it easier to turn the camera vertical, allowing the images to merge
vertically rather than left to right.
If you focus on an object, and look at the range scale on the lens, the
distance shown should agree closely with the actual distance to the
subject as measured in meters. If the images do not merge properly at a
measured distance, or if the the merged image is vertically misaligned,
the rangefinder is out of adjustment. It is strongly urged you have it
adjusted by a knowledgeable camera repairman.
The viewfinder is used only to compose the photograph, and the view
corresponds with the angle of view of the 50mm lens only. The viewfinder
cannot be used to accurately compose photos with wide angle or telephoto
accessory lenses.
The Zorki-5 differs from the earlier models in that it has a combined
viewfinder/ rangefinder window, which is much larger and no doubt much
brighter than the earlier ones. The Zorki-5 also has a much wider base
rangefinder (67mm) which is based on the FED-2 design, and offers
potentially more accurate focusing.
Shutter Speeds and f Stops
On these old cameras and lenses, you can expect to find shutter speeds
and f stops that do not correspond to their modern equivalents.
One solution to the problem is to find an old, working Weston meter that
has the old style shutter speed and f stop progressions, figure out
what the modern film speed equivalents are, and use it, but this is not
really necessary.
Assuming the shutter is working properly and the f stops correctly
calibrated, the differences can be ignored, as they more or less cancel
each other out. The f stops, where they differ from the modern ones, are
only 1/6 to 1/3 stop smaller in size than the modern f stops, while the
shutter speeds run a bit slower, allowing more light to hit the film,
equalizing things.
For instance,1/50 at f12.5 on a Zorki-C, is basically equivalent to 1/60
at f11, and so on. The old style exposure combinations can be
distracting until you get used to them.
Many of these cameras are also unusual in having shutter speeds of 1/20
and 1/40 second, which are holdovers from the Leica I & II. These
speeds tend to foul up the shutter speed progression, as they are not
full shutter speed increases, but represent about 1/3 to 1/2 speed
increase/decrease, as between 1/20 and 1/30, and between 1/30 and 1/40,
and this must be kept in mind if these speeds are to be used.
The rare FED-V, and FED-S have shutter speeds to 1/1000. The FED-V of
1938 also had slow speeds to 1 second located on a separate dial on the
front of the camera. To use the shutter speeds above 1/5 second, the
slow speed dial must be kept set at 1/25- this allow shutter speeds from
1/25 through 1/1000 to be used. To Use the slow speeds from 1/10 through
1 second, set the shutter speed dial at 1/25, then adjust the slow speed
dial to the slow speed desired. The FED-S, produced between 1938 and
1941 did not have slow speeds below 1/25.
Film Loading
To load these cameras, a long thin Leica style leader is required, which
is 18 to 22 mm wide, and 10 cm long. It is straight for 85mm, and then
curves sharply upward for a total length of 10cm. The upper edge of the
curved cut MUST fall between the sprocket holes so that there will be no
sharp edges that can catch on the shutter curtains, and believe me, they
will.
Leader cutting templates can be had to cut the above leader, and are
very desirable as they index the film sprocket holes so that the leader
cut ends correctly between the sprocket holes.
The baseplate must first be removed. To accomplish this, unfold the
locking key on the left end of the body, and rotate it 1/2 turn to the
left, until it stops. Using the key as a handle, pull up on the baseplate
until it hinges off the retaining pin on the right end of the body. The
rewind selector should be placed in the rewind position, which means
that it must be rotated counter clockwise until it covers the "B".
With the lens pointing at your body, you will find the takeup spool
located to your right. Reach in, and pull the spool off the spindle.
Attach the film leader to the takeup spool by slipping the end under the
metal clip on the takeup spool (which rotates counterclockwise),and pull
enough film out of the cassette so that 4 sprocket holes on the uncut
film behind the leader are protruding from the lips of the cassette.
Start the feed cassette and takeup spool into their recesses. Making
sure that the leader enters the slot behind the shutter assembly
smoothly. With the cassette and takeup spool inserted approximately
halfway into the camera, make sure that there is enough slack in the
film, so that when it comes out of the shutter slot, it makes a 90
degree turn and goes straight down into the the clip on the takeup
spool. This is VERY important, as it prevents the film from catching on
the film advance sprocket, which is located right next to the takeup
spool, as you are pressing the cassette and spool into position.
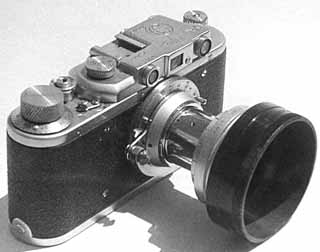
| Zorki 1c with series 6 36mm slip-on adapter ring, filter, and lens shade |
 |
Press the cassette and takeup spool fully into the camera, making sure
that the cassette is fully seated into the feed side by turning the
rewind knob slightly to verify that the rewind knob has engaged the feed
cassette spool properly.
While watching the leader and film advance sprocket teeth, turn the
winding knob slowly to engage the sprocket holes on the leader with the
teeth on the sprocket- NO FARTHER. If the film has not engaged the
sprocket teeth, turn the the rewind knob clockwise a bit to remove
excess slack, and engage the teeth on the sprocket.
When the sprocket teeth have engaged the holes in the film, reinstall
the baseplate, and turn the locking key as far as it will go clockwise,
and fold down the key. Reset the rewind selector to the film advance
position- pointing towards the cocking knob.
Cock the shutter, and manually rotate the frame counter dial so that
frame "38" is adjacent to the small arrow engraved next to the dial.
Fire and recock the shutter a total of 3 times, and recock the shutter,
which will put the frame counter on frame "1". You are now ready to make
photographs.
Rewinding The Film
When you have finished the roll of film,make sure the shutter is not
cocked. Set the rewind selector to the rewind position, and pull up the
rewind knob, and turn it in the direction of the arrow on the knob. When
the film is rewound, remove the baseplate, and tap the body on your palm
until the cassette emerges enough to be grasped easily and removed from
the camera.
Notes on Zorki Rewind Selectors
The Zorki-2, 2-C, C , and 5 cameras do not use the lever type rewind
selector found on the earlier FED and Zorki cameras.
The Zorki-5 appears to have the rewind selector in approximately the
position of the shutter release on the earlier cameras, and which
probably must be held down while rewinding the film.
The remainder of the cameras mentioned in this section, have a rewind
selector consisting of a relatively tall knurled sleeve surrounding the
shutter release. To put the selector in the rewind mode,make sure the
shutter is uncocked, then press down on the selector while turning it
clockwise as far as it will go. To return the selector to the film
advance position, rotate the sleeve counterclockwise as far as it will
go.
Self Timer
Of the cameras mentioned above, only the Zorki-2 has a self timer. To
operate it, make sure that the shutter is cocked, and rotate the lever
to the right to cock the timer. When the timer is cocked, a small button
will be exposed, which, when pressed will activate the timer and fire
the shutter. The timer delay is approximately 10 - 15 seconds.
Flash
Of the above listed cameras, only the Zorki-C, 2C, and 5 were synched at
the factory, BUT this does not mean that you will not find others that
were synched by repairmen later.
The Zorki-C and 2C have adjustable synch delays built in under the
shutter speed selector- the C is adjustable from 0-25 ms, while the 2C
is adjustable from 0-30ms delay.
The Zorki-5 has 2 synch cord sockets for M or X synch, a will probably
be the easiest of the 3 to use.
I have no data on the correct synch delay to use with which flash bulb, but
from what information is available, to use an electronic flash with the
C, and 2C, you need to do two things: set the delay for "0", and get a
cold shoe to hotshoe adapter, which are easily available, and has a
standard synch cord attached. The shutter speed must be set at 1/25 or
1/30 second to synch.
Accessories
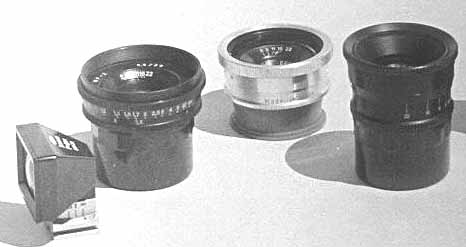
| Left to right:
20mm finder, Russar Mr-2 5.6/20mm lens, Orion-15 6/28mm, Jupiter-12 2.8/35mm |
 |
There were a number of accessories made for these cameras, including
lenses, finders, extension tubes and a stereo attachment.
Lenses
There were 6 relatively common Russian accessory lenses made that will
work on these cameras, with the possible exception of the pre-war, and
wartime FEDs. These are: Russar MR-2 5.6/20mm, Orion-15 6/28mm,
Jupiter-12 2.8/35mm, Jupiter-3 1.5/50mm, Jupiter-9 2/85mm, and the
Jupiter-11 4/135mm.
All of these lenses are decent performers, and with the exception of the
20 and 28mm lenses, are reasonably priced. With the exception of the
late, black finished 20mm MR-2, none of the above listed lenses are
multi-coated, but are coated.
Finders
Four viewfinders were produced for the above lenses. There were 2
finders produced that were for a single focal length only, in 35, and
85mm focal lengths.
The 20mm has a special viewfinder that is useable only with this lens,
and is usually sold seperately at a premium price. Late model 20mm
finders have parallax correction.
The most useful finder is the "universal" finder, which covers the 28,
35, 50, 85, and 135mm lenses. This finder is very useful to preview the
effect of changing lenses, and also has parallax correction to 1 meter.
This finder is a real jewel.
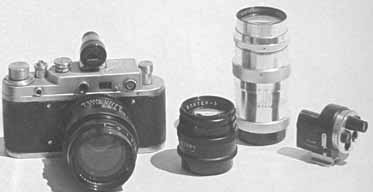
| Left to right:
Zorki-C with Jupiter-9 3/85mm and finder, Jupiter-3 1.5/50mm, Jupiter-11, 4/135mm, KMZ universal finder |
 |
Finders made for other rangefinder cameras are definitely useable on
these cameras, and usually can be had at reasonable prices.
Filters and Lens Shades
Filters and lens shades for the rigid normal and accessory lenses are
quite easy to obtain from large camera stores. The 2 sizes generally
required are 40.5, and 49mm. A very few less common lenses like the 50mm
f3.5 Industar-50 take smaller 35mm filters, but these lenses are not
usually found on the older cameras.
The collapsible 50mm lenses are the ones that present problems. This
lens requires 36mm press on filters, and about the only ones available
were intended for Leica cameras, and are usually quite expensive. The
Russians made 36mm press on filters, but they are quite scarce.
A lens shade would be quite critical on the uncoated Pre-WWII FED lenses
up to those made in the late 1940s. From available information, FED
started using coated lenses in 1949. Apparently, all Zorki lenses were
coated.
The best solution for filters and lens shades for the collapsible lenses
would be to use old "series" adapters that utilize series 5 or 6 filters
and the lens shades that are made to fit them. Though most of the
"series" equipment has been out of production for many years, there is a
great deal of it around, and can often be had for giveaway prices.
A good source for series adapters, and related items is:
John Aungst Photo- Video Inc.
Schoolside plaza
Rt 61, Box 688
Leesport, PA 19533
(610) 926-2655
[email protected]
Extension Tubes
FED made a set of extension tubes for RF cameras, and can be found at
reasonable prices. These tubes will allow up to 1:1 magnification, but
would be very difficult to use, as they would require very accurate
measurement from the film plane, which is not marked on the cameras.
Accurate framing would also be a challenge. The instructions with the
tubes are quite comprehensive, but are in Russian.
Stereo Adapter
These are fairly rare usually command a premium price, but if you want
one of these gadgets, make sure it has the special finder, which is
often missing.These stereo adapters provided 18x24mm negative pairs,
which reputedly have very poorly defined edges. The complete set
consisted of the stereo adapter, 18x24mm optical viewfinder, and a
folding stereoscope with adjustable eyepieces.
Repairs
Do It Yourself
Loose baseplate
The baseplate becomes loose when the loop that hooks over the retaining
pin on the right side of the body becomes bent slightly out from the
body. Remove the baseplate from the camera, and supporting it on your
leg- NOTHING hard-tap on the loop gently, but firmly with a plastic, or
brass hammer to move the loop back towards the camera body VERY
slightly. Test fit the baseplate to the body frequently. The fit is
proper when the baseplate requires a VERY small amount of force to pop
it over the opposite end of the body.
Loose, or tight cold shoe
If accessory finders, etc are too tight in the shoe, the lips of the
shoe can be VERY carefully pried upwards, preferably with a brass tool
to avoid marring the finish. Conversely, a loose shoe can be tightened
by GENTLY tapping on the shoe lips with a plastic or brass hammer, but
this must be done carefully to aviod damage to the rangefinder. When the
accessory is retained securely, but can be removed without undue force,
the lips are correctly adjusted.
Shutter problems
Great care must be taken when using cloth shuttered RF cameras in bright
sunlight.Unlike SLR cameras, there is no mirror to keep the sunlight
focused by the lens from striking the shutter curtains, and if the
conditions are right, the sun can burn pinholes in the shutter.
On later RF cameras that have removable backs, the shutter curtains can
be easily checked by the user by holding the body with the lens removed
up to a bright light, and examining the curtains carefully. If pinholes
are found, they can be easily repaired by the owner by dotting a very
small quantity of Kodak Opaque Black, or black fabric paint onto the
back side of the shutter curtains using a very tiny brush and extreme
care.
The users of the bottom loading RF cameras do NOT have this luxury, as
the shutter curtains are not accessible to the user. If you get fogging
of the negative, you will need the help of a knowledgable, skilled
camera repairman.
Repair Facilities
Here are two places I have found reliable for repairs on Russian RF, or SLR
cameras.
Leonid Treskunov
[email protected]
Trescam Inc.
9A Poplar Lane
Old Bridge, NJ
08857
AND,
Kiev/USA
248 Mill Street
Greenwich, CT 06830
Telephone (203) 531-0900
[email protected]
Bibliography
The Authentic Guide to Russian Cameras
Jean Loup Princelle
Hove Foto Books, Jersey, Channel Islands 1995
All You Need to Know About Design And Repair of Russian Cameras
Isaak S. Maizenberg
Self Published 1996
300 Leica Copies
Pont/ Princelle
Fotosaga, France 1990
Leica Copies
HPR
Classic Collection Publications, London 1994
Please email comments, suggestions to [email protected]