Jupiter 8 at Infinity
You gave up your auto-everything SLR for a classic rangefinder, and now you want to line up those split images for every shot, right? Well, perhaps not. A couple of rangefinder fans take a look at faster, and perhaps just as accurate focusing techniques that let you concentrate more on the image at hand, and less on fiddling with the focus ring. Take a look at Mr. Kevin Kalsbeek's thoughts on the Hyperfocal distance focus method, or click HERE to jump down to my article on zone focusing.
The use of the Hyperfocal Distance of a lens is a most useful focusing method for the photographer to learn. Unfortunately, in this day of computer controlled cameras, it is a dying technique.
You might ask why this is an important technique to learn, and that?s a fair question. To answer it, let me summarize the advantages and disadvantages of the method.
Advantages:
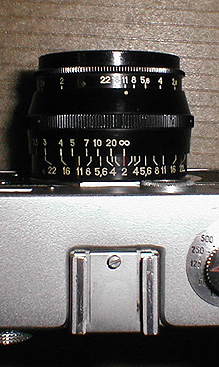
For an example of what can be accomplished, grab your rangefinder camera, and follow along. I?m using a Fed 3 with 50mm Jupiter-8 lens to generate these figures. If your camera has a different lens don?t worry about it, the results will be functionally identical.
|
Jupiter 8 at Infinity |
With the Jupiter-8 set at infinity focus, you will note that the near depth of field at f11- the aperture at which we will be shooting- would be approximately 5.5 meters, meaning that everything from 5.5 meters to infinity will be in focus. The problem is, though, that there is an important element of the photo located 4 meters from the camera, which will be out of focus unless we increase the DOF. |
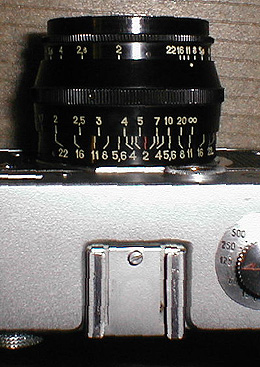
Setting the Hyperfocal distance
To increase the DOF, we will adjust the lens focus to it?s Hyperfocal Distance setting.
| Turn the focusing ring off the infinity focus setting until the infinity mark on the focusing ring lines up with the f11 mark on the DOF scale. You will see that the camera will be precisely in focus at 6 meters (6 meters IS the Hyperfocal Distance). It also means that your object at 4 meters will also now be in focus, for, if you look at the near DOF scale mark corresponding to f11, you will find that it indicates about 2.8 meters. So, everything from 2.8 meters to infinity should be in acceptable focus. |
|
Modified Hyperfocal Method
As I mentioned, there can be failures with the Hyperfocal method, especially if important objects are too close to the near edge of the DOF, and occasionally, the background may not be sharp. Also, I usually estimate distances, which can be another source of failure, so I modify the technique for insurance. Still exposing at f11, I would adjust the infinity mark on the focusing ring to line up with the f8 mark, which appears to reduce the depth of field, and it does a bit, but as I will be making the exposure at f11, it works.
The alternate hyperfocal method is, in my opinion, the best and safest one to use. If you are really trying for maximum DOF, moving the camera back to assure maximum sharpness on critical shots is wise, as this will place your important near details farther into the depth of focus, and it is easy to crop the negative during printing to restore the original viewpoint.
I think it wise to point out to beginners that these techniques can be used with most aperture/shutter combinations- the f11 setting was an example only, but one that I use frequently.
Other Considerations,
When using lenses of both shorter and longer focal lengths, an accessory finder is necessary. This frequently covers a range of lenses from 28mm to 135mm and is a very desirable piece of equipment. I keep one of these finders on my RF cameras at all times, and use it with all my lenses. These finders are also very useful for determining which lens you will use. When combined with the Modified Hyperfocal Method above, this combination provides a very quick to use camera, that makes excellent, sharp negatives.
When I am using my Russian RF cameras, it is very rare for me to use the rangefinder, except to check areas in the near depth of field, to make sure they will be in focus. It is also important to note that the rangefinder itself can be out of adjustment, and that the actual focus of the lens can be improperly set at the factory, or may no longer be correct due to tampering with the lens itself, not to mention that the flange to film distance on the camera body may also be incorrect.
While these problems can usually be fixed by a knowledgeable user, it is often better to have the adjustments made by a skilled camera repairman. Then you will have a camera that can be trusted.
I would recommend some experimentation before using the Hyperfocal Distance technique for serious work. Also, It should be understood that this focussing method is just as usable with 35mm SLRs, and Medium Format cameras, or any camera with DOF scales.
More information
For those wanting more information than is provided in this simplified version, I would recommend ?The Camera? by Ansel Adams, pages 52 and 115. Also, ?The Ansel Adams Guide: Basic Techniques of Photography? Vol.1, by John P. Schaefer, pages 89 and 90.
Ed. note -
Mr Kalsbek has been involved in photography as an avocation since his tour of duty in Vietnam, turning to the challenges and demands of black and white photography in the 80's. Today Mr. Kalsbek works in the aerospace industry in southern California. His ever expanding field of photographic interests led him into the world of Russian cameras, starting with Kiev medium format, and on to and extensive collection of rangefinder cameras and accessories. Somehow he also finds time to assist in mantaining the Kiev Report, an online members-only newsgroup dedicated to Russian cameras equipment and techniques.
| Example: Indoor shot, flash requirement at the flash synch speed is f4. The zone of focus is going to be roughly 1.8 meters to 2.3 meters - say 5.5 to 7.0 feet. In other words, everything between those points is going to be acceptably sharp for normal enlargements. BUT I CAN'T TELL IF SOMETHING IS SIX FEET AWAY! That is the beauty of zone focus - you do not have to! You only need to be within the zone of focus to get a decent image, not dead on. I am no living measuring tape, but I can certainly estimate a six foot distance with that much latitude. How? Well, I am nearly six feet tall. If I was to topple over face first, would I fall short, hit it, or fall beyond? Need three feet? Arm's length. 20 feet? My living room. Simple. Your own experience may suggest other "rulers". |
 |
Need more depth of field? If light conditions and available shutter speeds permit, use a larger f-stop number (smaller aperature). Note in the picture of the Jupiter 8 lens in the article above how much larger a zone you get at, say f11: a range of 1 1/2 to 3 meters, or nearly five feet to 10 feet. Or choose a shorter focal length lens. On my Steinheil f4.5 35mm focal lenght lens set at f11 focused for 6 feet (roughly comparable to the 2 meters in the example above) has a zone from just over four feet to almost 14! Obviously the reverse is true if you want minimal depth of field - use long focal lengths and large aperatures. But you had better be really, really good at judging distances!
At this point it probably sounds like more trouble than it is worth. But go to an indoors family gathering and try this sometime with a 35mm rangefinder - Take a 35mm lens and preset the focus on the lens at six feet. Now just aim, compose, and shoot. Very, very few of the shots you want will be unacceptably out of focus. You will catch nearly every fleeting expression, every quick movement. Shots that are blurred by an autofocus camera playing catch up as you pan the camera are now safely yours.
IMPORTANT - If you want big enlargements remember that a smaller and smaller area will appear sharp as your print gets larger and larger. This shows up quite clearly in Cartier-Bresson's early work as the Leica rangefinders of that day were simply too dim for his technique. Quite often in his great prints the strongest focus is some inches in front or behind the feature subject. This would have not been observable in a snapshot size print, however.
Some of you quick studies have already noticed that if you set the focus ring on the desired f-stop so that it just touches infinity you have a quite wide range that will be in the zone. All you need to do is avoid trying to capture something closer than the minimum distance indicated. Entirely true, and you have just discovered the Hyperfocal Focusing Method outlined by Kevin Kalsbeek above. In general, I prefer zone focusing for two reasons: I believe I get a higher percentage of enlargeable images; and I, like Mr. Kalsbeek, frequently find distant objects too ill defined, especially with shorter focal length lenses. Hey, if it is more than 30 feet away, set on infinity and call it good.
Zone focusing was once quite an accepted practice. Many of the great classic cameras came only with a simple viewfinder and distance scale: Zeiss Ikontas, Voigtlander Perkeo, and many others. Some still do - the Minox subminature camera comes to mind. I use a Minox III, a Zeiss Nettar, a Contax T, and occasionally a Fed 3 with zone focus and seldom have to discard a print for lack of sharpness. We will not go into the many other reasons I throw away prints.