ZORKI 4 OWNERS MANUAL
All material copyright by Mark Tharp, 2000
Introduction:
The Zorki 4 is a development of the earlier Zorki cameras, derived from the Fed and Fed 2 cameras, being themselves copies of the Leica II and III 35mm cameras. Many of the controls and much of the layout will be familiar to Leica screwmount users.
While certainly not in the same class as the Leica III, the Zorki 4 actually has some advantages. Tops among its advantages is the fact that you are not carrying an irreplaceable collectors item should you decide to use it. The viewfinder is also significantly brighter than a Leica screwmount and is coincident with the rangefinder. Above all, the film can be loaded, in daylight, with the ease and convenience of a modern 35mm camera - the entire back comes off!
There was a virtually identical Zorki 4K, differing only in having a winding lever, rather than a knob. Then there was the MIR, a Zorki 4 with no slow speeds and a top marked speed of 1/500th sec. (1/1000th may exist, but is not marked). The final versions were the Zorki 5 and 6. These differ from the 4 mainly in having a wider rangefinder base for improved focusing accuracy, shutter speeds of 1/30th to 1/500th only, seperate pc connectors for M and X synch, hinged back, and oh happy inspiration, a top mounted rewind knob big enough to be easily gripped by human fingers!
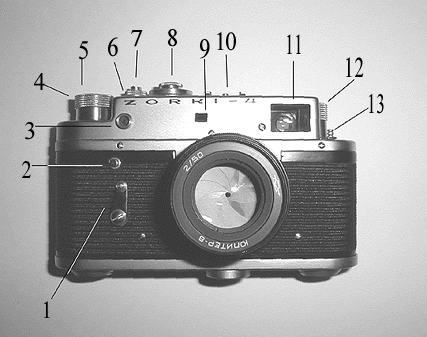
| 1. Self Timer | 8. Shutter Speed Selector |
| 2. Timer Release Button | 9. Rangefinder Optic |
| 3. PC connection | 10. Flash / accessory shoe |
| 4. Winder Knob | 11 Viewfinder |
| 5. Film Counter | 12. Rewind Knob |
| 6. Rewind Ring | 13. Diopter Lever |
| 7. Shutter Release |
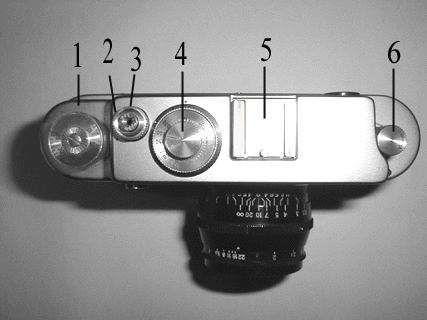
| 1. Winder Knob | 4. Shutter Speed Selector |
| 2. Rewind Ring | 5. Accessory Shoe |
| 3. Shutter Release | 6. Rewind Knob |
LOADING / UNLOADING FILM
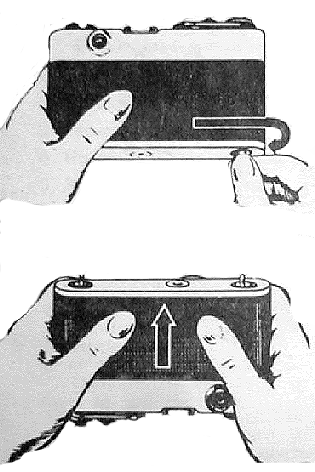
Note that this rendering is of a Fed 3. The latching mechanism and its operation are identical.
To access the film compartment you remove the one-piece back. It is secured by two rotating latches on the bottom plate. Rotate each latch toward the outside of the camera body as shown in the illustration above. Slide the back off as shown. Installation is the reverse of this proceedure.
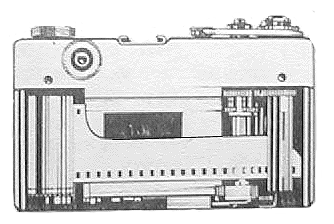
Again, note that this rendering is of a Fed 3. The film loading procedures are identical, except that the Zorki 4 takeup spool is removeable.
To load film place the 35mm cartridge onto the left spindle, with the film leader placed into the takeup spool on the right. Note that the takeup spool pulls the film UNDER the spool, so feed the leader so that it passes OVER the sprockets and then UNDER the takeup spool. You may find it easier to remove the takeup spool, attach the leader, and place both film cartridge and takeup spool into the camera together.
Make certain the rewind ring is turned as far counter-clockwise as possible. The rewind ring surrounds the shutter release, which is between the shutter speed selector and the film advance lever. It is not marked in any way. To advance the film the ring must be in the counerclockwise position. Wind film advance lever and press the shutter. The film should now be winding onto the takeup spool. Replace the back. Advance the film and release the shutter for two frames. You should now be ready to take pictures!
When you are ready to rewind the film you must FIRST RELEASE THE SHUTTER. Failure to do so may cause the shutter to behave erratically the first few times when you next load film. Rotate the rewind ring clockwise by turning WHILE PUSHING DOWN. Pull up on the rewind knob until it comes above the viewfinder (the fact that this knob pulls up was recently pointed out to me by an English gentleman who was kind enough not to point out I am 12 kinds of an idiot for not knowing that). Turn the rewind knob clockwise until no resistence is felt from the film. This will take far more turns than seems reasonable. The back may now be opened and the film removed.
FILM ADVANCE / COCKING THE SHUTTER
The film advance lever is a knob to the far right (viewed from the back) of the top, Turn the knob clockwise almost 360 degrees until it comes to a firm stop. This will advance the film one frame and cock the shutter.
FILM COUNTER
The film counter dial is not geared, so it can be rotated at any time. When you are ready to take your first frame, rotate the counter knob (directly above the film advance knob) until the first mark after the "0" is lined up with the black dot at the 9:00 position. The counter will advance up each time the film is advanced.
SETTING SHUTTER SPEED
IMPORTANT!!! NEVER CHANGE SHUTTER SPEEDS WITHOUT FIRST COCKING THE SHUTTER!!! In the worst case, you may do major damage to the mechanism. At best, you will find the shutter behaves erratically for a few frames.
The shutter speeds are located immediately next to the accessory shoe and are contained on a dial numbered B, 30, 1, 2, 4, 8, 15, 60, 125, 250, 500, and 1000. "B" will open the shutter for as long as you press down on the shutter button. "30" is 1/30th of a second and is the synch speed for flash. "1" is for one second. All other numbers are the denominator of a fraction of a second, of which the numerator is the number 1. In other words, 1/2, 1/4th, 1/8th of a second, and so on. You may wonder why 1/30th is out by itself and not between 1/15th and 1/60th as would appear logical. This is because the 1/30th setting works differently than any other, timing the full opening of the shutter to coincide with the maximum light output from flash.
To change speeds FIRST COCK THE SHUTTER (wind the film). Now grasp the speed selector knob and gently pull up while rotating the black marker to the desired speed on the surrounding dial. You will notice that the knob moves easily from 1/30th counterclockwise until it reaches the 1/15th mark. At that point resistance will be felt, and a noise like the winding of a clock will be heard. This is normal as the slow speed mechanism is engaged. The speed selector cannot be moved counterclockwise farther than the 1 second mark. DO NOT TRY! To go from on second to 1/30th you must turn the knob clockwise all the way around past B.
USING THE VIEWFINDER/RANGEFINDER
Note the lever under the rewind knob at the far right (viewed from the back) of Zorki 4. This is a diopter correction, allowing you to adjust the viewer for your own eyesight. In most cases, this will eliminated the need for glasses while using your Zorki 4 - a good thing as the hard plastic eyepiece may scratch your eyeglasses.
To adjust the diopter push the lever left or right until the viewfinder is at its maximum clarity. Make certain not to have your hand in front of the viewfinder as you will see only through the rangefinder optic. I cannot find a single setting that works for all focusing distances, but it is quick and easy to adjust at any time.
Now note the bright "spot" in the middle of the viewfinder. This is the rangefinder. It will provide a spit image of the object in your viewfinder. Rotate the focus ring left or right until the split image merges into a single image. If this cannot be accomplished, you are too close to the object for that particular lens.
What you see in the viewfinder is almost certainly not what the film "sees." At normal distances, and with the "normal" 50mm lens, there is little difference. Change to a wide angle or telephoto lens, or try and move in close and other factors come into play.
The Zorki 4 viewfinder has a field of view roughly comparable (at least to my eyes) of a 50mm lens. This will depend to a certain extent on the amount of your diopter correction. If you use a wider lens, say a 35mm, you will capture somewhat more than you can see through the Zorki 4 viewfinder. Conversely, longer focal length lenses take in smaller and smaller areas, until at 135mm the lens may see only the area encompased by the rangefinder dot. The solution here is to use one of the many available auxiliary viewfinders. These come in both dedicated (a single viewfinder to match a single focal length), multiple brightlines, and adjustable varieties. These are inserted into the accessory shoe and will provide the proper field of view for the lens desired.
When moving in for a closeup you run into the problem that the lens is in the middle of the camera, while the viewfinder is well off to the side. If using an accessory viewfinder, the problem is reduced, but the finder is still above the lens. This problem is known as paralax error. Some accessory viewfinders have paralax correction. Some of the macro lenses made by Leitz came with an optic that was positioned over the viewfinder and "corrected" the paralax. I am not aware of any Russian equivalents.
USING FLASH
Keep in mind that the Zorki 4 has no hotshoe - it is an accessory shoe only. You will need to plug your flash into the pc connector on the front of the camera above the self timer release button.
The Zorki 4 has a selector for either M (flashbulb) or X (electronic flash) syncronisation. The selector is a ring around the shutter speed dial. Rotate the ring to bring either the X or M into line with the black dot at the 6:00 o'clock position.Charles T. Hoskinson (Tom) of southern California has graciously shared the following with me:
M synchronization is for M type flash bulbs. An M bulb's flash duration is about 1/25 second. Due to burning inertia, the bulb reaches its maximum output about 1/50 second after the electrical circuit is closed. The M synchronization circuit takes this inertia effect into account by closing the electrical (flash) circuit before the shutter is completely open.
X synchronization is for electronic flash. With electronic flash the flash duration is 1/200 second or less. At shutter speeds of 1/30 or 1/25 second (and longer) the shutter curtain slit size is at least as large as the frame window. Consequently, with X syncronization the electrical (flash) circuit is closed at the moment of complete shutter opening.
The Zorki synchronization is designed for use with the flash at a shutter speed of 1/30 second.
Some Russian cameras have a flash "synchroregulator" that can adjust the flash firing delay from 0 to 25 milliseconds. For electronic flash, the correct setting is 0. The Zorki 5 is an example of this design.
Thanks Tom!
NOTE: I have received a report that some Zorki 4s came with the synchroregulator referred to above. It is on the same ring that has the M or X synch on other Zorki 4's, and is marked with numbers 0, 5, 10, 15, 20, and 25. As noted by Tom, use the "0" setting for electric flash.
For those unaccustomed to such slow synch speeds, be aware that you may have some "ghosting" problems with fast films in an average lighted room. Use 100 asa or less and it should not be a problem.
SELF TIMER
Your Zorki 4 also has a timer to allow delayed shutter release. This is commonly used for group shots while the camera is on a tripod and the photographer wants to be in the picture as well. I frequently use it for slow speeds when I wish to avoid "camera shake".
First, advance the film. Second, turn the self timer lever counterclockwise until it points at the 12:00 o'clock position. When ready to release, press the timer release button directly above the self timer lever.
CHANGING LENSES
Your Zorki 4 uses Leica Thread Mount (LTM) screw threads, 39mm X 1mm. This allows you to use not only the lenses made in Russia for the Fed, Zorki, Mir, etc., but also other LTM lenses made by Nikon, Contax, Steinheil, and currently by Voigtlander, as well as Leica.
CAUTION: KMZ (Zenit, or sometimes Zenith), made some LTM mount lenses for their early SLR cameras and these have a different focal plane depth. They may mount, but will not operate properly and could damage your camera.
Caution: Not all LTM mount lenses will work with your Zorki 4. Some lenses use a "tongue" to push against the rangefinder cam, rather than a cylinder. As the shape of the cam itself is slightly different on the Zorki from that of a Leica screwmount, it may not push pass the cam to completely seat the lens. Never try to force a lens into your Zorki 4 lens mount.
To remove the lens, simply turn the barrel of the lens counterclockwise until it comes out. To install a lens, carefully square up the threads and gently turn clockwise, making certain that it is not cross-treaded. Continue until the lens is firmly against the camera body, but do not overtighten.
Please email comments, suggestions to [email protected]