
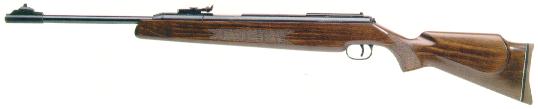
SM-1000 (top)
RWS-52 (bottom)
Super Max Velocity SM - 1000
AIR RIFLE
( TSA-B21/22)
Revised August 2001
* TSA-B21 was said to be an improved version of SM-1000 [see note 2] , it is available in both 0.177 (TSA-B21) and 0.22 (TSA-B22) caliber. The barrel sleeve on SM-1000 has been eliminated on TSA-B21/22.
SM-1000
RWS-48/52
1. front sight
hooded (globe)
open-post
2. barrel length
20"
17"
3. metal finish
matte dark grey
traditional glossy blue
4. Cheek pad
yes
no (RWS-48)
4. stock finish
satin
glossy
5. cocking lever
extendable
fixed-length
The metal finish of SM-1000 is worth mentioning
here. Instead of regular bluing (Alkaline Blackening process) used
on most commerical firearms, the action of SM-1000 has a high-tech
finish called Complex Phosphate Coating (parkerizing after blasting).
The advantages of this Phosphating process include much improved corrosion
resistance, and durability, and it is non-glaring. Today's military
small arms almost exclusiviely use this type of finishes.
|
|
SM-1000 (top) RWS-52 (bottom) |
Internally, SM-1000 is slightly different
from RWS-48. The design of the trigger group is almost same
as RWS', except the location of the two adjustment screws.
It was said that The change in the adjustment screw locations was
made to avoid possible legal trouble. SM-1000 trigger group is machined
solid steel construction, while those on RWS-48 trigger are stamped and
folded sheet steel. SM-1000 is not one of those cheap airguns.
A shooter once wrote;
"I have the Supermax SM-1000 (TSA-B21), and I am very happy with it.
It is modeled after the RWS 48/52 guns -- and is very similar in weight
and size to those guns. The power is exceptional. The trigger group and
guard are machined metal. The design is where the weight is, not "unrefined"
steel. The stock is solid and very pretty hardwood. Several internet
sites are selling this rifle for under $140.00. A $130.00 BSA (ss)
(now is $179) is a cheap gun. The TSA B21
represents a good faith effort by the Chinese to enter a higher level of
air gun manufacturing -- with an entry level price. You'll get more for
your money with the B21..."
[ HOME ]
 |
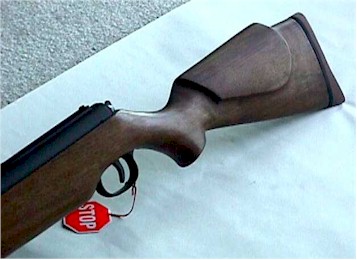
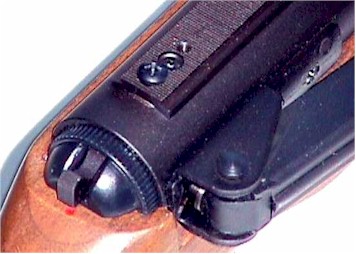
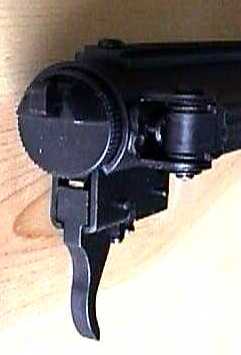
Receiver
Unlike RWS which as a glossy blue finish, sm-1000 has an attactive matt finish (the color is actually dark grey) , a scope mount base appears to be 11mm metric, but the standard 3/8" dovetail rings might fit. |
 |
|
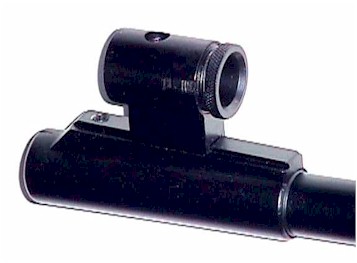 |
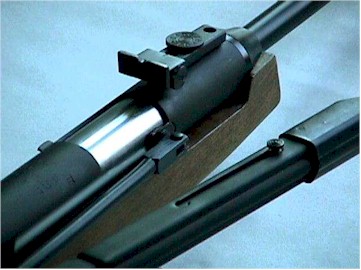
Front sight The all-metal tunnel front sight is
clamped on a dovetailed ramp, and is removable. It is ready to accept
variety of inserts (globe or post) to suit different circumstances.
It is believed that RWS-48 is shipped with an open post front sight,
and it costs extra to get a hooded front sight. The hooded
front sight is standard on all SM-1000. So if you want to use an
aperture sight system on SM-1000, you will only need to buy
the rear sight. Right here, a saving of at least $30.
|
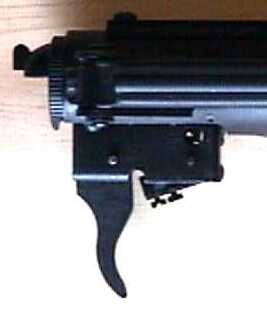 |
Trigger The design of the trigger assembly of SM-1000
|
 |
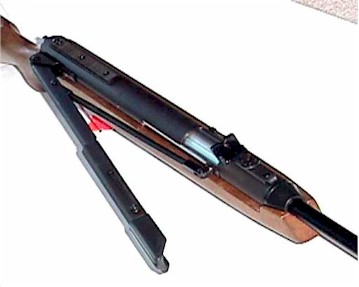
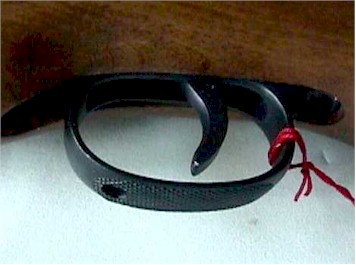
Cocking Lever, Link and Rear sight The fairly long cocking lever can be further extended by pressing a samll button on the lever, which makes cocking a bit easier. Like the orginal RWS, the length of the link (the rod linking the lever and the bolt) can be precisely set by adjusting the nut on the rear end. The rear sihgt is exactly the same as the one on the RWS. The linking arms on all new units should be perfectly STRAIGHT. If it is bent, it is probablly caused by someone who tried to close the bolt without pressing down the breech safety, and you should reject that unit as new. |
Automatic Safety & Scope Rail The trigger safety is automatically engaged when the rifle is cocked, and can be released by pushing the button at the rear end of the receiver. There is also a breech safety button near the breech port. This part appears to be exacty the same as the original RWS. The scope rail seems to be 11mm metric, which is slightly wider than the standard 3/8" dovetail scope mount. Millett's Angle-Loc Windage Adjustable .22 Cal Scope Ring (high, medium, steel and alloy) is a good choice since it can clamp on wider rails.
|
To disengage the trigger safety, press the button on the end-cap all the way down. Otherwise, the tirgger stop (the shinny piece on the top of the trigger) would not completely clear the the way, which will add some extra friction on the trigger, making it heavier than normal. The trigger safety needs to be lubricated, and sometimes polished to avoid its interference to the trigger. Note the push-down button under the pivoting point of the cocking lever. If you want to disassemble the action, that is the piece you need to unscrew out before removing any mian pin holding the end section/trigger assembly. |
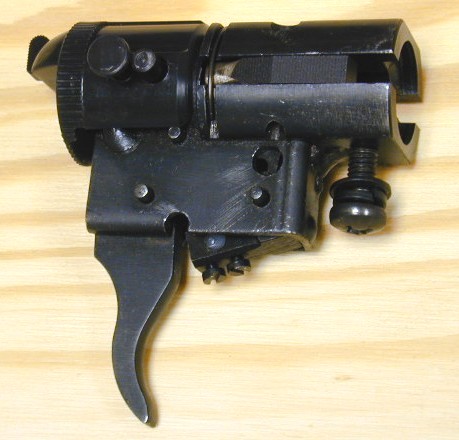
Close-up of SM-1000 trigger assembly.
The SM-1000 trigger is no surprisingly almost identical to the trigger
on the high end Diana-RWS air rifles, which is also said to be very
similar to AA TX-200 trigger. The only difference is that SM-1000
trigger is made of mainly milled-steel parts, while RWS unit is made of
stamped parts. True two sear, two stage arrangement, with trigger
pull weight and travel length adjustable. The device on the
top of the trigger box is a balanced final piston release system. It has
two jaws that hold the tail ball of the piston rod. The big
round hole on the trigger box is the window for observing the sear engagement,
very helpful for a precise trigger adjustment. The trigger of B21
is basically the same.
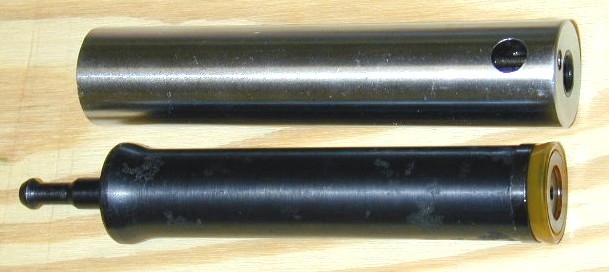
Close-Up of SM-1000/B21 air compression cylinder and piston.
As many have observed, SM-1000/B21 is constructed like a tank
, rock solid ! The air compression cylinder seems to be milled out
a solid steel stock, highly polished inside out. The piston rod and
the front cap is also one piece, turned out of a 1.28" dia. steel rod.
The piston body seems to be a forged steel part, turned and polished.
In contrary, many cheap airguns (not just Chinese) have an air compression
chamber and piston made out of tubings or rolled sheet metal. The
front caps are either welded or pinned to the tubing section.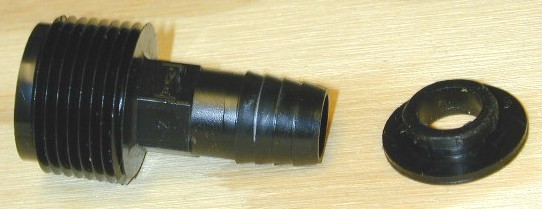
SM-1000 does not have a "top hat" or a shouldered washer to keep the
spring concentric with the piston rod inside the piston. I decided
that SM-1000 might benefit from having such a washer. So I made one
out of PCV 3/4" adapter which available at every hardware store.
I installed a 3/8" bolt in the PCV hose adaptater, and chucked it
on a drillpress, so that I could cut the plastic part like turning it on
a lathe. The original bore size fits the piston rod perfectly.
The rim diameter needs to be just under 1" to match the piston ID, and
the diameter of the shoulder ring has to be about 9/16" to match the spring
ID. The "machining" was easy.
[ HOME
]
This is an update (Jul '00) and compilation to some things that I have written in the two years that I have had my Supermax 1000's (I have two as you will learn.) I think that a lot of this knowledge applies to the current TSA (IAR, Brolin Arms) B-21/22 rifle that is being sold today. Some of the problems that I experienced have I understand (hope so) been fixed on these later models and there may have been some changes that make what I write here "not applicable" so it would be a good idea to check some other sources before doing anything major to your gun, but this should give you the basics of the Supermax to work from.
I'll give you a Description of how I now see the Supermax by discussing
my experience. I'll discuss the Disassembly. I'll discuss the trigger and
its adjustment, as the manual that I got with mine was not very clear on
what I was doing with those screws. And Ill talk about Pellets, Maintenance
and Techniques.
I will admit that I have "moved on" from my two Supermax and they don't
get shot much anymore. I would guess that I shot the "good" one about 2,500
shots and the "bad" one about 2,000 shots, as it became my "mule" for testing
fixes and adjustments. But of course while writing this I have gotten both
out of the Gun Rack and renewed my acquaintance with them. The "good news,"
for you, is that I now have a lot of more experience, and a lot more expensive
air guns to compare, with the Supermax. Overall (bottom line) the Supermax
is a "quality magnum* adult air rifle." It represents an excellent value
for the dollar at the around $150 purchase price (If you can get a "good"
one cheaper, great! - It is even a better value. - however at the sometimes
advertised price of $299 there are some other air rifles for your consideration.
And I would shop around - especially to see if I couldn't get a Supermax
and a good scope for that price.)
*I consider a "magnum" air rifle to be one that will shoot a .177 pellet
at a speed over 900 ft/sec.
I would guess that first, I had better cover what is the "good" and
"bad" part. When I bought my first Supermax from IAR (the earliest dealer
that I know of the "Brolin Arms Supermax 1000) I got a new gun in perfect
working order. This is my "good" Supermax. But evidently (and this has
proven to be the case) the Chinese Quality Control was not up to "perfection"
and they shipped IAR every rifle that the factory made. Well the Customer
became "quality control" for a while by complaining and shipping back rifles
that were less than perfect, and then IAR began inspecting the rifles before
they shipped them to save their customers grief and shipping expense. What
to do with the "rejects" - they sold them at a reduced price. The problems
were suppose to be mostly cosmetic and the rifles had been test fired and
were considered functional. I bought one of these (IAR even called me to
be sure that I knew what I was getting as part of the deal was "no returns.")
This is my "bad" Supermax. It provided a lot more education.
Problems and some Thoughts:
Well the "bad" Supermax had a "blemish" on the stock. It is either a crack or a repair on the pistol grip - you can see it if you look closely - but mostly you can feel it. I have done nothing to it and the gun has been fine. It just isn't perfect. And this is a good time to talk about the Supermax's Stock. It is a really nice stock of some "unknown" (to me) hard wood. Mine both have nice grain showing and are finished in a flat smooth light brown finish. These stocks (while not up to the "Extra Cost Walnut" of some European guns) are as good as, or better than, the quality of the beech stocks that have come with my other more expensive guns from England, Germany, and Spain. These stocks are far above the typical "hand carved dipped in brown lacquer" things seen on the cheaper Chinese air rifles.
I've mentioned the stock now let me mention the other "quality" difference
between the Supermax and the European air rifles. The Supermax is not "blued."
It has a "phosphate" finish - a military flat dark gray finish. Mine have
a finish that any military rifle would be proud to have = even and smooth.
Just for comparison I have a Diana Model 30 (this is a $1,000 gallery (bb)
gun made in Germany) that also has a phosphate finish along side my Supermax
in the Gun Cabinet and I would judge that the Supermax has the better finish.
But it is not the deep bluing that we associate with "quality" guns. However
the Supermax finish seems to stand up pretty well. It can be scratched
however, if you try hard enough.
The open sights that come with the Supermax are pretty good. But the
"bad" Supermax had a sighting problem with the open sights. The rear sight
was over as far to the right as it would go to get the gun to shoot on
target in my 10-yard home range. It turned out that the front sight was
not quite on straight. As I was going to scope the rifle anyway and as
the scope mount was not out of alignment I didn't do anything to fix the
front sight. I just loosened the screw on the "globe" part (the round part
with the front sight insert in it - the Allen screw (3mm) is reached by
a hole in the top) and slid it off to clear the way for my scope to see
(I think that this looks pretty good, and no "muzzle brake" replacement
is required.) By the way loosening this screw and sliding your "globe"
along this inclined rail is the way you adjust the front sight to get the
rear sight in the middle of its elevation range at your desired shooting
distance. On the "good" Supermax, as the front sight was fine, I removed
the rear sight (two screws - and you can get two small Allen head screws
to fill the holes, sort of, if you wish) and added a Beeman (made by Williams)
Aperture sight (Model No.5822.) And I made my own front insert so that
I would have a circle in the front sight instead of a post. I really like
this arrangement for the Supermax. I understand that the Daisy Model No
#5899 Micrometer rear peep sight and Model No 5998 Set of 4 aperture front
sight inserts will work with the Supermax and are considerably cheaper.
I didn't know this when I got my Supermax and have not yet tried them.
So what about a scope? Well unlike the Qb-88 there is no problem with most scopes interfering with the loading port as the Supermax has a long compression tube. Of course you want an Airgun rated scope because the Supermax is a "Magnum Springer" it uses a powerful spring and some heavy-duty parts so it is going to give your scope and mount a good jolt in both directions. You need to use some quality parts here. And you mount the rear mount against that round screw head that stick out of the rail as that is your "scope stop" to keep the scope from sliding off the rear. However, when you choose a scope for the Supermax you may want to choose a small and light scope because the early Supermax have a problem with the scope rail (the part that comes attached to the rifle) coming loose. What happens is that the glue the factory used fractures after some of this pounding and the screws alone can't hold the scope rail, scope and mounts on. This happened to both of mine (the "good" one had a scope on it at the time.) Fixes have been "evolving" over the years and Tim at Mac 1 Airguns is the expert as far as I'm concerned (He did the official repair service on the Supermax sold by IAR.) You'll need a combination of screws and glue to hold that scope rail on. My combination of screws and glue has held up so far but as mentioned before the "good" Supermax only has a 1oz peep sight on it and the "bad" Supermax has a Leapers 6X40AO "mini scope" on a set of Millet (TP0005) steel high mounts. I think minimizing the stress with a light scope is a good idea. You will still need a set of good mounts to hold that scope to the rail. As I understand it the latest versions of the Supermax to be shipped from China have a longer scope rail that is spot welded on to the receiver tube so this loose scope rail problem should be a thing of the past (and note this was the only problem that I encountered with my "good" Supermax.)
And good sights are necessary for the Supermax because....
The Supermax is an accurate air rifle. I would be willing to bet that
If shot from a vise my two Supermax would be the equal of my TX-200 (a
magnum spring air rifle made by Air Arms in England and pretty much the
top of its class in Field Target Shooting.) But shooting from a vise, and
holding and shooting those two rifles are two different stories. Both rifles
are heavy. The Supermax has a long (the longest I've seen on a spring gun)
barrel this makes it easier to hold on target, but (and this is a big but)
when the spring is released the rifle begins to move. These vibrations
have the length of time the pellet is in the barrel to effect its flight.
Plus you have that much time to move (flinch) and throw the pellet off
the target. (The TX-200 has a short 8.5" barrel - the rest is a tube to
support the front sight and add weight to minimize this problem.) The TX-200
also has a stock design and weight distribution that makes it easier to
shoot accurately. I dont know how they do it, but the Chinese should study
that rifle for the "Supermax Mark II." But with the right technique and
follow-through the Supermax can be shot very accurately.
Another problem that I had with the "bad" Supermax is that the barrel
was restricted at the breech. I looked at it with a magnifying glass and
some how in turning the "cone" on the breach end of the barrel they had
left a lip that make it difficult (impossible for a flat head) to insert
the pellet. I was able to grind this off because I had no choice. Hopefully
this quality control problem is gone, but if you get one your best course
of action is send it back and get another one. This is tough to fix properly.
I have had my Supermax for quite a while now and had almost forgotten (actually I had, but someone reminded me) about this. When you first get a Supermax and cock it you will find it "graunchy" (rough, gritty.) The reason for this is: You know that hole in the receiver tube that you load the pellets through, It is punched through the metal of the tube. Well this leaves a nice smooth surface on the outside but on the inside there is a sharp edge. Now when you pull back on the cocking lever you are not only puling back on the compression tube, but you are also pulling it to the side up against those sharp edges. This is what usually causes the "graunch." You could disassemble the rifle and file off this sharp edge. Or just keep using the rifle. It will wear this edge down after a little while and you will forget this "problem" ever existed with your rifle.
Disassembly:
For those of you that want, or need to take your Supermax apart I'll give you the benefit (or whatever) of my experience taking the "bad" Supermax apart. I would guess I have done this at least 50 times (including once while I write this so that I am not entirely relying on my memory - a chancy thing at best, at my age.)
First, with the Supermax you can easily remove the stock from the action.
It takes just two screws - the large Philips head (Use Driver Size No 3
) that you see on the bottom of the forearm and the same size one that
you see in front of the Trigger guard. The rear trigger guard screw just
holds the trigger guard on and need not be removed. I usually then lay
the stock aside somewhere separate from where I'm working so that it won't
get scratched. There should be no danger of things jumping out or coming
loose right a way, but there is one caution here - the trigger pins. On
many air guns, and this is one of them, some of the trigger pins are retained
by the stock so when you take the stock off they can be pushed out. There
are three trigger pins on the Supermax one is down in the slot where the
trigger assembly slides into the "receiver tube" (it is also inside the
plastic covering) so it isn't going anywhere. But the other two (one in
the front one in the back) are free to be pushed out. They are under some
spring tension so they shouldn't just fall out by them selves. Just be
careful of them for now. With the stock off you can see how the anti-beartrap
works and you could take it apart if you had some need to do so (it isn't
necessary to take it off for the rest of the disassembly so I recommend
you leave it alone.)
There are two small holes that let you see a coil or two of the mainspring.
If you were not going to disassemble the Supermax but you wanted to add
a couple of drops or oil to the mainspring this is the only place that
you could do it. I recommend that you learn to take it apart and grease/tar
the mainspring. I think that because of their location - exactly opposite
the screws on the scope rail - the purpose of these holes was to do something
to those screws.
Without a mainspring compressor the only other things that you could do at this point is disassemble the cocking lever ("e" clips on the bottom of two pins) and remove the intermediate piece of the trigger (the piece with the two screws pivoting on the front pin - there is a spring in front of it but you can get it out and put it back.) Don't try to remove the trigger itself - yes the pin will come out, but the trigger piece won't, and if you did get it out you won't get it back (it is easy once the trigger assembly is out on the workbench.)
So you need a "mainspring compressor." What is it? What does it do?
Where do I get one? Well...right now in your Supermax there is about 100+
pounds of mainspring pressure pushing on the front of that trigger block
assembly. There is one pin holding it in place. You need to find a way
to push on the back of the trigger block assembly to easily remove that
pin (OK you could drive the pin out and the whole assembly will come flying
out like some giant pellet - but how are you going to get the pin back?)
Most people build a device to apply this force using a screw (like the
screw from a large "C" clamp) and connecting to the rifle at the muzzle,
and with a push block (wood) against the flat back side of the trigger
assembly. There are plans available on the net. I don't know of any that
are for sale already built. Some people that have a large lathe or a tall
drill press use those to apply this pressure. I would guess that you could
use a large bar or pipe clamp although I haven't tried this myself. And
some people, I'm told, just use a block of wood placing the muzzle on a
piece of carpet on the floor and pushing down with their body weight -
this seems like a Difficult and Really Dangerous way to do it ! - especially
getting it back in (Definitely Not Recommended!) I happen to have one of
those wooden work benches with a vise on the end and by building some wooden
pieces to attach to the work bench and the movable part of the vise I can
easily apply the necessary pressure and control it very carefully. Whatever
you decide to do you need a "mainspring compressor" to go any further.
If you are further disassembling your Supermax you need to remove the
pin that holds the cocking lever to the "receiver tube." This pin (the
big one furthest to the rear) has an "e" clip and washer on the bottom.
Remove these (I usually use a small screwdriver to slide the "e" clip sideways
till it is free - carefully you don't want it to go flying and you loose
it - do this somewhere where you can find it if it does go flying - a cluttered
workshop is not the best place.) Then relieve the pressure on the pin by
starting to open the cocking lever (don't cock the rifle just start to.)
The pin should slide out easily. I put the "e" clip, pin, and washer aside.
OK, now put your Supermax into the "mainspring compressor" and take
up a little tension to hold everything in place. Now the first "Secret
of the Supermax" (this refers to some writing that I did when I first tried
to take this thing apart - this is something that is not obvious.) You
have to remove the "Safety pin." If you slide the cocking handle out of
its bracket underneath it you will see a "pin" with a big flat head sticking
out. This is what I call the "safety pin." Its function is to push on the
safety when you cock the rifle. It has to be removed to slide the trigger
assembly out of the "receiver tube." How do you do that? That is the trick.
It unscrews. Looking down on it, turn it (usually by hand) counterclockwise
(it is a right hand screw.) Take it all the way out and put it aside.
Now, right ahead of where the "safety pin" was you will see the "main pin." This is the one that holds the whole thing together. What I do is add tension on the "mainspring compressor" and tap lightly on this "main pin." (I use a 3/8" tapered alignment punch (it is a punch with a 3/16" flat end and tapering up to 3/8" at the handle) and tap it with the handle of a big screwdriver.) Then add more tension and tap. At the point where you just about balance the spring pressure the pin will start to move easily. Push it out. Now relax tension on your "mainspring compressor" and the trigger assembly will start to slide out. You did leave enough room (about 3") for this assembly to slide all the way out and be removed didn't you? (I didn't the first time but I've learned.)
OK now you should have in your hand the "trigger assembly" and there
should be a large spring with a piece of plastic in it (called the "spring
guide") hanging out of the end of what is left of your Supermax. Resist
the temptation to slide that plastic cover off of the trigger assembly!
There are things that will jump out and one of them is tiny (almost impossible
to find if it does.) Wait till we get to that part! Slide the spring and
guide out of the "receiver tube" and put them aside.
Now if all you wanted to do was install a new mainspring - you are there.
But if you want to see the piston and seal, or the compression tube here is what you do. Pull the cocking lever back and it will pull the compression tube (the silver part) back. In the front of the compression tube where the cocking lever joins it there is a pin that unscrews with an Allen (hex) wrench. It is a 3mm, and you will need a bent one ("L" shaped) to be able to turn this pin. Screw it all the way out and the cocking handle with its attachment will just slide out. Now you can slide the compression tube with the piston inside all the way out the back of the "receiver tube." I think that this is the best way of doing it, as it protects the piston from any damage. When it is out you can slide the piston out of the compression tube.
It all goes back together pretty much the reverse of the way it came
apart. When you put the compression tube and piston back it will stop its
forward motion at the anti-beartrap, but you just have to release that
the way you always did. Before you slide your trigger assembly back into
the receiver tube make sure that the hole for the main pin is lined up
in the trigger assembly (there is a plastic block in there that can get
out of true.) It is usually easier to use a tapered alignment punch to
get all these pieces straight both when the trigger assembly is outside
the receiver tube and when you are just about lined up - before you insert
the "main pin" - to make sure that it goes in easily.
OK the trigger assembly: - while you have it out - now is the time to do any trigger work that you have planned. Work on a clean sheet of paper or something so that you can lay out parts and so you won't loose some of the little bitty parts.
Here is the "Second secret of the Supermax." Now carefully slide the plastic cover off the back end of the trigger assembly. I said carefully! About 1/3 of the way back a spring will be released out of the hole in the left side (as if it were on the rifle on your shoulder and right side up) of the plastic cover. This you will notice is on the opposite side of where you unscrewed the "safety pin." This is the spring that pushes the "safety pin" back out. OK just a little further and a very small spring will come out from under the lip of the plastic cover on the top (if the rifle...etc.) of the trigger assembly. With that spring out turn the trigger assembly over and dump a very small ball bearing out on to your paper. This is the ball detent that holds the safety lever in when you push it in. Now you can slide the plastic cover the rest of the way off (if it hasn't come off in your hand once the tension from those springs has been released.)
Now the safety lever (the one you push) will just slide out the back of the trigger assembly. You can see how this works. When it is back - pushed by the part the "safety pin" screws into. The trigger is blocked. When you push it forward - and it is held in place by that little ball and spring - it clears the trigger. If your trigger is hanging up on the safety you have the part in your hand to file off whatever it is hanging on.
You could now push out the rest of the safety pin, a piece of plastic
that is held in by it and a spring that tensions the plunger and arms of
the piston retention assembly - but why? If it ain't broke (and it probably
isnt).... Only one note here, that piece of plastic ahead of the safety
pin needs to line up its hole with the hole in the trigger assembly housing
so the main pin can pass through. If you disturb it make sure that you
get it back in the right place.
With the safety out of the trigger you can now get to the trigger parts
that count, i.e. the parts that you feel when you pull the trigger. There
are three parts and they come out in order.
Part 1: The "intermediate piece" this is the one with the two screws
and you could have taken it out right after you got the stock off. Push
out the forward (you know ) pin. This little part has a spring enclosed
in the front of it and the two should come out together. If not find that
spring. Now this spring is almost identical (I don't know if they are the
same or not) to the one that pushed the "safety pin" I keep them separate
just in case they aren't the same.
Part 2: Next remove the trigger. Push out the rear pin and the trigger
can be removed to the rear of the trigger assembly housing. It will come
straight back and there will be some spring tension pushing it that way.
Part 3: Finally remove the sear. Push out the top pin. Please note that
there is a spring that this pin passes through. Note how the curved portion
of that spring lays in a shaped cavity in the sear and its two "feet" stick
down (up if you have the whole thing upside down) into the trigger assembly.
Look at the trigger piece that you just took out. See how the thin piece
slides between those two spring legs. That is what was pushing it when
you took it out.
Now you can lay out the pieces of the trigger on a piece of paper or
by using the pins on the outside of the housing assemble it outside of
the housing to see how it works and what you should polish lubricate etc.
Putting it back and operating it.
Lay the sear piece in the housing and slide the spring into place (curved
piece in the slot that it fits) and push in its pin through the spring.
Slide the trigger piece over the legs of the spring and put in its pin.
Then finally the intermediate piece with its little spring in the hole
(this is actually the hard part for me - and it isn't too tough) and then
slide in its pin.
OK lets test it. Take your alignment punch and push in the plunger at
the front of the trigger assembly. If you look at the front of the trigger
assembly right in the middle of the top part there is a "piston" about
3/8" in diameter recessed down between the two locking arms. Push this
in about 1/4" until it clicks. Then you can "fire" it by pulling the trigger.
Although the pressures won't be the same, now is a good time to get a rough
position of your two adjustment screws (read adjusting the trigger below.)
If it works, great. Put in the safety and slip the plastic cover back on remembering to put the ball and little spring in the top and the safety spring in the side as you slide the cover forward. Look through (or run your alignment punch through) the hole that the main pin goes through to make sure everything is lined up. And then reassemble your Supermax.
The only other hint that I can give you, is as you use your "mainspring
compressor" to push the trigger assembly back into the receiver tube "jiggle
it." In other words as you increase tension move the trigger from side
to side a little. It should slide smoothly in only resisted by the spring.
But sometime things will hang up (the plastic housing for example) just
move it around so that you aren't pushing on something other than the spring.
And when you put your cocking lever pin back in, remember to have the
pressure off the pin (cocking lever partially open.) Then with the pin
in but before you put the "e" clip back test it (close the lever) to see
if you have enough over center pressure and make sure that the cocking
lever is right side up (" made in china" and the extension pin on the top
side with the push tube slightly bowed toward the gun.) If you dont have
enough over center pressure, but you did when you started, rotate the cocking
lever one full turn. If you just want to adjust the cocking lever tension
remove the second "e" clip and pin on the cocking lever and turn the push
tube end piece in half turns. Dont turn the tube as it has to be bent
in towards the gun to function correctly. Then test again.
There youre done. Pretty easy right? It was for me (and will be for
you after you've done it a couple of times.) Of course you don't know if
you've done it right until your shoot it. Good Luck! Hey, I didn't tell
you that you had to take it apart. I'm just trying to help you.
Trigger Adjustment:
First, I should tell you what I consider to be a "good" trigger. The
Supermax trigger is by design a two-stage trigger and I think that it should
work like this. You get your rifle pointed down range at your target and
pull the first stage of the trigger. I.e. you pull against a "moderate
force" on the trigger. The trigger moves a certain distance and then there
is a point where that "moderate force" is not enough and the trigger stops.
Now you do your final sighting and squeeze the trigger just a little harder
and the gun fires. I shouldnt notice any additional movement or anything
else about the trigger just begin to squeeze and bang! That is what I
am trying to adjust a trigger to do.
Now about the Supermax trigger: One of the other things that was wrong
with my "bad" Supermax was that it had an awfully hard trigger.
The Supermax/B21 trigger and the RWS-48 trigger are different designs and no parts are interchangeable (same principals - but all triggers are pretty much the same principals.) The Supermax trigger is a very good design. It is all steel and very rugged. And some of them are very good triggers. Others are very hard (on occasion almost impossible) to pull. So what is going on here?
Well the Supermax trigger is also a very "compact" trigger and the lever parts are very small (each appears to be under an inch) compare this to a Rekord trigger where the lever parts are at least twice as large (and cleverly worked into a relatively compact housing - an excellent design.) A small lever and a large lever can each produce the same "multiplication" factor, but to produce a consistent "multiplication factor" the small lever has to be manufactured to higher precision. Here is where the Chinese manufactured Supermax trigger has its problem.
I have found two problems with the Supermax trigger - both due to manufacturing tolerances:
The first is the trigger hanging up on the safety. Sometimes if you
push the safety in and down at the same time (or hold some in and down
force on the safety "button" while you squeeze the trigger you can cause
it to clear the trigger and the trigger will move with "normal" forces.
If this is the problem the permanent solution is to file off the part of
the safety that is interfering with the trigger movement.
The second is that the holes in the "intermediate piece" (the piece
that has the two trigger adjustment screws) were not drilled in the right
place. With these very small levers a "little off" can make a big difference
in the feel of the trigger. And in some cases the end of the trigger lever
is actually shooting the gun - this makes for a very very hard trigger
second stage.
To check out how well Your trigger CAN work I suggest the following:
(I am going to refer to the "front" trigger adjustment screw - as the one nearest the muzzle and the rear trigger adjustment screw as the one nearest the butt.)
I assume here that the trigger works now. First, Back out (looking down on it turn the screw counter clockwise) the front trigger screw a quarter turn at a time until your second stage goes away.
[OK. first stage? second stage? what?
When you cock the Supermax. (And Load it. And Point it at a safe backstop! -because it IS going to shoot!)
And pull the trigger the force to pull the trigger will increase in three steps:
First there will be a very light pull as you take out all the mechanical space and bring all the levers into contact - this doesn't have a name that I'm aware of and on my Supermax it is a very slight distance but it is perceptible. The trigger moves but the "intermediate piece" does not. Because of the way your trigger is made everything might be touching already and this movement might not exist.
Now your trigger lever is touching the tip of the back trigger screw
and your leverage is such that the trigger moves a lot and the Intermediate
piece moves just a little. This moderate pressure is the "First Stage."
The trigger should move quite a way under this "First Stage" pressure.
This is a safety feature as you are partially disengaging the sear with
this first stage travel. Dont try to make the Supermax trigger into a
"Single Stage" trigger by removing this travel. It isnt designed for it
and it will be Dangerous!
Finally - just before the trigger is ready to release (if it is set
up right) the trigger and "intermediate piece" will have rotated so the
trigger lever comes into contact with the front screw. Now the trigger
moves a little and the "intermediate piece" moves a lot. This increases
the force you feel and this is the "Second Stage."
Depending on where those screws are drilled into the "intermediate piece"
the forces that I mentioned can vary quit a bit - but they still happen
in the order as described above.]
OK, with the front screw backed out so that there is no second stage
- will pulling the trigger all the way with the force of the moderate first
stage fire the gun? If that is the case this "moderate" force is minimum
force you are going to get without changing springs and reprofiling some
parts. If this is good enough all you need to do is adjust that front screw
so it just touches when the gun goes off and that is the best that this
trigger is going to be.
IF - The moderate force doesn't fire the gun, but if you then pull "real
hard" the gun will go off. OR IF backing out the front screw had no effect
on the second stage, which was "real hard." What is happening here is that
you are firing the gun with the tip of the trigger lever touching the inside
of the intermediate lever and because of your "leverage" (well forward
of the front screw) the force required is "real hard." If this is the case
turn the rear trigger adjustment screw in (again a quarter turn at a time
- cock and fire the gun) until the gun can be fired with the first stage.
If the screw is in all the way and it still won't fire on the first stage
you will need to find a slightly longer screw for that gun (the screw is
metric thread.) [Warning - I haven't had this happen but Im guessing
that it could - If your "first stage travel is getting less and less as
you turn the screw in (You need some first stage travel for safety don't
adjust any where near a very short trigger pull!) There is some other problem
that I've not encountered back that screw out some and get help somewhere
else.] Once you get it to fire on the first stage adjust the front screw
"in" until it just touches before the gun goes off. And there you are.
If you have a spring compressor and can take the trigger out of the
Supermax (see disassembly above) - you can cock the mechanism by pushing
the plunger inside the front of the trigger housing in and watch the parts
work as you make these adjustments. The forces will be a lot different
under load and the adjustment points will be slightly different under load.
But this is a good start.
The "Intermediate piece"(I think it is part No 58 in my Supermax book
called the "Transmission Lump Assembly.") can be replaced without a spring
compressor. If once all the above adjustments have been carried out and
you still don't like your trigger (If you can get another one) replacement
of this part would be a good thing to try.
Pellets, Shooting techniques, Care and Maintenance.
Most of my shooting is in my garage at a range of about 10 yards, but
it is an "instrumented" range. I.e. I've got a Chrony (a device for measuring
the speed of the pellets) set up there and most of my shooting goes through
it. This is a good place to test my air guns.
My Supermax will shoot a "CP light" ( this is the Crosman Premier pellet
and they come in two weights 7.9 grains and 10.5 grains = light and heavy.
Today these are pretty much the "standard" for "serious" air gun shooters.
Everybody (who is "serious") has a wide selection of pellets and almost
selections have CP lights in them.) at about 945 ft/sec. Or about 15.7
ft-lbs of energy (Kinetic Energy the old mass times velocity squared =
7.9 grains X 945 ft/sec X 945 ft/sec divided by 450,000 - well actually
its something else, but this is the constant that I remember and this accounts
for the fact that your mass is in grains etc.)
What about that 1,000 ft/sec that they advertise? Are they lying? OK,
just for you, I will go out and shoot some RWS GECO pellets (the lightest
pellet that I have at 6.8 grains) through the "bad" Supermax. 992, 998,
991, 994, 1,000! whew! There are you happy. And that would be 15.1 ft-lbs
(6.8 grains at 1,000 ft/sec.) Actually these pellets grouped pretty well
too. This surprised me as 'usually' flat head (match) pellets don't do
very well over 700 ft/sec. For every rule there is an exception, you just
never know how a pellet will do till you test it. Each air rifle and pellet
combination is different. That is why "serious" air gun shooters have lots
of pellets. The answer to what pellet will work best in my air rifle? Is
try a lot and see. But the CP lights are a good place to start.
It turns out from my experimentation and for my Supermax the CP heavys shoot the most accurately (noticeably better than the GECOS) at about 795 ft/sec (14.8 ft-lbs.) And for me accuracy is everything. You can feel the rifle kick a little bit harder with the heavy pellets (and you can see by the ft-lbs) that not as much of the spring energy is going into the pellet (each shot starts with the same amount of energy = the amount that you put into the spring.) So these pellets are not quite as efficient as some others and are stressing the parts a little more, but my goal was accuracy. You'll want to try an assortment of pellets. But a good standard to start with is the CP lights (almost as accurate in my Supermax as the heavys and more efficient.) I have also had good luck with the Beeman/Marksman FTS pellet 8.8 grains and my Supermax shoots them at 900 ft/sec (15.8 ft-lbs.) Try everything. Find what works.
Like I said, for me accuracy is everything. So how do you shoot a Supermax
accurately? You have to hold it very still and squeeze the trigger (of
course) then let it do its thing. "But I get the steadiest sight picture
if I rest the rifle on a bench." Yes, but you won't get the best (smallest)
groups of pellets on your target. Remember when that spring lets go there
is "a whole lot of vibrating going on." Rested on a hard (or even semi-hard)
surface your barrel will be jumping (the same reason that bipods don't
work to well with spring rifles.) You could try a soft pillow with your
hand under the stock. You have got to hold the rifle lightly and let it
recoil, hopefully in pretty much a straight line (if the barrel doesn't
move up and down it won't effect the accuracy.) It is a technique, and
it takes a little while to learn how to be consistent at it. Trial and
error, and practice. As I said the Supermax is a very accurate (mine are
at least) air rifle, but it is not all that easy to get the accuracy out
of it. It is up to you and it is a skill.
Care and Maintenance: (You should note: that this is my opinion after
my experience none of these suggestions are "laws of physics.")
First, what should you do when you receive your Supermax brand new right
out of the box. Well, resist the temptation to cock it and shoot it for
a few moments and read the instructions (if for nothing else than to see
how the anti-beartrap works and avoid bending your cocking lever.) Then
get out your cleaning kit (weed wacker line, whatever) Cock the gun, make
sure that the anti-beartrap is working, and then run a clean patch down
the barrel. This doesn't require a thorough cleaning and don't put anything
on the patch this is just to remove any obstructions, iron fillings, grease
etc. (I do this for any new air gun no matter who made it.) Now that you
have it cocked you have got to shoot it - with a pellet! (Shooting any
spring powered air gun without a pellet - called a "dry fire" - is a really
bad idea - they aren't designed for it and it can cause damage.) So go
out to wherever you were going to shoot the gun and
Shoot the gun! There
is nothing more I would do to a new Supermax than shoot it for the next
500 to 1,000 (one or two tins of) pellets. This will smooth things out
and "wear things in." (I'm assuming here that there are no mechanical problems
- and there really shouldn't be.)
What about lubrication etc.? Well my first Supermax (the "good" one) I shot for 900 pellets before I took it apart to install my Jim Maccari Kit. When I opened it there was a good reason I didn't get any "diesel" shots. There was no lubrication inside the gun. Bone dry! It was even starting to rust! This was probably a "fluke" as the second one (the "bad" one) was lightly oiled inside. Careful inspection showed no problems from this complete lack of lubrication. So I feel pretty confident in telling you to just shoot it for awhile.
When you finish a shooting session with the Supermax (or any airgun)
a wipe down with a lightly oiled (or silicone) cloth is a good idea to
keep surface rust away (though the Supermax finish will probably be more
rust resistant that bluing.)
OK, I've shot the Supermax for 1,000 pellets and I want to do something
to it to maintain it. Well if it were me I would at this point completely
disassemble it and put my selection (that I've developed over the years)
of grease, oils, and tars in the places that I think they belong. Or: here
is a good time to get a Jim Maccari Spring Kit (it will come with a new
spring and guide and the appropriate tar for the spring and one to go just
behind the piston seal.) Or: If not that than I would put a light coat
of grease or chain lube on the spring. And a light coat of grease on the
outside and inside of the piston (the metal piston not the plastic "piston
seal" - don't put anything on that especially in front.) I would lubricate
with either oil or light grease all the trigger parts and pins. And I would
make sure that I pulled the pins in the cocking lever and put a light coat
of grease on each and a drop of oil on that rivet that attaches the cocking
lever to the compression chamber. That is a "complete overhaul" as far
as I'm concerned and I wouldn't do anything more to that gun for the next
5,000 to 10,000 pellets. It should be a really smooth and wear free gun
after such a treatment.
If you don't want to take it apart and you can't find someone else who
will do it for you; then I would get some "spring cylinder" oil and put
a couple of drops (3 or 4) through the front hole where you can see the
spring once the stock is off. And I would put a drop on each of the 3 pins
on the cocking lever. I might do this again in about 2,000 pellets. Don't
over do it. And this is suggested only if you won't take your Supermax
apart.
Don't clean the barrel unless you just can't stand not cleaning it.
It doesn't need it. And you'll probably do more harm than good. If you
do decide to clean it use a dry patch, or a little spring cylinder oil
and then a dry patch. Don't use any firearm cleaning solvent! It will damage
the seals! Don't even think about it!
That's it! Airguns are easy to maintain.
Conclusion:
The Supermax is a great airgun value and a "quality magnum adult air
rifle." If I were to lay the trigger assembly parts of a RWS (Diana) 48
(actually I have a RWS 54) and Supermax side by side and ask almost anyone
which was the highest quality part. I think they would choose the one machined
out of a solid piece of steel vs. the one made of plastic and folded metal
(this is the RWS part if you haven't taken your Supermax apart yet.) The
Supermax trigger is not a copy of the RWS unit and they are not interchangeable
(or a lot of them would find their way onto RWS guns.) The Supermax is
not a low quality gun - it is just that most gun owners judge the quality
of a gun by the bluing and the dark walnut color of the stock - I think
that the Supermax stock is the equal of the RWS unit. It is just that the
Factory chose to finish it in a light color. As you'll see if you take
your Supermax apart there is nothing in it that wasn't designed to last
forever. Well maybe not the mainspring but no magnum airgun mainspring
is going to last forever they are just too highly stressed. And once you
know how to take your Supermax apart you can change the mainspring in less
than 20 minutes and new ones are not very expensive. So....
Just Shoot it and enjoy it.
Jim P.
7/22/200
Note: DAISY front sight insert set (set of 4, #5998 ) for M-753 fits SM-1000 / TSA-21/22. Golden Toler has it (for $3.98/set).
[ HOME
]
* NOTES.
[1] Information provided by Xisico (4296
Clark Road, Houston, Texas 77040, 713-690-6880)
Xisoco is an importer
of TSA, XS airguns, and representing the manufacturer - Factory 971 ( AKA
Xin Su Industrial Co. ) in US.
[2] Information forwarded by Mr. James Kitching of Fun Supply
His observation on the B21/22s of very recent (August, 2000) shipments:
"The factory has changed the front sight mounting
on the B21 B22 to a side screw and solved the loose front sight problem.
I an getting the
new mounting system on .177 and .22 guns.
The quality control on these guns are getting
better all the time. I have very few problems now compared to the past
production. Most Xisico imported Xifeng guns are shipped without any changes
to them."
The bservations he made in an earlier time on those B21/22 with the old front sight mounting system:
"Recently (March 2000), the shipment of TSA-B21/22s all have the one piece barrel, no shroud on .177 and .22. Less crooked sight problems too, but can still occur. If it (crooked sights) does (occur) , best to send the gun back, as these sights are VERY difficult to remove without damage, they are glued and pressed on with a severe interference fit.
A new problem has also occurred, on some guns
the front sight does not fit the rail tightly enough, and can come off
when tightening it, or from
shooting the gun.
Overall tho, less minor problems with the guns, quality control is getting better."
A final note: There is a significant improvement
on the scope rail of the newest productions (3rd or 4th generation)
. The length of the scope rail has been extended, and that makes
it easier to mount bigger scopes. The rail is now permanently welded
on the receiver. So, the scope rail issue has been resolved.
(2/1/01).
Congratulations on your purchase of one of the finest air rifles available today. Proper care and use of your new air rifle will bring you a lifetime of shooting enjoyment.Basic safety rules (in addition to good common sense)
Your new IAR TFA Air Rifle is a high pressure, spring loaded, piston driven, side cocking, air rifle which fires lead pellets only.Safety Mechanism Your IAR TFA Air Rifle utilizes two automatic double locking safety mechanisms. The first is the trigger safety and is located at the rear of the receiver. It will automatically engage every time the rifle is fully cocked. Even if it is automatic, common sense demands that you check it each time.Cocking Procedure Hold the rifle by the forend of the stock in your left hand and place the butt stock securely to your upper thigh. Keep a good grip on the rifle at all times. Grasp the forend of the long cocking lever on the right side of the rifle. Now fully swing the cocking lever to the right rear in arc motion as far as it will go. It will lock in the open position.Sighting The sight picture you need for your IAR TFA Air Rifle is the same as same as that for cartridge rifles. Your rifle is perfect for transitional training.Shooting After the rifle is pointed at the target and you are satisfied with the sight picture, you may commence the firing procedure by pushing forward on the rear mounted safety and squeezing the trigger. Keep the rifle pointed down range, even after shooting and throughout the loading process. Your rifle is equipped with a fully adjustable trigger which is the same as tournament grade rifles.Telescopic Sights Your IAR TFA Air Rifle is equipped with a dovetail scope mounting system which can accept a wide variety of scope and mount systems.Product Support IAR Inc. is here to help you. If you have any questions or concerns, please call us for help. After-sales support is our job. We want you to be happy with our air rifle and our other products and accessories. |
Assembly Drawing and Parts List
Click on the above image for an enlarged view!
|
|
Description |
|
|
|
|
|---|---|---|---|---|---|
|
|
Screw |
|
|
Cocking lever assembly |
|
|
|
Front sight moving support |
|
|
Turning pin |
|
|
|
Front sight |
|
|
Blocking ring |
|
|
|
Front sight locking screw |
|
|
Pint for cocking lever |
|
|
|
Screws |
|
|
Blocking ring |
|
|
|
Front sight support |
|
|
Washer |
|
|
|
Rifle body assembly |
|
|
Linking sleeve |
|
|
|
Air cylinder |
|
|
Locating sleeve |
|
|
|
Piston assembly |
|
|
Coping rod cap |
|
|
|
Piston spring |
|
|
Blocking spring |
|
|
|
Washer |
|
|
Pin |
|
|
|
Piston spring plunger |
|
|
Pad lump |
|
|
|
Shooting support assembly |
|
|
Moving lump spring |
|
|
|
Locating sleeve |
|
|
Moving lump |
|
|
|
Washer |
|
|
Pins |
|
|
|
Spring washer |
|
|
Blocking lumps |
|
|
|
Screw |
|
|
Steel ball spring |
|
|
|
Stock |
|
|
Steel ball |
|
|
|
Trigger guard |
|
|
Safety (small button) |
|
|
|
Washer |
|
|
Coping rod spring |
|
|
|
Screw |
|
|
Safety coping rod |
|
|
|
Screw |
|
|
Transmission lump assembly |
|
|
|
Recoil pad |
|
|
Transmission lump spring |
|
|
|
Recoil bearing assembly |
|
|
Sear |
|
|
|
Screws |
|
|
Sear spring |
|
|
|
Linking nut |
|
|
Pins |
|
|
|
Linking sleeve |
|
|
Trigger |
|
|
|
Screws |
|
|
Rack plate linking screw |
|
|
|
Rear sight assembly |
|
|
Serrated nut |
|
|
|
Up - down adjusting screw |
|
|
Whole course safety assembly |
|
|
|
Locating plate |
|
|
Rack plate turning spring |
|
|
|
Cylinder linking nut assembly |
|
|
Pin |
|
|
|
Linking rod sleeve |
|
|
Blocking ring |
|
|
|
Linking rod |
|
|
Seal |
|
|
|
Nut |
|
|
Cylinder linking screw |
|
|
|
Linking nut for cocking lever |
|
