Hello
my friends, thanks for according a bit of your precious time in reading
the long and boring documentation I spent hours to write! :-) (but it's
worth it!!)
As Francois and I were working on separate and different projects, the
version 1.0 of the skyLightControl has been delayed a bit, but finally
we are proud to release that 'well-working' version.
First
of all, I have to thank Thomas Briggs,
Francois Zarroca
and Stephane Deverly and Bryan
Ewert for their precious help on writing this mel. They did everything!!.
Actually I did nothing but telling what would be best for us in having
such a powerful GUI for faking outdoor illumination.
However, in the contrary of the method explained in the tutorial which uses the closestPointOnSurface node to get the color from the closest pixel in U and V to the light, here we used 2 plugins (included with the maya3.0 dev kit): the iffInfoCmd and iffPixelCmd plugins.
Thomas has been the first to send me a simplified GUI which uses those plugins. The very advantage of those is that we will no longer have hundreds of ramps and their 2d placement 'polluting' our hypershade!! :)
We use the iffInfoCmd plugin to retrieve U and V coordinates from an IFF texture file, and the iffPixelCmd to get the color of the pixel at U and V coordinates, then we dispatch pixels color to all the lights (according to their positions)
The
second difference from the tutorial, is that maya's default lights illuminate
the diffuse, ambient and specular components of a shader, and the very
bad point of using maya's default light source are the little specular
smudges on shiny materials. The only workaround was to set a negative
value of shadow color and set the intensity of each light to 0 so only
the shadows were visible (but that would mean too: forget about the color
illumination: for a tutorial about outdoor illumination, that was top
knotch!! :-))
There is another plugin (also present in the dev kit) which is the lightNode
plugin that allow the user to affect one (or more) of those 3 components,
but there's still the problem of shadows (as the lightNode doesn't cast
shadows of any kind)
Here we used 2 types of light:
- Ambient light
(for illumination: color emission) with the ambientShade attribute set
to 1 (no specular)
- Directional or point lights for the shadows (cause I dare you to render
one single image with 100 ambient lights casting RT shadows with the deadlines
we all have more or less!!) :-)
This is twice heavier (in number of lights) than before, but it makes miracles!! :-)
I
was hoping a lot from A|W's R&D to make a light that had both properties
from an ambient light (ambientShade attr.) and a point light (cast dmap
shadows), but it seems that no! We'll wait until Maya 4's been released.
The last thing is we still need to create a sky surface to adjust correctly the texture file the lights will emit (by default, the sky_surface doesn't cast shadow) Once the texture is adjusted you can hide it or use it as background...
Ok, this was for the 'theoretical' part of the SkyLightControl window, now lets get into what you came here for...
Installation:
- Unzip the SkyLightControl.zip file.
- Copy the iffInfoCmd.mll
(NT) or and iffPixelCmd.mll files into the directory you specified
in the MAYA_PLUGIN_PATH env. file;
or copy them in C:/AW/Maya3.0/bin/plug-ins/ (maya default plugin dir for
NT OS)
- Then copy the SkyLightControl.mel, skyGeodesic.mel, and skyLightTuneAmbientLightsWithoutWindow.mel script into your script directory (usually C:/WINNT/Profiles/user/maya/scripts/)
Now load the plugins in Maya (Menu Window - Settings / Preferences - Plug-in Manager...)
Source the scripts
with the script editor: Click on 'File, source script...' menus;
with the browser go into your script directory, and select them (one by
one), and press enter or click on open, or type in the script editor:
source skyLight geodesic.mel. Press [enter], then type source
skyLightControl.mel. Press [enter]
Now, always in the script editor, re-type skyLightControl and
press [enter]

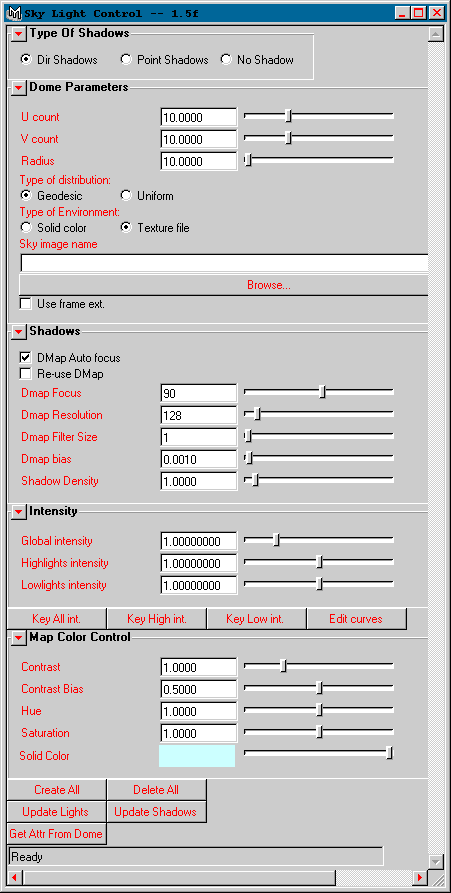
How the SkyLightControl window works?
TYPE OF
SHADOWS
Dir shadows:
creates directional lights to cast shadows
Point shadows: creates point lights to cast shadows
No shadows: no 'shadow' lights will be created.
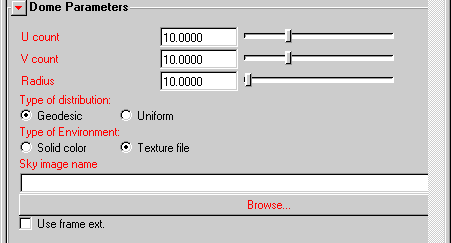
DOME

U count:
specifies the number of lights in U (default: 10 - min:2 - max: 30)
V count: specifies the number of lights in V(default: 10 - min:2
- max: 30)
Radius: specifies the radius of the dome (min 0 to max: 200)
Type of distribution:
- Geodesic: Uses a geodesic hemisphere to distribute the lights perfectly
over the 'sky' surface. (for more infos on Geodesic domes,
follow this link...)
- Uniform: same distribution than in the beta version, duplication of
(U Count * V Count) lights in U and V over the 'sky' surface.
Important note: The 'status' field at the bottom of the window displays the number of lights that will be created with both method according to the U and V count values.

Examples:
- Uniform: 5 * 5 = 25 lights, 10 * 10 = 100 lights and so on...
- Geodesic: 2 * 5 = 16 lights, 5 * 10 = 64 lights, 10 * 10 = 256 lights!!
(and the higher number of lights the longer you'll wait for update!!)
Type of environment:
- Solid color: yes it's a solid color (+/- cyan by default) that'll be
emitted by the skyLight. Click on the color to open a color picker.
- Texture file: a texture file will be emitted by all the ambient lights
Sky image name: Path and name of the texture file used by the skyLight.
All along the tests we've done, at least Targa (.tga) , SGI (.sgi / .rgb),
Maya IFF file formats are supported. I recommend you however to enter
the absolute path of the texture (ex: d:/maya/projects/project1/sourceimages/image.iff)
Use frame extension: if checked on, the script will update the lights (checking U and V position, retrieving pixel's color...) each time you change of frame. Your first frame (if you are using a sequence of images as light emission) has to have the number 0 (frame_seq.0000.iff, ...) The padding is not important. This is the only condition to use a sequence of images. (Anyway, it just work as hell!!) :-)
SHADOWS
The shadows attributes
are the same as a point or directional light. The parameters
remain the same as the beta version plus the addition of the Re-use dmap
shadows attribute, and the modification of the way we treat the shadowColor.
Cast shadows: specify if the lights casts shadows or not AFTER
the creation of the skyLight.
Dmap auto-focus: auto-focus on/off
Re-use DMap: if checked on, the shadows are stored with the light's
name and re-used for rendering (for still pictures)
Dmap focus: value of focus (when Dmap auto-focus is checked off)
Dmap resolution: 128 by default (min 64 - max: 1024)
Dmap filter size: 1 by default (min 1 - max 10)
Dmap bias: 0.01 by default (min: 0.00001 to max: 0.1)
Shadow Density*: 1 (min: 0 (no shadows), max : 20) Previously,
we were modifying the shadowColor attribute itself by setting a negative
value to it. Now the shadowColor has been set (by default) to -0.5. The
Shadow density attribute is the intensity of all the lights divided by
the total number of lights.
Shadow Map Contrast: Lets you contrast the texture's luminance
to 'force' the 'shadow' lights to emit more shadows on the highly contrasted
part of the texture (where texture's luminance is high you'll have more
shadows than when texture's luminance is low (no or few shadows will be
emitted)).
So, the higher the shadow Map Contrast value is, the more 'oriented' your
shadows will look like.
Then, even with a well lit environment, you'll be able (after some tweakings)
to manage very realistic shadows.
If you miss the old and uniform shadow behavior (with v1.0) just set the shadow Contrast to 0. But you'll have to modify the shadowDensity.
For
those who wants to modify the shadowColor in the script, edit it and search
the string float $shadowColor[3];
You should fall on something like this:
float $shadowColor[3];
$shadowColor[0] = -0.5 ; //* $shadowColorFloat;
$shadowColor[1] = -0.5 ; //* $shadowColorFloat;
$shadowColor[2] = -0.5 ;//* $shadowColorFloat;
Modify the -0.5 in red (You'll have to do this twice, so find another string like this and modify both of the values as there is 2 $shadowColorFloat strings)
*IMPORTANT NOTE: As the 'shadow' lights are just here to cast shadows, they have by default NEGATIVE values for SHADOW COLOR. So be very careful when adjusting the Shadow density (to avoid total black areas because of the superposition of hundreds of shadows)
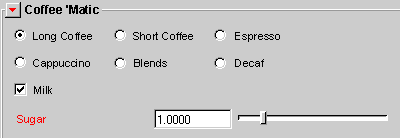
COFFEE 'MATIC
Coffee 'Matic:
Allow the user to select and drink his coffee during the loooonnnng renderings.
Many kinds of coffee are available here and for free!!. I hope further
versions will include Arabica, Colombian, and many others...
Milk: no comments!!
Sugar: default 1 (min 0 (Aaarrh!!), max: 5 (but
it's bad for you!! I've warned ya!)
INTENSITY
Global intensity:
To the contrary of the beta version, this parameters is now a multiplier
of the highlights intensity and lowlights intensity values.
Highlights intensity: Sets the highlights intensity regarding texture's
luminance. It affects only pixel's luminance > 0.5.
Lowlights intensity: Sets the highlights intensity regarding texture's
luminance. Affects only pixel's luminance < 0.5.
Key All int.: Sets a keyframe for the three intensity attributes.
Key High int.: Sets a keyframe for the Highlights intensity attributes.
Key High int.: Sets a keyframe for the Lowlights intensity attributes.
Edit curves: Displays the graph editor to edit and modify the animation
curves.
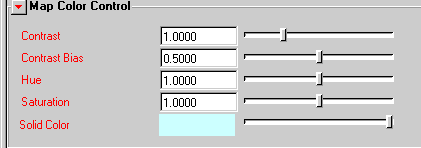
COLOR CONTROL
Contrast:
sets the contrast of the texture emitted by the lights (default: 1 - min:
0 - max: 4)
Contrast bias: sets the contrast bias (default: 0.5 - min: 0 -
max: 1)
Hue: Sets the hue of the texture file or the solid color.
Saturation: sets the saturation of the texture (default: 1 - min:
0 - max: 2)
Solid Color: Click on it to open a color picker (Remember to close
after use, because it can affect the good behavior of the standard maya's
color picker)
CREATION
/ UPDATE
Create all:
once you set all the wanted parameters for the skyLight, click on Create
all to create the lights and the sky_surface.
Delete All: delete all the lights, sky_surface, shader, and all
the nodes resulting from a skyLight creation.
Update lights: updates the lights modifications (intensity and
color control attributes)
Update shadows: updates the shadows modifications (all shadow attributes)
Get Attr From Dome: Major improvement in the version 1.0 (with
Coffee 'Matic). Retrieves the values of skyLight from a previously saved
scene. Pretty useful feature!!
The status field: Displays the status
Note that if you have already created a skyLight, and you want to change the type of light that casts shadows, you'll have to delete the first skyLight and then re-create another one with the new type of lights.
Attributes or features that will be added or implemented in the final version:
- Uniform type of distribution of light: There's still too many lights created at the top the 'sky' than at its base, so we're working on that.
- Color control: All color attributes will be keyable.
In
version 1.0, if you batch rendered an animation with a sequence as light
emission, maya returned an error message about a procedure.
This bug has been fixed with the new mel script included in the zip file
(skyLightTuneAmbientLightsWithoutWindow.mel).
All
keyable attributes (light intensities and (now) shadowDensity) are refreshed
when the time slider moves.
The major feature in version 1.1 is the real_shadow_behavior (works only
with texture files)
Before (beta version and v1.0), shadow casting was uniform (no relation with the texture used as light). So on the majority of the renderings, shadows were projected diregarding the 'texture's light orientation'.
Now, the shadow casting depends on the luminance of the texture. If you have a part of the texture that is very dark (black or anthracite), the lights over these dark areas will cast lighter shadows than the lights placed on a higher luminance value of the texture.
Fixes bugs during the creation of a skyLight with uniform distribution of lights and a texture file.
Known limitations
/ bugs:
- If you try to source the script by typing in the script editor [source
skyLightGeodesic.mel and source skyLightControl.mel] you'll get the
following message: Error: Cannot find "./skyLightGeodesic.mel"
for source statement
Workaround: source the script with the menus File / source
script...
- Sometimes,
when one uses the skyLightControl after maya has been restarted, the skyLightControl
window doesn't show up, and this error message is displayed: Error:
Cannot find procedure "SkyLightCreationUV".
Workaround: re-type skyLightControl in the script editor,
and it should work
- If, by any chance, you get a coffee with the Coffee 'Matic feature, don't call me or email me to tell me "it works, you're a genius!! How did you do that?? etc..." 'cause I won't believe you!! :-) (hey, pas folle la guepe!! Not crazy the bee!!) :-)
- Undo: to undo your last modifications in the skyLightControl, press [z] to undo in Maya, then click on Get Attr From Dome
- If you use a
file you have converted in solid texture file from a standard shader network,
you may have a wrong 2d placement.
Workaround: select the placeSkyMap (place 2d texture) of the SkyMapShader,
and change the rotate frame from 90 to 0.
-If you are using
a sequence of images as texture file, it seems that the skyLightControl
doesn't find the sequence.
Workaround: You must specify the first frame of your sequence and
the frame has to have the number 0 (ex: frame_seq.0000.iff) The padding
is not important.
- If you use the color picker from the skyLight window, when you have picked a color, close the color picker to continue the refresh of IPR.
Voila, c'est fini!!
if you have any comments / critics / improvements / bug report, you want
to tell me: [email protected]
Here is an example
of using the SkyLightControl.mel in production (6 * 6 point lights (uniform
distribution) at +/- 5 mn / image in 1540 * 1152), another image
rendered with the skyLight and this little tutorial on 'how-to-use'
the skyLight.
download SkyLightControl.mel and plugins version 1.1a Irix / NT