First Aid
Rapid treatment
of injuries can often spell the difference between living and dying. the
tips presented here are for your use in the event that you find yourself
in a survival situation and should only be used if no other options are
available. As with anything seek out and get training in first aid, it
could save the life of someone you love.
Triage
Triage is the sorting
of causalities by the severity of their injuries. Triage is done when ever
there are more patients then you have the resources to handle, that could
be anywhere from 2 to 200 patients. It all depends on what you have available
to treat those that are injured and the number of personnel you have to
treat them. There are four different categories in triage:
-
Expected ~ people
in this category are not expected to live even with extreme measures. This
category includes those with no pulse or respiration's, severe head injuries,
severe uncontrollable bleeding, major body surface area burns (< 80%
2nd and 3rd degree), and any other trauma that is not compatible with life.
-
Serious ~
people in this category are expected to live, but can quickly move into
the expected category unless extreme measures are taken quickly. This includes
respiratory arrest, severe, controlled, bleeding, multiple long bone fractures,
moderate 2nd and 3rd degree burns, GSW's to the abdomen or extremities.
-
Delayed ~ people
in this category are stable even though they are injured. Their injuries
are generally not life threatening and include minor bleeding, isolated
fractures, minor burns (1st degree), and other minor non life threatening
injuries.
-
Deceased ~ people in this category are those
that are obviously dead. No amount of treatment will bring them back.
The decision on who gets treated and who does not
and what order the causalities are treated lies in the hands of the person
with the most medical training at the scene of the incident. Often times
that is the your teams' medic. It is a job that know one wants, yet has
to be done in order to do the most good for the most people with the limited
resources on hand.
And what if you have major resources to fall back
on? Triage is still done the same way. I know from first hand experience
what it is like to make the call on who lives and who dies. It is the crapiest
thing I have ever had to do in my life and I have the ability to call on
5 medivac choppers and over 15 ambulances to move people to a Level 1 Trauma
Center. Yet I still had to leave those that stood no chance for survival
lying where I found them.
I hope that your groups' or teams' medic never
has to make that call when TSHTF.
Doc
Cold Weather injuries are often over looked by those of us who do not live
in areas of the country where cold weather is the norm. To that end here
a few tips.
Temperature alone is not a reliable
guide as to whether a cold weather injury can occur. There are many additional
factors which in various combinations determine cold injury occurrence.
these factors include:
-
Humidity
-
Wind Speed (wind chill)
-
Exposure time
-
Activity
-
The type and condition of your clothing
As well there are other factor that
can increase a person's chance of receiving a cold injury. they include:
-
Previous cold injuries
-
Race (Blacks are more vulnerable
to cold injury)
-
Geographic Origin (Someone from a
warmer climate is more likely to develop a cold injury)
-
Ambient temperature (the temperature
of the air or water around the body)
-
Wind Chill Factor (Your team should
be familiar with the workings and the meanings of wind chill factor. Increased
wind chill means increased body heat loss)
-
Terrain
-
Clothing
-
Moisture
-
Dehydration (Probably the most overlooked
predisposing factor for causing cold injury. Avoid alcohol, coffee,
tea, & hot chocolate these drinks are diuretics (cause increased
fluid loss) and should be avoided.
-
Age
-
Fatigue
-
Concomitant injury (Injuries resulting
in shock or loss of blood reduce the flow of blood to the extremities and
predispose the injured person to cold injury)
-
Discipline, Training, and Experience
(Well trained and disciplined individuals suffer less then others from
the effects of cold)
-
Nutrition
-
Activity
-
Alcohol, Drugs, and Tobacco (Certain
drugs, medications, alcohol, chewing or dipping, or smoking tobacco have
adverse effects on circulation, perspiration, hydration, and judgment of
certain individuals and should be avoided under conditions of extreme cold)
-
Weather (Sharp changes in the weather
have adverse effects on those exposed)
Now that we've hit on the factors that
can increase a person's chances of getting a cold injury let's talk about
HYPOTHERMIA.
both wind and water chill are forms
of hypothermia. When a person dies from "exposure" it usually means hypothermia.
Hypothermia means the lack of temperature, or more to the point, the bodies
"core" temperature. The condition results when heat loss exceeds the body's
production and retention of heat. The body can lose heat through:
-
Radiation
-
Conduction
-
Convection
-
Evaporation
-
Respiration
Thus sitting on wet clothing, sitting
on cold surfaces, handling cold objects, contact with cold liquids, or
even breathing extremely cold air can cause hypothermia. An unprotected
head can loss up to 3/4 of the total body heat produced. And wet clothing
extracts heat 240 times as fast as dry clothing.
The symptoms of hypothermia include:
-
Intense shivering (Shivering stops
at 86 degrees F.)
-
Feeling of deep cold/numbness
-
Fatigue
-
Poor coordination
-
Disorientation
-
Blueness of the skin
-
Slow, weak, or irregular pulse
-
Slurred speech
-
Dullness and apathy
The treatment of hypothermia is as follows:
-
Shelter the person from the wind and
weather
-
Avoid rough handling (Handling a
person with a severe cold injury can result in cardiac arrest)
-
Keep the person insulated from the ground
-
Remove all wet clothing
-
Give the person warm drinks and food
IF they are alert
-
Get the person in a warm sleeping bag
(If need be with another person)
-
Get the person to advanced medical care
as soon as possible
the proper equipment and training are
great advantages when it comes to a cold injury. It does not take long
to become a victim of cold injury so take a few extra minutes before setting
out in cold weather to grab that extra coat or the warm gloves. Remember
you can always take something off that you are wearing but you can't put
on what you didn't bring with you.
other cold injuries are Immersion
Foot also called "Trench Foot" is caused by the feet being exposed to cold
wet conditions for extended periods of time without allowing time for the
feet to get properly dried and warmed. This can, and often does, cause
debilitating problems with your feet. Your best defense is to keep your
feet as dry and warm as possible under the conditions you find yourself
in.
Another more serious condition is
frost bite. Frost bite is the actual freezing of your flesh. Although there
are varying degrees/depths of frost bite they should ALL be treated
as serious medical emergencies.
Tips for frost bite:
NEVER rub the frozen part(s)
with snow, this can cause even more damage.
DO NOT thaw the frozen part(s)
if there is a chance of refreezing, it is better to leave the part frozen
then to thaw it and have it refreeze. If you know that it is going to be
awhile before you can get proper medical attention or in a survival situation
you stand a better chance of not having the frost bitten part amputated
if it is left frozen. If you are in a position that you can stay warm and
do not have to worry about refreezing then you should use a buddies body
heat to thaw the part. Put feet inside of a coat and shirt directly on
your buddies chest. Place hands in your arm pits or crotch. If you are
inside and have access to tepid water (99-101 degrees F.) then
rapid re-warming of the area is indicated. Watch for the signs and symptoms
of hypothermia and shock, and again, if there is a chance that the part
can be refrozen DO NOT thaw the part. Seek out advanced medical
care as soon as possible.
Unlike the warmer months, what you
think is "just plain old tired" may very well be death in the winter months.
FIRST
AID
It is highly recommended that you seek CRP and first aid training.
The knowledge that you gain may help you to save the life of someone you
love.
Minor Wounds and Burns
For minor cuts and bruises it is important that you clean the wound
thoroughly. Bleeding is not a major concern with small cuts and bruises,
infection on the other hand is. Gentle clean the wound and wash the skin
around the wound. Apply a disinfectant solution such as iodine, betadine,
hydrogen peroxide, etc.( make sure to dilute full strength antiseptics
with sterile saline in a 50/50 ratio) and then cover the wound with a sterile
dressing (Band-Aid).
Minor burns may be caused by flames, hot liquids, chemicals, electricity,
or the sun. If you receive a minor burn you should immerse or flush the
affected area with cold water until the pain subsides (about 5 minutes).
Minor burns are those that only cover small areas of the skin but may
have some blistering. Or burns that cover large areas of skin but have
no blistering (sun burns). If blistering is present DO NOT pop the blisters.
Cover them with dry sterile dressings to help keep them clean and protect
the skin. Under no circumstances should you ever put butter, shortening,
mustard, pickle juice , lard, etc. on ANY burn.
If a burn that has blistering or charring occurs that involves the face,
hands, or genitals call 911 right away!
Cover the effected area with dry sterile dressings and wait for EMS
to arrive. Do not use any burn creams or other remedies on these types
of burns.
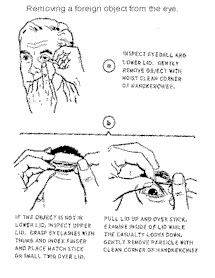
Foreign Bodies in the Eye
If foreign material gets into the eye DO NOT rub the eye! If the
foreign object is beneath the upper eyelid grasp the eyelashes and and
pull the lid away from the eye. Hold the lid in this way until tears start
to freely flow. If this fails to work try the technique shown below (figure
a). If the foreign object is glass, metal, or can not be removed. Cover
BOTH of the persons eyes and get them to the emergency room ASAP.
If caustic or irritating material like battery acid, ammonia, etc.
gets into the eye, immediately flush the eye with large amounts of water.
When the person feels that the burning has stopped, bandage Both eyes and
take them to the emergency room.
Controlling
External Bleeding
Controlling external bleeding can be done many ways:
-
Direct Pressure
-
Direct pressure and Elevation
-
Direct Pressure, Elevation, and Digital Pressure
-
Pressure Points
-
Tourniquets (tourniquets should only be used as a last resort)
Extremity
Wounds
Before applying any dressings, examine the victim to determine if there
is more then one wound. For example a bullet will generally make an entrance
and exit wound with the exit usually being larger then the entrance. Make
sure to find all of the victims wounds.
Next cut away and remove any clothing around the wound to help prevent
further contamination of the wound (tearing the clothing may result in
rough handling of the wound).
Thoroughly clean the wound with soap and water. For large wounds rinse
the wound thoroughly and cover the wound with dry, sterile dressings (4x4s,
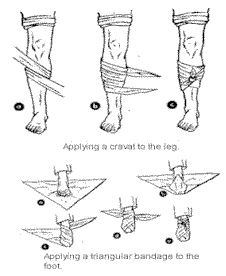
5x9s, etc.), then using bandaging material (Kling, Kerlex, clean sheets,
cut T-shirts, etc.) wrap the dressing tightly. Do not use so much pressure
that you cut off the pulses distal (away from the heart) to the injury
but enough that the dressings are held firmly in place.
If the bleeding has not stopped put another, larger, group of dressings
OVER the first set and add another layer of bandaging material over that,
again wrapping it tightly.
If after that the wound is still bleeding elevate it above the level
of the heart and apply digital direct pressure, that is use the your hands
directly over the dressings to apply pressure. If there is a possibility
that the limb may be fractured you should NOT use elevation. The next step
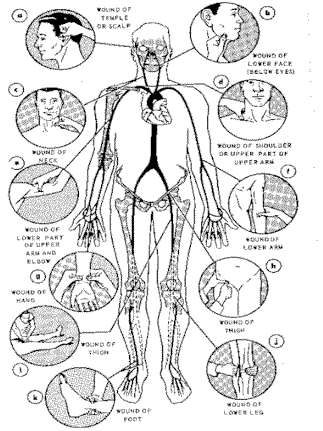
to control bleeding is the use of Pressure Points. To use a pressure
point you simply apply pressure to the artery nearest the wound.
(See pressure points chart)
If after you have applied pressure dressings, digital direct pressure,
and elevation the bleeding has not stopped then you would want to use a
tourniquet. Tourniquet's are the LAST resort and should only be used to
stop severe bleeding that can not be controlled any other way! Once a tourniquet
is placed it should never be loosened and should only be removed by a doctor.
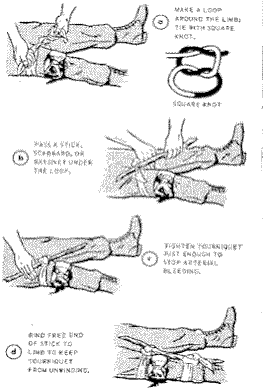
Place the tourniquet around the limb between the wound and the trunk of
the body. Try to place the tourniquet 2-4 above the wound. (NEVER place
a tourniquet directly on a wound!) When possible place the tourniquet over
a smoothed down sleeve or pants leg to prevent the skin from being pinched
or twisted. (Damaging the skin may deprive a surgeon of the skin and require
the amputation of more of the limb then might otherwise be needed). Protection
of the skin reduces pain. (Application of a tourniquet usually means that
the effected limb will be amputated below the tourniquet site. So use care
in the application of tourniquets). Tighten the tourniquet only tight enough
to stop the flow of blood. If a pulse can be felt in the intact wrist or
foot of the affected limb before the application of the tourniquet, stoppage
of the pulse will let you know that it is tight enough. After the tourniquet
is properly tightened, arterial (spurting) bleeding will stop right away;
but bleeding from the veins in the lower part of the limb will continue
until they drain of blood already in them. DO NOT try to stop this bleeding.
(See diagram for tourniquet placement)
The next thing to do after you have dressed and bandaged all the person's
wounds is to treat for shock. Shock occurs when the amount of blood a person
has does not meet the demand for blood that the person's body has. Shock
can and often does kill. To treat for shock position the person on their
back, loosen any restrictive clothing (shirt collars, pants, etc.), elevate
their feet above the level of their heart (4 6), and cover them with
blankets or coats to keep them warm and keep them calm. Make sure that
911 has been called and that medical help is on the way.
(See shock treatment diagram)
Wounds
of the Chest and Abdomen
All wounds to the chest should be covered by occlusive dressings
(Vaseline gauze, saran wrap, clean trash bag liner, etc.) prior to placing
sterile dressings over the wound and bandaging it (this includes wounds
to the upper back).
If the person has a large abdominal wound with organs protruding DO
NOT try to put them back in! Just cover them with moist, sterile, bulky
dressings and treat for shock. Under no circumstance should you ever give
someone with an abdominal wound anything to eat or drink.
Pressure
Points
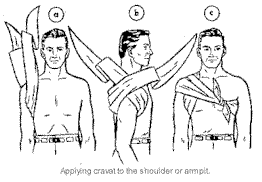
Dressings
& Bandages
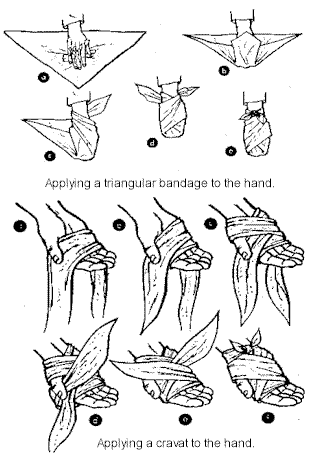
Fractures
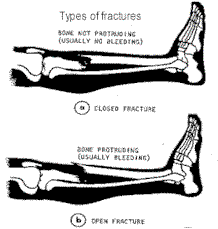
There are two types of fractures, open and closed. Open fractures
are fractures that have pieces of the bone protruding through the skin.
Usually there is bleeding that goes along with this type of fracture. NEVER
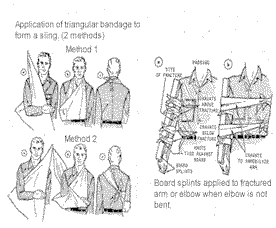
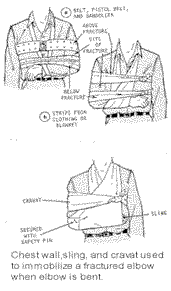
try to push the bone ends back under the skin. Instead place bulky, dry,
sterile dressings over the bone ends and splint in the position you find
the extremity in.
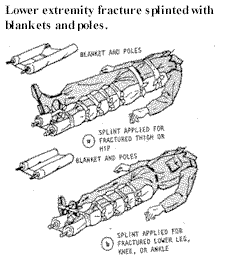
Closed fractures usually have no external bleeding. If someone has
a closed fracture DO NOT try to straighten it out. Splint it in the position
you find it in. Be very careful not to move broken limbs around too much
as this can cause an increase in pain as well as possibly cut arteries
and veins near the fracture site.
Moving
Victims
The only time that you should move an accident victim is if they
are in further danger to their life. You must weigh the benefits and hazards
of moving them carefully. Moving someone with a neck injury that can still
move all their fingers and toes could result in paralysis or death. You
must use good, sound common sense when it comes to moving the victims of
accidents. Life over limb is a good measuring stick to go by. Ask yourself
Can this person die if I do not move them? If the answer is yes then
you should do so. If on the other hand they are not in any immediate danger
of loosing their life you should leave as they are and wait for emergency
medical personnel to arrive.
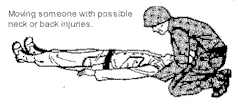
If you must move someone that you think may have neck or back injuries
you should do everything you can to keep the neck and back in a straight
line. Making sure to keep the neutral alignment of the neck and back (neutral
meaning the position the neck and back are in when a person lies flat
on the floor).
One way to do this is to drag the person by grasping their shirt at
the shoulders, supporting their neck in a neutral position with your arms
and pulling them backwards along the ground.
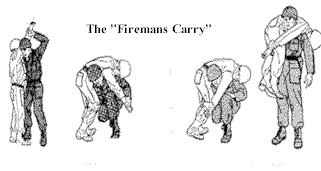
If on the other hand you do not have reason to think that there may
be a neck or back injury the fireman's carry can be used.
Anyone who has fallen 5 or more, been in an auto accident, been struck
in the head, or you just think may have a neck or back injury should be
treated as such. Always remember that when it comes to moving injured persons
that life over limb is the first rule and the second is Dead hero's
can't save lives. Do not put yourself into any situation that you can
not safely get yourself and the victim out of.
If in doubt about your ability to safely extricate someone from a potentially
life threatening situation WAIT for trained rescue personnel.
How
to Apply a Tourniquet
First
Aid Kits
Below are listed the contents of first aid kits both for you as
an individual and for use in your 72 hr kit. These lists are good basic
starting points for you to build upon. You will need to tailor them to
fit your situation by adding the things that you think you will need (blood
pressure medication, heart pills, etc.).
Personal
First Aid Kit
-
ABD pads (5x9s) 2 (feminine hygiene maxi pads will work as substitutes)
-
Sterile 4x4s 10 (keep them in the wrapper they come in)
-
Vaseline Gauze - 4
-
Band-Aids 15-20
-
Triangular/Cravat bandage 2
-
Eye Pads 2
-
Gauze Rolls, 5 yd ea. 3
-
10 lb. test monofiliment fishing line 10 ft. (for sutures, clothing
repair, etc.)
-
Small diameter curved sewing needles 2
-
Pain Reliever/Fever Reducer 3 day supply (Tylenol, Motrin, etc.
-
Anti diarrhea medication 3 day supply (Imodium AD, Pepto, etc.)
-
Antiseptic solution ½-1 oz (iodine, betadine etc.)
-
Snake bite kit 1
-
Scalpel/X-Acto blade 2
-
Personal Medications 3 day supply
-
Sterile Saline Solution 1-2 oz.
72
hr Kit First Aid Kit
-
ABD Pads 15
-
Sterile 4x4s 30
-
Vaseline Gauze 10
-
Band-Aids 50
-
Triangular/Cravat bandage 12
-
Eye Pads 6
-
Gauze Rolls 5 (5 or more yd. each)
-
ACE Bandages 3 (2, 4, & 6)
-
10 lb. test monofiliment fishing line 1 spool (100 yd. Minimum)
-
Small diameter curved and straight sewing needles 5 (Assorted lengths)
-
Pain Reliever/Fever reducer 2 bottles (500 tablets each minimum)
-
Anti diarrhea medication 2 bottles
-
Antiseptic solution 2 bottles (8 oz or larger)
-
Snake bite kit 2 (Sawyer extractor recommended)
-
Scalpal/#11 X-Acto blade 10
-
Multi-Vitamins 3 bottles
-
Benadryl (tablets) 1 bottle
-
Benadryl Cream 2 tubes
-
Tweezers - 1
-
Bandage scissors 1
-
Lock Blade knife 1 (3 minimum blade length)
-
Sterile Water 3 16 oz. Bottles (can be water boiled for at least
20 minutes and placed in sterilized soda bottles)
-
Personal Medications 3 day supply of each one you take
-
Sterile Saline Solution 8 oz or larger bottle
-
Latex Gloves 1 box
I strongly urge you to seek out and
get training in CPR and First Aid through the American Red Cross, The American
Heart Association, or by taking an EMT course. I hope that the information
that I have put together will be helpful to you and your loved ones.
Doc
Wound
Care
The use of antibiotics
after TSHTF may or may not be available, therefore as an alternative I
give you the following.
Doc
Given some of the draw backs of antibiotic therapy after TSHTF the use
of granulated sugar for the treatment of infected wounds offers a practical
and proven approach. Sugar therapy consists of every day granulated sugar
and povidone-iodine to enhance wound healing.
First, as with any wound, clean and debrid the wound, make sure that
bleeding has stopped and the patient is in a stable condition as far as
blood loss. (A wait of 24-48 hours is ok prior to application of the sugar/PI
solution. During the delay a simple dressing of PI is applied.)
Deep wounds are treated by pouring granulated sugar into the wound,
filling all cavities, and covering the wound with sterile gauze sponges
soaked in PI solution.
Superficial wounds are treated by coating a PI soaked sterile gauze
with approx. .65-.70 cm thickness of sugar and applying to the wound.
In a couple of hours the sugar is dissolved into a "syrup" by the body
fluids drawn into the wound. The effect is osmotic shock on the bacteria
since they need water for growth. this "syrup has little antibacterial
effect though and may accelerate rather then inhibit growth of bacteria.
It is for this reason that the wound must be cleaned with water and repacked
1-4 times a day (or as soon as the sugar turns into "syrup") with more
sugar so as to keep drawing fluid from the environment of the bacteria.
A supplier of a commercially available sugar/ PI compound is distributed
by:
Sugardyne Pharmaceuticals Inc.
Greenville, MS 38701
I hope that this information will help in your preparedness preparations.
Here are some links to first
aid related sites:


