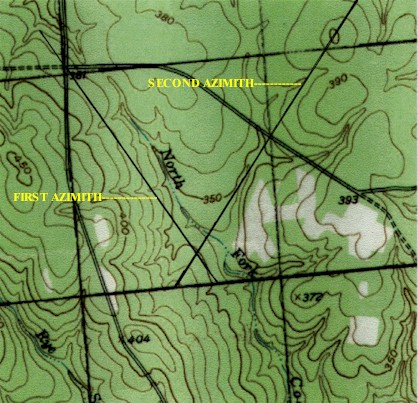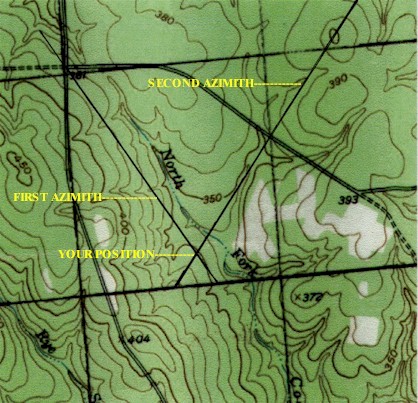
Finding your exact position
on a map need not be difficult. With just a few steps you can pinpoint
your location on any topo map.
The first thing you need to do is
orient your map so that the top edge is pointed North.
To do this lay the map flat on the
ground and place your compass along the declination scale at the bottom
of the map. Slowly turn the map until the North seeking arrow on your compass
and the top of the map point in the same direction. Once you've done that
you are ready to find your location.
First pick out two terrain features
on your map. Next, find those features on the ground.


Dead Reckoning (Compass Course)
Dead Reckoning
entails navigating a course with a compass and no map.
A dead reckoning
course should be similar to the figure below.
(Fig. 1)
The area should be anywhere from 2000-5000 meters of hilly, wooded terrain.
The starting stakes should be set along some type of linear feature such
as a road or trail. Each stake should preferably be marked with a letter
and contain distances and azimuths to the corresponding intermediate point.
The intermediate points should be numbered and contain the distance
and azimuth to the next intermediate point and so on. The last intermediate
point should have the distance and azimuth to a finishing point.
The distance between the starting and intermediate points can be anywhere
from 300-1100 meters. maps of the area should not be given to those participating
in the course although a sketch of the area with the boundaries should
be provided.
Once you have laid out the compass course it can used during any weather,
day or night. A large master map of the area should be kept at the finish
point so those who participate can give critiques.
A point system should be generated with a total of 100 points possible
and a score of 70 being the minimum passing score. A time limit should
also be an integral part of the exercise. Points should be deducted for
failing to reach the finish point in the allotted time, such as minus 2
points for each minute over the time limit.
Accuracy is the main key to dead reckoning and while missing an intermediate
point by one stake left or right is allowed, a predetermined amount of
points should be deducted for any distance away from the correct position.
Orienteering
Each person is given a topographic map with control points circled on it and a compass. Each control point should be marked with a flag and have a distinctive punch or color associated with it. Orienteering involves moving from control point to control point as quickly as possible. Orienteering is much more demanding the dead reckoning not only because of terrain, but because the oienteer must constantly concentrate, make quick decisions, and keep track of the distance traveled. Orienteering challenges a persons mind and body; however, a persons ability to think and make wise decisions under pressure is more important then speed or endurance.
The area you use should be heavily wooded, preferably uninhabited, and difficult enough for all levels of experience. It should be accessible and coordinated with appropriate range officers.
The challenge is setting the course so that it is interesting but not
beyond the individual or groups ability. As a general rule you should select
locations that are easily identifiable on the map and terrain, and accessible
from several routes.
While there are several different forms of orienteering the most common
is cross country orienteering sometimes called free or point orienteering.
In cross country orienteering all participants must visit the same control
points in the same order with a one minute starting interval.
After selecting the control points for the course, you must determine
the start and finish points. The last control point should be near the
finish point. In describing each controls location an eight digit grid
coordinate and a two letter combination identifying each point should be
included in the descriptive clue list each person or group is given at
least two minute prior to their start time.
There should be between 6 and 12 control points on the course of varying
degrees of difficulty and distances apart so that there are no easy or
directly routes. Instead participants are faced with many choices of direct
but difficult routes, or of indirect but easier routes. Each point is circled
and the order they are to be visited is clearly marked on a master map.
the start and finish may be at the same point with the course going in
a circle or they may be at different locations. The length of the course
and difficulty in reaching control points should vary with the degree of
expertise of those involved. Regardless of the difficulty, all who participate
must show proof of visiting each control point. this is easily done by
using different color markers, ink stamps, or punches at each control point.