|
2001 |
Making Touchmarks | ||||
| Front Cover |
My name is William L. Howard,
Bill for short, and I have made my living as a metalsmith for the last
30 years. I am considered a master goldsmith by those who care about
such things and I also engrave, sculpt, mint, cast, forge, make
prototypes, teach, consult, appraise, drink scotch and whatever else
might be available, weld, do seminars and most anything else which is
legal, fun, informative and earns fair wages. I live with my wife, Kathy
and our kids, Aaron & Missy, in Stoughton, Wisconsin where we
operate our business and do all the usual stuff. I've had to do some pretty weird things with metal in the course of
making custom orders and one of the most useful skills I ever learned
was how to make those special tools you couldn't buy if you wanted to
but really make the job happen faster. The following constitutes the
lecture part of a demo I did for the blacksmiths at the '95 QUAD STATE
ROUNDUP in Ohio. It was received well and I wish to thank my hosts who
treated me very well Not everyone has vast resources of cash or tools so I have presented
this information based on a low tech, low cost approach. You will need
some concrete nails, a belt sander or grinder, a heat source, hammer,
striking surface, a can of water, a vise and about 20 minutes. SAFETY TIPS: For those of you who have lawyers
please observe the following advice. You are responsible for your own
safety and work habits. Use safety glasses when using grinders, torches,
hammers and all potentially dangerous (especially rotary) power
equipment and tools. Avoid burns, if it gets hot let go! Remember that
black heat (not glowing red) can burn you. You can hold work with your
hands while forging but if you're not a quick worker be prepared to let
go quick. Enough said about the obvious.
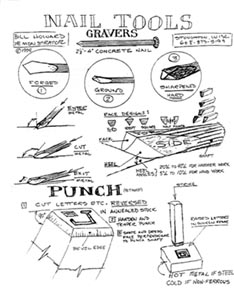
NAIL TOOLS: Making an engraving chisel...
The cutting edge is where the face and the bottom of the heel
meet. The profile of the face is a cross section which has been
ground off the tip, above the heel, at an angle. This will cut
different shaped grooves into your work. The best one to start with
is the 1/2 round.
IS IT RIGHT?: If your tool has developed a
mushroomed tip and won't cut it is too soft. If the tip has chipped or
fractured it is too hard. Anneal & re-harden. The nail will stand
this a good number of times as long as you don't overheat and burn out
the carbon (emitting sparks during a heat). SPARK TESTING TOOL STEEL: Take the suspect stock and
grind it hard enough to create a shower of sparks. If the sparks are
straight and not too bright you have non-tool steel or iron. If the
sparks fork and fan out in a bright pattern you have tool steel. Use a
wood nail and an old drill bit for comparison. Compare a wood nail
(bends) and a concrete nail (breaks) for spark patterns. This is a
scroungers' test and will not provide an alloy number or hardening
information but can lead to results with a little trial and error
experimentation. Junk is cheap, high tech tool steel ain't! continue... Once you have a good pattern, you only have to follow the lines until
you have cut them all to your satisfaction. Beware brushing off your
work surface with your hand as the burrs you have raised at the end of
your cuts will cut lines in your hand until they are removed with an
exit cut. (SEE ILLUS.) This is designed to get rid of them and save your
hide from damage. While cutting, your graver acts like a plow or a wing
according to the angle of attack. Steep angles cut deep and vice versa.
The more taps per inch of line cut the smoother your cut will appear.
Numerous light taps will work better than heavy blows for delicate line
work. If you find that the shank of your graver is bending it is because it
got too hot during forging or some other part of the process and didn't
get hardened later. Heat the center and quench to try and remedy this.
Take care to keep the ends cold or you will have to fix them next. Engraving and penmanship have much in common. Everyone has a
different style so experiment with face shapes and angles as well as
heel angles. Use the bottom and sides to create compound or beveled cuts
and tapered lines etc. These tools can be hammered, which is the usual method for cutting
steel or they can be mounted in handles for cutting softer metals and
fine work in steel by hand. The plates for printing our money are hand
cut in steel for example. This is highly advanced work not recommended
for beginners or amateur counterfeiters. A clever combination can be had
by mounting your shaft in a handle you can use and including a short
steel striker of smaller diameter which contacts the shaft through the
other end of the handle. This allows you to cut by hand or hammer cut
with the same tool. Handle shapes are usually shaped like a mushroom cut in 1/2 from cap
to stem. The shaft is mounted in the stem end with the heel and the flat
part of the handle on the down side. Stamps, dies and trademarks can be made with your new skills. Coining
dies, embossing dies for shaping thin metal and a multitude of other
techniques are now available to you. You can also do decorative gun
engraving, inlay work and a variety of other things which I highly
recommend you practice first before you cobble up a valuable shotgun
etc.! Steel is hard and mistakes you make are hard to erase! Try planning
your cuts, working some from two directions. This works well with
curves. Most cuts work well if you cut from right to left (southpaws may
ignore) and you don't have to make a cut all at once. It can be
segmented and cut from different angles and directions as with
lettering. Last but not least, use finesse. Most novice engravers try to make a
deep cut all at once when a better and more controllable approach is to
shave it down in stages. A power slip can spoil hours of work or require
the removal of a sharp tool from some part of your body. I know, I've
done both. Try and plan your mistakes with the "what if game". MAKING A STAMP OR PATTERNED PUNCH:
QUENCH your stamp after using it on hot iron or you
will eventually ruin it through gradually softening the face. Air
hardening steel eliminates this problem but water hardening steel is
just fine and a bit easier to work for your first stamp. NEED
HELP? or DID IT WORK FIRST TRY?: Send me sample of your work
and I'll provide a constructive critique of your engraving or maker's
mark etc. if you send a SASE. NO charge but donations are gleefully
accepted. William L. Howard PO Box 472
|