
A circuit is a path that electricity goes through. A circuit has three basic parts: (1) a source, such as a battery, (2) an output device, such as a motor or light bulb, and (3) a connection, such as a wire, between the source and the output device.
If any part of the circuit is removed, such as a wire, the current cannot flow. The circuit is then considered broken or open. When the connection is made again, the circuit is considered made or closed. A light switch opens and closes a circuit to turn lights on and off. At ordinary frequencies the beginning and the end of the circuit must be connected. This means that if you attach one end of a wire to a battery and the other end of the wire to a light bulb nothing would happen, because there is no connection from the bulb to the other end of the battery. In very high frequencies, electricity can flow when there is no visible connection. The gasses in the air complete high-frequency circuits.
Types of circuits.
A simple circuit has one power source and one output device. Simple circuits are limited in the amount of power that can be provided.
A series circuit has more than one power source or output device. It uses a single path to connect all the devices. An advantage of a series circuit is that you can add more power devices, such as more batteries, and increase the force of the output. This will give you more power. One disadvantage is is that as you add output devices, such as light bulbs, you increase the resistance and the bulbs do not shine as brightly. Another important disadvantage is that if one output device stops working, all the other output devices will stop working, too. This is because all of the power and output devices are connected in a straight line. When one fails, you have a broken circuit and nothing will work.
Parallel circuits also have more than one power source or output device. They use more than one path for the electricity to flow. You can think of a parallel device as having a main line going out from the power source and another main line going back to it. The output devices use branch lines to connect each of their positive poles to one main line and their negative poles to the other main line. The advantage of a parallel circuit is that if one of the output devices burns out, then only that device stops working. The disadvantage is that if you have multiple power sources, the power stays at the same voltage as that of the single power source. But in parallel circuits increasing the number of output devices does not increase the resistance the way it does in series circuits.
Complex circuits have hundreds or thousands of parts, and combine series and parallel circuits. They are used in televisions and computers as well as in other things.
Congratulations! You have just built three types of circuits.
There are four types of circuits: simple, parallel, series, and complex.
Build a circuit board.
You can build a circuit board like the one pictured to demonstrate simple, series, and parallel circuits.
Materials:
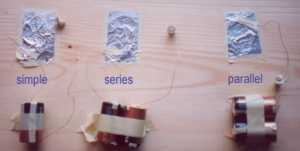 Sam's circuit board
Procedure