This page will show you some different experiments that teach about electricity that you can do at home. Nick's favorite experiment to do is the one involving lemons.
The Lemon Experiment
Materials:
- 18 gauge copper wire
- wire cutters
- paper clips
- lemons
- multitester
- small flashlight bulb
|

"What a lemon!"
|
Procedure:
- Roll a lemon to get the juices moving inside.
- Straighten a paperclip.
- Insert the paper clip about an inch into the lemon.
- Insert a 6 inch piece of 18 gauge copper wire about an inch into the lemon. (Make sure that the two metals are not touching inside the lemon).
- Attach the lemon wires to the multitester wires and check for a reading.
- If the lemon passes the test by producing a reading, try attaching the lemon wires to the metal base of the light bulb.
- If the light bulb doesn't light, prepare more lemons as in steps 1-3, and attach the lemons to each other by stringing them in a series, copper to copper and paperclip to paperclip.
- Try the multitester again with the series of lemons.
- Try step 4 again.
- The light bulb doesn't always light, so don't get frustrated.
The Voltaic Pile
Materials:
- 5 cents
- 5 dimes
- lemon juice
- multitester
- paper towels
|
|
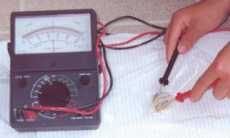
Testing the voltaic pile
|
Procedure:
- Cut 10 paper towel pieces, 1x1 inches square.
- Wet the paper towels with lemon juice.
- Make a stack by sandwiching a dime, a paper towel piece, a cent and repeat until all coins are used up. This is known as a voltaic pile.
- Place the wires on the multitester on either end of the stack. If there is no reading on the multitester, reverse the wires.
What do these experiments have in common? Alessandro Volta is the person you can thank for these experiments. He discovered, and these two experiments prove, that electricity can be made by separating two different metals (called electrodes) by a liquid that conducts electricity (called the electrolyte). In these experiments, the coins or the wires are the electrodes and the lemon juice, with its citric acid, is the electrolyte. Electrons move through the lemon juice and the electric current will flow from the more highly charged metal to the less charged metal when you connect the two metals together.
Making An Electromagnet
Concept
When an electric current flows through a coil of wire, the whole coil acts like a magnet. Winding the wire into a coil increases the strength of the magnetic field around the coil.
Materials:
- A large iron nail or bolt, about 2 inches long
- Heavy insulated wire, such as bell wire
- A handful of paper clips
- 2 D-cell lantern batteries
- Masking tape
|
|
Procedure:
- Leaving about 6 inches of wire hanging free, wrap about 20 turns of insulated wire around the iron nail.
- Leave about 6 inches of wire hanging from the end.
- Strip the insulation from about 2 inches of each end of the wire, exposing the wire.
- Attach the two batteries together in a series, either using tape or with wire. Make sure that the positive end of one is connected to the negative end of the other.
- Tape the one end of the wire to the positive end of a batter and one end to the negative pole of the other battery.
- Move the iron bar over the paperclips and see what happens.
Congratulations! You have just made an electromagnet.
Charger
Try this to see how you can charge materials without touching them.
Materials:
- Scissors
- Ruler
- Aluminum foil
- Pencil
- Needle-nose pliers
- Large paper clip
- Poster board
- 1-quart glass jar
- Modeling clay
- Masking tape
- Wool scarf
- 9-inch round balloon
|
|
Procedure:
- Cut two 1/2 x 2 inch strips of foil.
- Use the pencil to make a small hole near one edge of each piece of foil.
- Reshape the paper clip as shown in the picture.
- Cut a circle from the posterboard to fit over the jar's top.
- Use the pencil to make a hole in the middle of the posterboard.
- Push the loop of the paper clip through the hole in the paper circle.
- Mold a small piece of clay around the base of the loop to hold the paper clip in place.
- Hang the foil strips on the wire hooks. They should jiggle back and forth. If they do not, enlarge the hole with the pencil point.
- Place the paper circle over the mouth of the jar with the foil strips inside the jar.
- Tape the paper cover onto the mouth of the jar.
- Inflate the balloon and rub it on the scarf.
- Hold the balloon over the jar.
The pieces of foil should move away from each other. This is because when you rub the balloon on the scarf you positively charge the balloon. When you move the charged balloon over the jar you charge both pieces of foil negatively. Because they're both charged negatively they repel or move away from each other.