261st TopDogs | home
Instructions
Task Saturation
"If the rare occasion arises where aircraft malfunction / emergencies make it impossible to perform your five basic priorities, it is time to eject."
MCHII F-16 USAF Flight Manual
Before you fly, you should always review your priorities that you follow for flight, think through the mission, plan what you are going to do in certain situations, and finally, make sure you are up to it. It is no good flying the mission if you do not feel like it. This will accomplish nothing for you or your flight, and may even be detrimental.
Priorities
Priorities are split into two sections:
1) Things you have to do
2) Things you would like to do
There are five basic things that fall into the "need to do" category on all flights, and I do not just mean combat missions. These five basic things are:
1) Maintain aircraft control.
2) Never hit the ground or anything attached to it.
3) Never hit anything in the air.
4) Never run out of fuel.
5) Never let anything fired from the air or ground hit your plane (Yes this includes from naval units)
Your next priorities fall into the "would like to do" category:
1) Complete the mission objectives.
2) If you cannot accomplish the above, (RTB) return safely to home plate or eject as required.
Task Prioritisation
Although the F-16 Falcon is relatively simple to fly, fighting in her is not. In a combat environment you will have many tasks that need to be performed to accomplish your mission. Task prioritisation will help to reduce the workload on you, and allow you time to accomplish the important thing, which is the prosecution and destruction of your target.
Your tasks, when flying, will be all related to the CROSS CHECK- which is keeping a good SA (situational awareness), and knowing your status and that of your wingmen etc... and of course accomplishing the five basic priorities.
Situational Awareness
This means knowing what is going on around you, where the threats are etc... This information must be 'collected' through various ways, these can include :
1) Your Mission Briefing
2) Your Visual Cross Check
3) Radio Communications
4) Radar
5) AWACS
6) Wingmen
7) RWR
During your preparation for the mission, start to build a mental picture of what is going on and where things are located. Look for Enemy SAM sites, CAP's, and where there are concentrations of enemy activity that you should stay away from. You must also be aware of all the resources you can use to build up your situational awareness. This is VERY important.
In flight, I split SA into two areas - Near Picture and Big Picture. By splitting the two 'areas', it is easier to maintain SA. Always 'filter' in the information you picked up from the briefing into the relevant Picture.
Near Picture
This is achieved through using primarily the Visual lookout. Back this up with close range radar check, and AWACS calls. This information is what is affecting what you are doing NOW.
Always maintain a good visual look out. You must always consider that your radar, AWACS, and wingmen are fallible. This is not an insult to anyone, but it means that you will cross check more often. A good visual lookout is one that covers all area's. The following lookout 'scheme' is the USAF model, and the one that I use, however, if flying online with others, make sure you are all using compatible methods of visual look out, so that all areas are constantly checked.
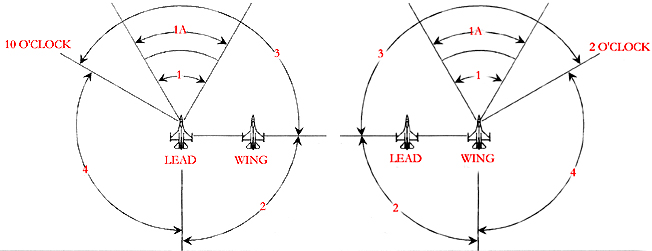
Remember, different formations lead to slight alterations in visual lookout. The below illustration is for a basic battle formation and provides maximum six o'clock coverage for both fighters.
Sector 1
This is the main part of the visual lookout. This section is further divided into two parts:
1) Near Rocks
1A) Far Rocks
Near rocks are any terrain formations that will affect you in the next 10-15 seconds. Far rocks are terrain features that will affect you in the near future. Pilots that look ahead at the 'far rocks' are smooth in their maneuvering to maintain position and in their navigation, because they see mountains and valleys and make corrections for them. (Especially important when leading a flight at low-level).
Sector 2
This sector is to check INSIDE the flight, and the LEADS six o'clock area or to check the wingman's six o'clock area. This and Sectors 1 and 1A are the basic cross section check. When task prioritisation becomes important, these are the ones that you should keep in your visual scan. Also, looking at this sector makes sure you are in formation.
Sector 3
This area is not as important as sectors 1, 1A and 2. This area should be bought into the cross check when there is sufficient time to do so.
Sector 4
This sector is the last place for you to look, this area of 'battle space' is covered by others in you flight during there cross check. As with sector 3, scan this area when time permits. Sometime in the future I will write another article specifically on SA and how to achieve and maintain it.
Big Picture
This is what is going on around you, and is 'created' by using information from all sources. Taken into account is information from your radar, radio comms and your wingmen (assuming your flying with humans) AI wingies don't tend to report much to you. Apart from engaged defensive, which by the way, if followed by a bullseye and altitude, indicates the location the enemy, and not your position, as most people think ( the altitude is your current altitude ).
Formation Integrity - This is simply maintaining position in the flight. This task is accomplished at the same time as the visual lookout. Keep in mind that you will need to constantly adjust to stay in formation. (More on formation flying at another time).
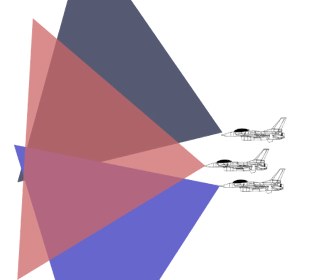
Avionics Manipulation - Playing the piccolo, this is using your radar, and other instruments that you have. The plan below shows various ways of each flight member using the radar to cover all forward areas for the flight.
The diagram below shows the basic radar configuration for a flight
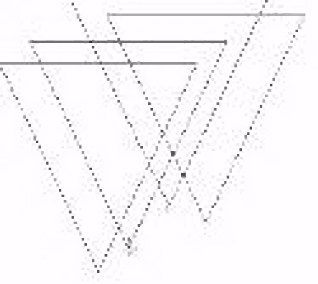
This diagram show the different height area scans for a flight.
Other things like weapons configurations for attacks, comms, etc. should be selected before take-off, or in times of low task saturation, thus minimizing the amount of workload on the run-in to the target.
Additional items you should always include in your basic cross-check:
1) Timing - are you on time?
2) Fuel State - enough to complete the mission safely
3) Systems State - all thumbs up, or RTB
Ordinance Employment
You will be required to fire or release your weapons when in flight. This should never take preference to accomplishing the FIVE basic HAVE TO DO's. Weapon employment will add to you task load when you start to prosecute an attack on a target, so knock off the LIKE TO DO items from your list, keeping to the basics at all times when flying.
You must constantly balance all of the above based upon your survival. That is the most important priority (Editors note - Number one on my list!).
Knock off items in reverse order from that of the list, You must ALWAYS maintain a good Visual Lookout, then think about the formation (If your life is in danger by staying in formation, then don't, but make sure you inform your lead of your departure from the flight.
Editors Note - Diagrams were what was available at time of publishing. I apologize for their fuzziness.
![]()
![]()