CONSTRUCTION CONSIDERATIONS


 Who
will do the work, and how long it will take
Who
will do the work, and how long it will take
We knew this would be a big and long project and difficult to do just by
working on weekends, with the odd week off work to speed things up. However, it was supposed to be fun, and
satisfying when the job was completed, and doing as much as possible as an
owner-builder would make it all worthwhile.
It was also important to approach the project from the perspective –
“the journey is just as important as arriving at the final destination”.
From the outset we realised that there was an important choice
affecting all activities in the design and building of the house – time
versus money. Either I could
spend more time on the construction works (and so save money) OR I could spend
more money (which often meant getting a tradesperson to do it) and get it done
more quickly. The time versus money
decision could be applied to all aspects of the house construction, and
includes the labour aspect (to get a job done), the materials required and the
tools. Examples of what I refer to
here are:
·
do I spend time going to an
auction to buy some cheap doors or timber, or do I save time (but spend more
money) by buying the new product at the local hardware store or timber yard;
·
making or buying concrete – a few
licensed builders advised me that there was no way that I could make concrete
for anywhere near the same price that the local concreters could deliver it to
me by cement trucks. I did the
calculations based on bulk supplies of sand and gravel delivered to my out of
the way house site and it works out about a saving of 50% to do it myself
(another lesson – take no notice of licenced builders). I must add though that making concrete is
hard work;
·
we needed to move about
100 tonnes of fill and sand to build up the ground level under where the floor
was to be constructed. The options
were to pay for a backhoe or move it ourselves with a wheelbarrow. We opted for the wheelbarrow because it was
cheaper, and would not cause problems with machinery running over the footings.
·
About 70% of the cost of building
an average house is required for the labour.
If you have a lot of spare time you can dramatically reduce the costs of
building a home, but that ignores the value you put on your own time.
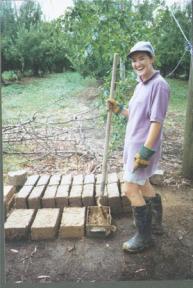
Making
the mudbricks
·
We tested the soil from various
parts of the property and found the most suitable stuff was near the house
site. After digging down through the
top-soil we found a band of soil about 700 mms thick that it had a high clay
content, and not too many stones.
·
We made some experimental bricks
and found the mud mix would require the addition of sand to stop cracking. Some river sand was trucked in and added to
the brick mixture as they were made in the ratio of about 1 to 10. Two hand-fulls of straw are added to every
batch of mud mixed (equivalent of about 30 mudbricks). The mud is mixed thoroughly by shovel with
water and time being allowed to do a lot of the work.
·
 The best
approach is to try to make a few every day – early morning is best as its
cooler, and is good exercise. It is
important to keep to this regime and we found that in a fairly short space of
time we had a large stock of ready to use dried bricks
The best
approach is to try to make a few every day – early morning is best as its
cooler, and is good exercise. It is
important to keep to this regime and we found that in a fairly short space of
time we had a large stock of ready to use dried bricks
·
How did we know whether they were
good bricks or not – we made some and then did some tests. What sort of tests you may well ask. These tests are not scientific but are based
on common sense:
o The Drop test – drop the brick on bare ground from a
height of 1 metre (no damage)
o The Hammer test – rest the brick between 2 pieces of
wood and hit it hard with a carpenters hammer (no cracking noticed)
o The Strength test – jump on the middle of a mudbrick
laid between 2 pieces of wood (no damage)
o
The compression test – 8 bricks were stacked on top of each other (no
damage noted)
·
I made some brick moulds
out of scrap mild steel. They have
handles on either end, and the sides are slightly tapered to aid in getting the
brick out once moulded. We make one
brick at a time, and although this is slow compared to some we have seen with
multiple brick moulds, it is best for quality control. There are only 2 sizes (full and half) –
when odd shapes or sizes are required I use a chisel and/or bush saw. The moulds are brushed with oil every 10
bricks or so to allow easy brick removal.
·
I estimate that the
bricks cost about 10 cents each to make taking into account the cost to buy the
sand and straw, and dig up the soil from the ground. Of course we needed a shovel and wheelbarrow, but we had these
already for other parts of the building project. This calculation does not include the $$ value put on the time
to make the bricks.
·
Based on the above the
total cost for a medium sized house using 5000 mudbricks would be about $ AUD 500, with about the same again
for steel poles, timber wall plates, and other bits and pieces. Of course you can buy mudbricks ready made
(or even get a team to make them on your building site). The approximate costs for these options are
about $1.40 to $2.50 per brick. This
sounds cheap but to complete the walls you will need to spend a lot more money
on doors, windows, architraves, etc ( which of course would be required with most
house designs).
Walls
·
A big question when making
mudbrick houses is whether to make the walls “load bearing” or
“non-supporting”. This refers to how
the roof is to be held up.
load bearing or supporting – in this system the roof is constructed so that it rests on the walls
– in other words the walls hold the roof up.
The roof must be secured strongly to the walls so it doesn’t blow away
in wind (usually with rods set into the bricks and plates a few courses
down). This method is not popular in
Australia because many people (some councils and engineers included) think that
mudbricks are not strong enough to support the weight of the roof. A disadvantage of this system is that the
roof does not cover the walls, or floor as they are being made.
Non-supporting –
in this system the roof is held up (and down) by poles or a frame, and the
mudbricks are used as an in-fill between the poles. This has an advantage in that the roof can be built first and
used to shelter the building works and mudbrick walls as they are being
constructed. A disadvantage is that
eventually the timber poles used shrink away from the bricks and create a
gap. This can be remedied for some
walls. Another disadvantage is the
extra cost for timber poles (which are usually large section) and also diagonal
bracing in the walls.
·
In our house we decided
to use a system that gives the advantages of both these systems. We used 50 mm X 50 mm Mild Steel
poles which are secured to the floor with 6mm plates and 13mm bolts. The poles require little more effort and
cost to install than the rods and plates that most builders use to hold down
the roof (in supporting type structures).
The cost was a lot less than the timber required to do the same job. The poles provide support for the roof and
also hold it down after the wall is completed.
The roof was installed on the poles with the mudbrick
walls, windows and doors etc following.
A small amount of metal diagonal bracing was also used to add strength
while the mudbrick walls were being built
·
This system has the
advantages of the mudbricks, and other materials stored on the floor, being
protected from the elements while walls are being built. Also there is no problem of shrinkage away
from poles. The poles are 50mm by 50 mm
square and are completely hidden by the mudbrick walls that are made around
them. . The steel poles also have the advantage that they make an easy
anchor for door frames and some windows.
Building the roof before the walls also has an important psychological
advantage – the walls go up slowly, and getting the roof on quickly gives the
feeling that construction is happening quickly.
·
It is much easier laying mudbricks in a wall than regular fired bricks.
I only need to use a stringline on long runs, but need a spirit level
handy for all laying. Problems with
the level, height or straightness are easily fixed and can’t be noticed if you
finish your wall by wet rubbing it down.
I found that 4 courses of bricks was the maximum for one day, otherwise
the weight of the bricks would squash the wet mortar out of the bottom
course. I make the mortar about 25mm
(1 in) thick, which makes the height of one course equal to 150 mms (6
ins). It is usually best to slightly wet the
top surface of bricks in the wall before adding the mortar and next course.
·
There
are many ways to finish the walls off on the outside. Leaving it unfinished allows insects and
spiders to set up home in the small gaps and holes. The best way around this is to lightly spray the finished wall
with water and rub back to a fairly smooth finish – the small holes fill with
mud and then dry. This is very
difficult to do if your mud bricks contain cement.
Floor
·
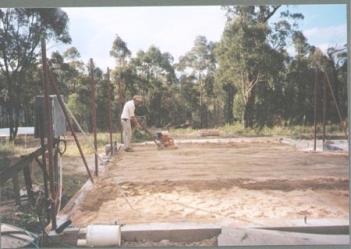
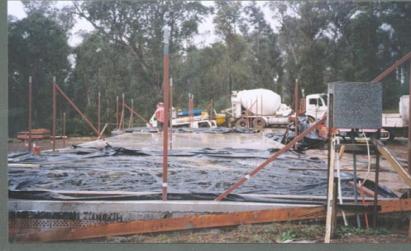 The
floor is made from a reinforced concrete slab that is 100 mms thick and sits on
the footings
The
floor is made from a reinforced concrete slab that is 100 mms thick and sits on
the footings
·
The concrete was laid in 2 slabs (higher plus lower level) with the 2
sets of steps constructed later
Roof
·
The roof slope was chosen as 21 deg to ensure we could still walk on it
easily while construction took place.
·
Colorbond is a fairly flexible building material and easy to
install. It can be ordered and cut to
the nearest 1 mm. A few basic building
skills are required to install it properly.
A number of builders advised me that longer sheets would require 2 persons
to install, but I found I was able to install sheets up to 4.8 metres long on
my own.
Windows
and Doors
·
We sourced 15 large timber windows from a convent, another 6 of
different sizes from the Trading Post, and a small number of new timber (Western
Red Cedar) windows. A big expense was
required for 3 cedar full sized French doors with screens. The new windows were very expensive
(compared to secondhand), but necessary because we needed half height windows
installed at bench height in the kitchen area.
·
We also purchased some secondhand panelled doors from a recycled timber
yard. These cost about 50% to 80% of
the price of new doors, which is not a great saving considering work has to be
done to sand and paint them. However
the same must also be done for new doors.
Termite
management
Termites are common in
our area and neighbours have reported very serious damage to some of their
buildings. The traditional method of
controlling termites is to spray under the floor and inside the house with some
fairly toxic chemicals every few years.
These chemicals do not seem to do a very good job (according to
neighbours) and also are likely to cause long term health problems for humans. As a result we took a different
approach.
The basic approach was
one of managing the risk or threat.
This included the following:
·
All construction to be separated from the ground by a 100 mm (4 ins)
concrete slab, with minimal joins;
·
A product called Termimesh (a fine stainless steel mesh) was installed
at the same time as the slab at the joins (eg at the steps) and around plumbing
service pipes
·
The edge of the slab is exposed all the way around the house, and I
undertake a 6 monthly inspection to ensure no termite tracks have formed
·
Take
care that no plants, or building materials that could be used as an ant highway
rest on or near the slab
·
The
use of Copper Chrome Arsenate treated roof trusses. These cost about 5% more than untreated trusses
·
minimize or eliminate the use of softwood that is most attractive to
termites (especially Oregon)
·
minimize use of material that termites could use as a pathway to
furniture
![]() Bushfire management
Bushfire management
The
house is located in a bushfire prone area and precautions were required to
minimise the possibility of disaster. A
bushfire went through the property just before building commenced as the photo
below shows.
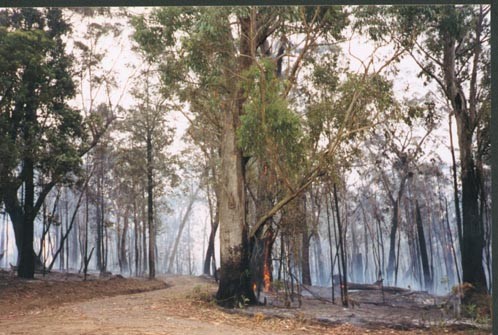
Precautions
taken were :
·
No
bushy plants or trees next to house
·
Gutter
guards, and regular cleaning of gutters
·
Cleared
area of at least 20 metres around house
·
Burning
off of bush close to the house in years when bushfire activities are expected


homepage