The Analog Addicts Phono Preamp
In the recent few month (added much, much later - god, how long ago was that... ;-) I can't remember a thing that happened in the last century) I have spend a lot of time playing around with various RIAA Pre-Amp Circuits. The final configuration I arrived at may seem extremly familiar and common but great care and much work has ensured that the resulting sound is rather better than usual. Please read the following carefull and do take my recommendations serious.
If you use substantially different Parts, values or otherwise change the design, it's your design. By all means tell me and the world what you think about the Sound of the Design IF YOU BUILD IT LIKE INSTRUCTED. If you change things, don't say it's my design that sounds so and so, it's yours then.
Let me set out first my main considerations for a Phono-Headamp of the 90's:
So, what did I do to fulfill this brief. Well an awfull lot realy, though in the End (as always) KISS proved to be the best method.
(KISS stand for Keep It Simple Stupid)
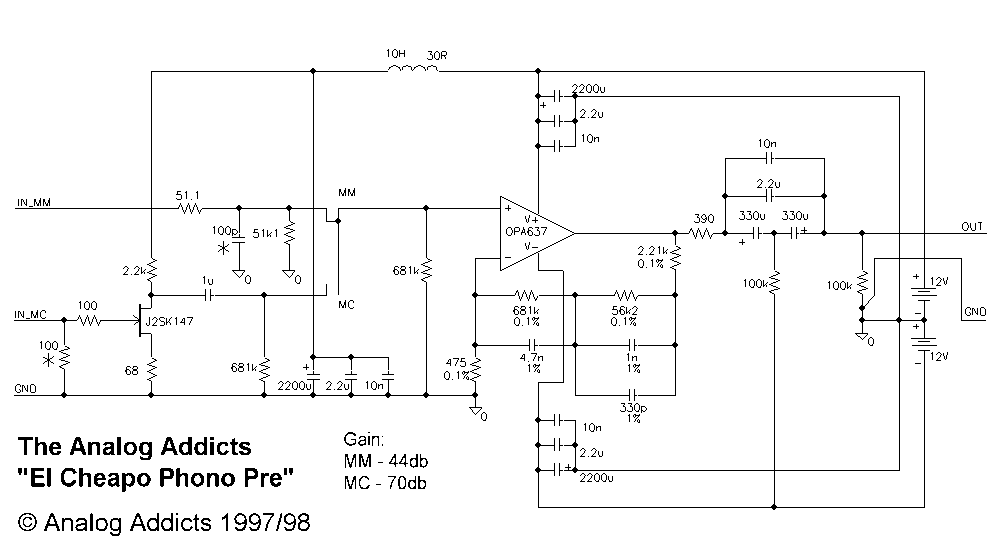
Below you can see the Circuit I managed to come up with as so far the best MM-Equaliser. The Circuit (currently implemented inside my integrated Amplifier) has a excellent technical performance AND sound's exceptionaly good.

* Note, a 1% Polystyrene Capacitor of Suitable Value should be connected across the MM Input to achieve the correct loading of the Cartridge. The 100 Ohm Resistor at the input of the MC-Pre-Pre should be set so that the value is optimised for your cartridge. For neither of these are DIP switches, jumpers or the like acceptable. I use a second RCA Jack to connect the Loading Resistor/Capacitor which I mount inside decent RCA Plugs.
(refer to the manual for your Cartridge for the recommended Loads - note that the capacitance of the cable connecting the Cartridge to the Phono-Headamp is part of the total capacitance) .
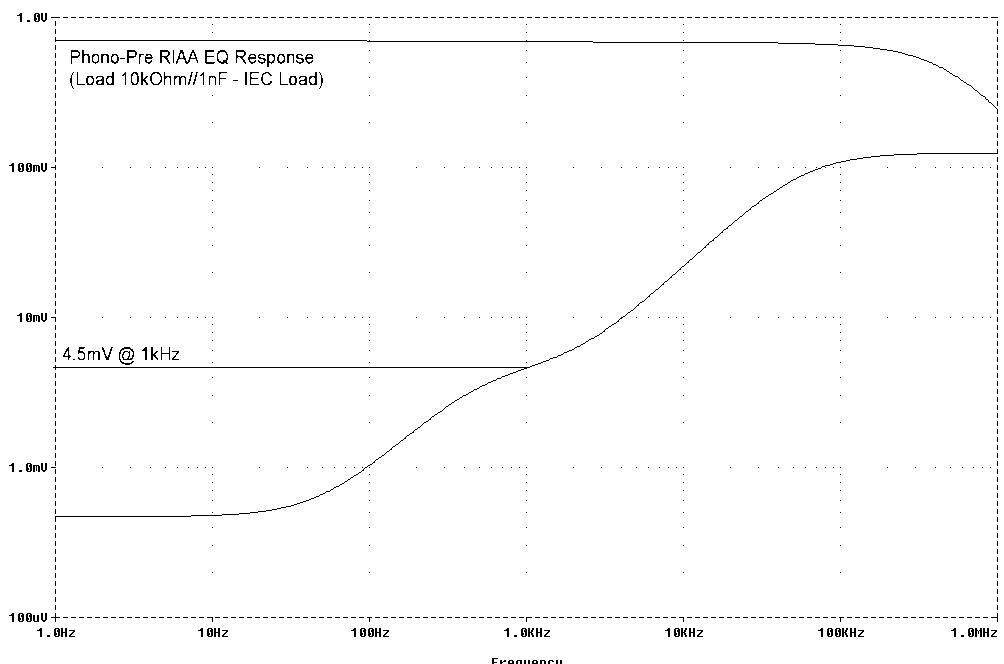
The simulated frequency response of the circuit is shown below:

The Noise-levels are very low, though not as low as the best, but close.
The Circuit is designed around a Burr-Brown precision Fet-Input Op-Amp. At the Moment I use the OPA604 (actualy a dual one), but simulations in PSpice have shown that the OPA637 would be the best choice, with lower Distortion levels as well as a advantage of about 4-5db with regards to the Signal-Noise Ratio.
(added later) The final version was build into a "passive preamp" using a Alps "Blue" Volume control and Silver contact Toggles as input Selectors. I used a 2SK147 FET and the Burr Brown OPA627 per channel. This whole unit stuck around quite a while. It's still floating around somewhere in my attic but has been unused since I build a really good valve Preamp.
Both the OPA 604 (~USD 5.00) and the OPA627 (~ USD 21.00) are readily available from Maplin Electronics in the United Kingdom.
A key-feature of the Circuit is the fact that throughout this Circuit Directcoupling is employed as much as possible. This is possible due to the exceptional DC-Performance and low offset of the Burr-Brown Part's.
The Output-Offset does reach almost -1Volt in one Channel though (the other is +150mV). This is relativly harmless when blocked out, but could cause serious problems with certain Amplifiers/Preamplifiers when direct-coupled. I consider the loss of headroom due to the offset inconsquential when compared with the possibilty of inducing noise through the offset adjustment.
After carefull Test's, I chose an output capacitor realised as Film-Capacitor (or Film/Electrolytic Compound Capacitor) as the best compromise. I found that using even a much oversized and bypassed electrolytic Cap in the usual DC-Blocker Position did audibly degrade the Sound. I have also tried Servo's and found them unsatisfactory.
The Capacitors in the RIAA Network are Philips non-inductive 1% tolerance polystyrene capacitors (again, Maplin stock's).
In my case, I took the time to hand-match the Capacitors between the two channels to a difference of less than 1pF for each Cap (measurement limit of the RC-Meter). This is HIGHLY RECOMMENDED, as stereo imaging relies on accurate channel balance.
Please note, that most cheaper meters are quite inaccurate with regards to absolute values, but even the cheapest unit is very usefull to match the relative values of capacitors.
Even with the maximum specified tolerances and assuming the worst-case scenario for accumulation of tolerances into suitable directions, the RIAA error should remain within +/- 0.15 to 0.2 db of the Specification. Typhically the RIAA accuracy should be better than +/- 0.1db between 100Hz and 10kHz.
All resistors used where 0.5Watt 0.1% Holco's, though more mundane Metal-Film resistors (1% though) should work well too. If you really want to have a go, try Vishay Bulk Foil Resistors or Vishay EE10 Series ones.
Compared to other (also highly accurate) networks that I tried the one shown below sounds much more musical. I think this is due to the use of higher Impedances in the Circuit, which will load the Op-Amp's output less at higher Frequencies than the other Networks tried. This will result in an improved Distortion behaviour.
The MC Pre-Preamp is a very simple implementation based on a circuit published in the french l'Audiophile Magazine. The Fet can be the 2SK147, 2SK389 or the American 2N5566 (NPD5566). It should be noted that the MC stepup inverts absolute Phase, a compromise I accepted as otherwise much more electronics would be needed without much sonic benefit. The Coupling Capacitor should be as good as possible, a WIMA MKP4 (or Siemens stacked film) bypassed with a 10nF polystyrene will likely do the trick.
Finaly, the Layout of the Circuit is Dual-Mono and uses full Star-grounding. My current implementation feeds of the Amp's PSU, which is external and uses Batteries. The Voltage is taken from the + and -12-Volt "tap's" on the Battery stack.
I cannot recommend any type of regulated supplies. You MUST use Batteries to have the full performance possible with this circuit. May I humbly recommend the Yusea NP Series 12Volt 2.1 Ah sealed Lead Acid Batteries (or eqivalents). These should be charged in parallel.
The electrolytic Capacitors I used in the PSU are specifically designed for low Distortion and good frequency Response. I personaly use the ELNA Starget Series Capacitors in any audio application (if possible - voltage limitations apply). If these are unavailable please use Panasonic HFQ or HFZ Series electrolytic capacitors.
The 2.2uF bypass Cap's are idealy WIMA MKP4 Type metalised polypropylene. These have become hard to obtain and I have found a capacitor series that is sonically as good, but the mechanic stability is compromised. These are Siemens "stacked film" Type capacitors without the protective plastic casing used by ERO and WIMA.
The 10nF Philips polystyrene film and tin-foil bypass Capacitors further extend that wide frequency response achieved (again Maplin Stocks). The makes and types of capacitors (both 'lytic and Film) are critical. Using different parts may result not in an extended flat impedance for the PSU but in a very reactive PSU line which will degrade the sound.
If only the 2.2uF Film Capacitor is used at the Output (nothing larger or a electrolytic bypass), the Load-impedance should be preferably kept above 22kOhm. This is to avoid any audible phase-problem effects, which can subjetivly lead to slower Bass-Transients.
Any Part's substitutions should be taken very carefully.
Specifically the Op-Amp used MUST be a FET-Input Type. Very few of these have suitably low-noise. The AD OP275 is NOT SUITED, neither is the AD797, NE5534 or OP27/37 Series as all these MUST use DC-Blocking on the Input, which to avoid was part of my Design goal.
Idealy the Phono-Pre should be mounted in a non-metallic Enclosure (together with the batteries) and be kept close to the Turntable. It may be beneficial to hardwire the output Cables (and maybe inputs) to eliminate one RCA Connection. The Input switch is best a high quality rotary (Elma) and second best a silver contact miniature Toggle of the type using one piece contacts.
If you want to build this from scratch, have fun. If you want to modify an existing Circuit, enjoy, it's easy. For a unit build from scratch, using parts at full retail, I'd expect to spend about 200 Dollar (US) including batteries, charger and case.
But most of all, enjoy the music afterward's.
As for a few listening impressions, the Phono-pre is very detailed with glorious soundstaging and a very natural and transparent treble. It can be a bit "analytical", "cold", "matter of fact" with certain recordings, but it still makes rather bad recordings enjoyable.