(read this in its entirety before starting; see << >>)
Tools:
(read this in its entirety before starting; see << >>)
Tools:
Rent the following unless you have to buy them: Pinion Depth Setting Tool, Dial Indicator (setting backlash).. You will also needs Jack stands, torque wrench, pry bar, small sledgehammer, and regular type hammer. Socker: 14mm (brake caliper bolts), 17 mm socket (ring gear bolts), 1/2" socket (housing cover), 5/16" wrench (carrier cross pin bolt), 5/8" socket (carrier bearing cap retaining bolts), 7/16" wrench (driveshaft retaining bolts), and 1 1/4" (pinion nut). In addition, buy a tube of marking compound from the dealership, find a small paint brush (for painting models) to apply the marking compound, an air wrench or electric impact wrench will make this job go a lot quicker, and get a few rolls of the paper shop towels.
Additional Parts needed:
Crush sleeve, shims, new pinion nut, fluid and/or additive, Black Permatex (to seal the housing cover), or new gasket.
Disassembly:
Before you get started make sure your work area is clean and you have a way of organizing all the parts you remove. This will make assembly much easier.
Before you start, jack the car high enough to allow plenty of room to work underneath. With the rearend lifted, secure the jack stands, take the wheels off, remove the driveshaft from the pinion yoke, remove the brake calipers, disconnect the panhard bar from the high side so it will fall out the way (note: this is optional because it is possible to take the carrier out without doing this step). Note: As long as the seals are not leaking and you don't damage them, don't worry about replacing them. I've still got my original seals in after a dozen times of pulling it apart and 88K miles. AXLES: After you have completed the previous steps, remove the housing cover. It is now time to pull the axles out. When you take the axles out be careful not to let them drag across the seals. This could damage them and cause a leak. Use the 5/16" wrench to loosen the cross pin bolt. Once it is loose, rotate the carrier so you can push/pull the pin out. With it now removed, push inward on the axle shafts at the hub and remove the "C" clips from inside of the carrier. (Most of the time the "C" clips will fall out when you push in on the axle shafts as long as the cross pin is removed.) CARRIER: To get the carrier out, first take the bearing caps off, and use the pry bar to pull the carrier out (I usually pry from the drivers side against the housing and a ring gear bolt. Be careful! This is very heavy so don't let it fall on you, or the ground. ***Be sure to mark the bearing caps, carrier bearing races, and shims driver side and passenger side. PINION: It's kind of tricky taking the pinion gear out. Remove the nut, then use a hammer to knock the yoke off. Once the yoke has been removed, put the nut back on and tighten it down flush with the end of the pinion gear. (The idea of this is so when you start knocking the hell out of end of the pinion gear with the small sledgehammer you don't mess up the threads.) Next, start whacking on the end of the gear to drive it out of the housing. Once it moves back far enough that the nut is near or inside of the pinion seal, take the nut off and knock the gear the rest of the way through the housing. At this point take it easy, it won't take much for the pinion gear to go flying across the floor. RING GEAR: If you need to take the ring gear off the carrier, follow these steps: Remove the ring gear bolts (they are reverse thread pattern), find something like a punch or a bolt approx. 4" long with a smaller diameter than the ring gear bolts, stand the carrier on end, on a solid surface, put the 4" long bolt/punch in each of the ring gear bolt holes and beat the ring gear off by hammering in a criss-cross pattern. If you need to remove the reluctor gear, gently hammer on the side of the gear to knock it off the same side that the ring gear was on. (Do not hammer on the teeth of the ring gear or reluctor gear.)
Installation:
PINION: If I remember correctly, the GM gears have the measurement stamped on them for the correct pinion shim. If you are using a different set of gears, the correct installation method is to use a pinion depth setting tool. If you use one of these, you're on your own because I never have. If you're not sure what size shim to use, you'll have to do the trial and error method. Don't even think of installing a pinion shim under the pinion bearing, and then trying to take it off to try another shim. I'd rather get into an ass-kicking contest with one leg. The pinion bearing usually needs to be hammered on or pressed on. (Stock Pinion Bearing P/N: TIMKEN HM89249.) If you're not sure about the pinion shim, get a bearing with the same outer diameter, but larger inside diameter so the bearing can easily be taken off with a little help from a chisel and hammer. Once you decide on the correct shim, just leave it on the pinion and put the new correct sized bearing on. This is undoubtedly the hardest part unless you have some special tools to take the bearing off or try the oversized bearing trick. It'll save you hours, possibly days. Another option is to reuse the stock pinion shim. I read an article once that said the pinion shim is directly related to the housing it came with. Most of the time reusing the stock pinion shim will work fine. It has for me many times. To reinstall the pinion gear, slide the crush sleeve on, slide the gear into the housing, and whach the back of the gear a couple times. This will hold it in the housing. Now, slide the yoke on, and install the pinion nut. Leave the pinion washer off until you have tightened the nut enough to pull a sufficient amount of shaft through the yoke. When you have enough of the pinion pulled through, take the nut off, install the washer, and retighten the pinion nut. Follow your torque specs. in the manual, OR tighten the nut until the pinion starts to drag when turning it, then back off the nut a little and whack the end of the pinion gear towards the housing. This will push the pinion back a little after you've loosened the nut. Make sure the pinion spins freely and has no fore and aft movement. RING GEAR: The ring gear does not need to be pressed on. Slide the reluctor gear (Beveled edge against mating surface) and ring gear on the carrier, then stand the carrier on end (opposite from the way you removed the ring gear). Now start to thread the ring gear bolts in place. As you tighten them, the ring gear will pull onto the carrier and press the reluctor gear into place. Be sure to use a criss-cross pattern when tightening them. Remember, these are reverse thread bolts (counter-clock wise to tighten). After that, put the carrier assembly back in the housing with the carrier bearing races. Of course, this is after the pinion has been installed. Hold the carrier in place with the ring and pinion gears making contact then start installing shims. Once you have a tight fit and the ring gear barely has free play against the pinion gear, install the bearing caps and tighten them down. When installing shims, the total thickness of the shims you install should not exceed the total thickness of the stock shims. This is what the manual says; however, I've yet to take the time to do this. I add enough shims so that I have to hammer the last ones in with a little force. :) (If you hammer on a thin shim, it will bend.) Rotate the carrier a complete revolution or two before you check your backlash measurement. Use the marking compound and small paint brush to "paint" the front and back side of 6 or 7 teeth on the ring gear. Do the same to about 3 or 4 pinion gear teeth. While you rotate the carrier, this will show a contact pattern on both the ring and pinion gear. Compare it to the illustration in the instructions.<< ***If you're not sure about this, put some marking compound on the stock ring and pinion gear before you pull it out, rotate the carrier and notice the contact pattern left by the stock gears. ***After installing new gears with the correct backlash measurement, it may be necessary to adjust the pinion shim if the pattern does not look right. Don't use very much marking compound, otherwise the pattern won't be apparent. Trial and error will tell you how much to use.>> To set the backlash: mount the dial indicator in a fixed place and put the plunger on a ring gear tooth (try to put it on the face of the tooth, on the drive side). Change shims until you get .006 to .0012 reading on the dial indicator. Make a few complete rotations of the carrier before settling on a reading. It doesn't take much to change this measurement drastically. Axles: When installing the axles, slide them back into the housing, but be careful not to slide them across the seals on the end of the housing. This could damage them. Once they are in place, push them in all the way, reinstall the "C" clip on the end of the axle shaft, then grab the axle hub and pull it back out. This will hold the "C" clip in place. Another way to do this is after the "C" clip is installed push the axle shaft outward from the inside of the carrier. Next, reinstall the cross-pin to keep the ends of the axles and c-clips in position. Once you get to this point, you'll have a better idea of this procedure.
Overview:
After you have finished, road test the gears. If they make noise, stop driving it. Put the car back on jack stands, take the cover off the housing, then recheck the backlash and contact pattern on the ring and pinion gears. Make adjustments based on what you find out. As a side note, I've broken in my gears by running the car with the rearend still on jackstands. I run it for about 10 minutes while varying the speed then let it cool down while I clean up.
A lot of this you will be able to figure out as you're working on it. It's really not that difficult. Take your time; notice what everything looks like BEFORE you take it apart. Figuring what carrier shims to use is the most time consuming part. If you apply marking compound to the stock gears before disassembly and notice the contact pattern, you'll have a good example what the contact pattern on your new set is supposed to look like. As long as you have a good contact pattern, your new gears shouldn't make noise. Getting the right contact pattern is essential to installing the gears correctly. Don't be afraid, this is far from a mystery. My suggestion is spread this out over a couple days so you'll have plenty of time for the difficult part. If you need more help, let me know.
So far my best time is 2.5 hours from the time I pull it in the shop to driving it out. This is for those times when I'm simply installing new gears with the same ratio because I broke a set. I usually don't need to recheck the measurements.
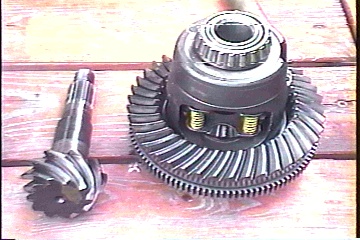
The stock posi is not a clutch type. The posi action is produced by hydralic pressure formed behind the axle gears while pressing against 5 springs inside the carrier that hold the axle gears apart.
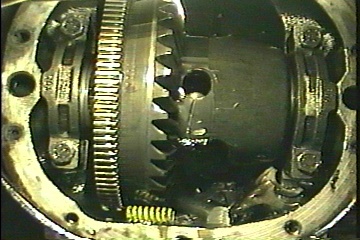 This is the beast...know it,
love it, fear it. Unfortunately, this shows mine in a state of destruction,
but this was the only picture I had. The hole in the middle is were the
cross pin used to be.
This is the beast...know it,
love it, fear it. Unfortunately, this shows mine in a state of destruction,
but this was the only picture I had. The hole in the middle is were the
cross pin used to be.
--
See ya,