 |
 |
Making Frames- Cutouts & Latice
Constructed by : Articfx3
.
The frames I made for this Tutorial are attached as tubes.
(Download consists of: 4 frame tubes, this wallpaper, & the pattern used for these frames laceframe.sel)
.
These should work in both PSP5 and 6.
Just open the tube as a pic in psp, and export as tube.
Also attached is a "selection" of the design used to make the frames.
Save it in your selects folder, if you don't have one, create one.
Then you can use the selection to create the color frame you would like.
 |
.
How I made the frame:
.
Open a new file 500x500.
(The frame selection is about 420x420)
.
Open a background pattern(s) or picture(s)
you would like to use, and flood fill the new file.
.
Now go to the selection menu, load from disk, and choose laceframe.sel
(from the download)
You'll see the frame pattern highlighted.
.
Now go to copy, and paste as a new image.
This will give you the design with trasparent background.
.
Now add a new layer, and move it to the bottom.
With layer 2 selected, flood fill with the second pattern.
(I used a darker color for the selection, and a lighter color for the layer behind.)
.
Now switch back to layer 1
(on top, the select color)
Use your magic wand and click in the center square. Switch back to layer 2
(on the bottom) and choose cut.
This will leave the center transparent.
Right click anywhere on pic to unselect.
.
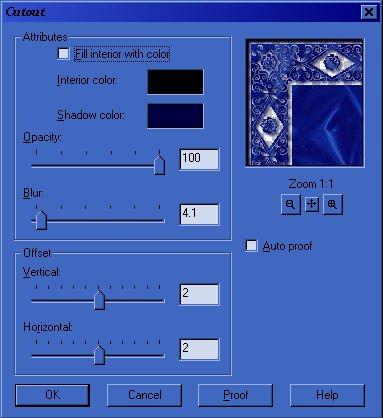
Now go back to your first pic with the select still loaded. Go to image/effects/cutout.
Don't worry when the color disappears, it's the highlight we want.
These are the settings I used, but you will have to adjust according to the colors you are using.
The opacity won't have to be so high on a lighter color.
I applied the cutout twice.
 |
Now go to copy, then switch back to your frame picture,
and go to edit/paste/as new layer, on top of your other two layers.
Now you have a cut out effect, so one layer looks deeper than the other.
.
Now go back to layer 2 (on the bottom) and apply a small inner bevel.
Eye candy or psp6 both work well.
I also used eye candy glass on the flower frame...gave it a bit more shine.
You may also want to adjust brightness and contrast on both bottom layers also.
Contrast up helps define the pattern more.
Then go to layers menu, merge all, visible.
Save your frame as a picture tube, or psp image.
.
Have fun creating!
Lee
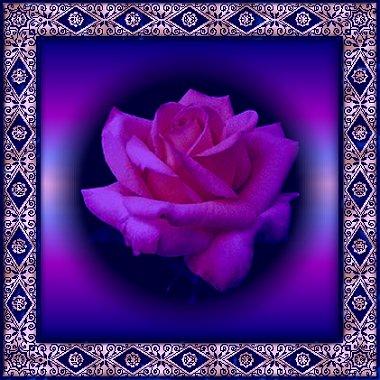
ps. also attached the frame below I made while doing the tutorial <g>
 |
.
.
Copyright � 2000 by Articfx3, all rights reserved
| I, Articfx3, Give my permission to Ldy Archrr aka Artists for PSP to place any and all tutorials that I have made on her site.. this 18th day of October 2000. These tutorials were made solely by me and permission is mine to give. |
This site is sponsored and maintained in its entirety by Artists4psp
Copyright � 1998-2001 by Artists4PSP, all rights reserved
Artists4PSP Home Page | Join our Group | Contact: LdyArchrr