.
.
Making a Bordered Background
Created by: It'sCherlyn
.
.
.
Making a bordered background like the one to the left, is fun and easy. I use most of mine in email but they just as easily be used on a website using the HTML recommendations published in ItsCherlyn's Corner by Artists for PSP.
.
1. Just open up a new canvas in your paintshop program with the background color of your choice. I use Paint Shop Pro and I usually work with a white background, but any color is fine. I work with a canvas size of 800 by 800 but you could increase the width to up to 1200 and/or the height. The height is not important but changing the width might be advisable if you want to use the set on a webpage. Most of this is a matter of choice and will not affect the steps you follow to create the finished product. Once you get the steps down, you will be able to adjust the canvas size to your personal needs and tastes.
.
2. Open a new layer.
.
3. Pick the graphic of your choice and copy it into the
new canvas. I use the copy and paste function to add my graphics, but you
can use a tube ![]() if you choose to. The choice is yours and will have no effect on the
finished product.
if you choose to. The choice is yours and will have no effect on the
finished product.
.
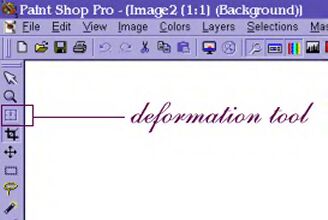
4. Use the deformation tool (see illustration below) to reduce the size of your graphic if necessary and move the graphic to the left side of the page. (It works just as well if on the right if you choose to a right side border, but you will need to adjust the canvas size .)

Note: The deformation tool becomes available whenever an image is available to be resized, such as any image that is pasted in or any tube image that is applied, especially if the image is applied as a new image.
.
5. Take another look at the graphic and make sure the size is right for what you want to do with the rest of the border, such as adding an edge, for example. (You don't want to make the border too large or you will limit the amount of space you have left to apply text to.) Then apply shadowing and any other desired effects.
.
6. Add a new layer. Select the text tool ![]() and
add text around the graphic if so desired. Play with the text to get the
size, color and placement right. Remember to shadow the text or add other
finishing touches before you go to the next step.
and
add text around the graphic if so desired. Play with the text to get the
size, color and placement right. Remember to shadow the text or add other
finishing touches before you go to the next step.
.
7. Look at the image and make any adjustments, layer by layer, before proceeding to the next step.
Merge the layers using the merge/flatten option. Make sure you like what you see before you proceed to step 8.
.
8. Add a new layer. Add a border edge of your choice. Again, play with the placement and effects before you proceed to the next step.
Note: You can use any number of things as an edge or nothing at all. In the example at the left,
I built the edge:
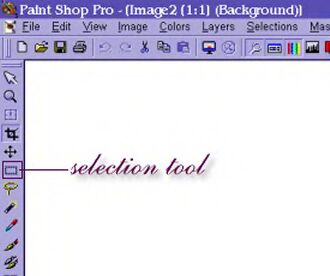
a. Draw a long thin rectangle using the selection tool
(see illustration below) and fill ![]() it with the color of your choice. Then buttonize it, copy it (Control + C)
for later use and move it in place next to the graphic. To move the panel,
make sure the background color is correct. Use the selection tool to draw
around it and move it into place. Make sure you center it from top to
bottom next to the graphic so that it will be easy to crop later.
it with the color of your choice. Then buttonize it, copy it (Control + C)
for later use and move it in place next to the graphic. To move the panel,
make sure the background color is correct. Use the selection tool to draw
around it and move it into place. Make sure you center it from top to
bottom next to the graphic so that it will be easy to crop later.

.
b. Repeat the step above, but this time make the rectangular box twice as wide and apply effects to distinguish it from the buttonized panel. Use any filter to add the effects of your choice. When finished, butt it up to the left side of the buttonized panel completed in step a using the same method to move it. Make sure you get it close enough to the buttonized panel so that there is not a white line between the two while not overlapping the panels. (Make sure the background color is correct before moving the image.)
.
c. Paste (control + E) the buttonized panel you saved. Butt it up to the right side of the panel you built in step b (above). Make sure you get it close enough to the middle panel so that there is not a white line between the two while not overlapping the panels. (Make sure the background color is correct before moving the image.)
.
d. Make sure that the bottom of the bordered edge matches the top of the bordered edge before proceeding so that they will butt against one another seamlessly when applied as a background.
Note: This is how I built my border edge, but you can use any number of things to add an edge to the border. Be creative so that your work will look unique and different.
.
9. Add another new layer and add your adornments. Remember to use the deformation tool to resize the decorations. Add shadowing and other effects as you go. If all of the decorations are the same, other than size for example, you can wait until they have all been added before adding the finishing touches, such as shadowing.
.
10. Look at the border and decide if you are done. Once you are happy with the looks of the border, you are ready to crop the image to produce the final product. I can crop it in normal mode, but it is easier to see what you are doing if you change the view (View / Zoom Out / 1:2). Once you can see the entire image, just crop it to size and then return to normal mode to see the final product.
Note: The thing to watch out for when you are ready to crop is to make sure that the top of the image will match up to the bottom of the image seamlessly. Make sure that the shading matches, especially on the edge you have added in step 7. Make sure that you including all of the border with a little room to spare at the top and the bottom of the image to be cropped.
Save the image!!!
There you have it. You have built a bordered background and now you can experiment with the techniques and build borders that will be unique and different from anyone else's. Remember to have fun and be creative.
.
Copyright � 2000 by It'sCherlyn, all rights reserved
| I, ItsCherlyn, give you, Ally, permission to use my tutorials, original and created by me, for the Artists For PSP website. October 19, 2000. |
This site is sponsored and maintained in its entirety by Artists4psp
Copyright � 1998-2001 by Artists4PSP, all rights reserved
Artists4PSP Home Page | Join our Group | Contact: LdyArchrr