|
. here's a tutorial I wrote up for a beginner class but the advanced class had fun with it too....:) . This will use a lot of the tools that come with PSP and will employ some of the very basic techniques... :) .
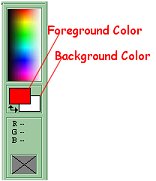
. 1) Choose your foreground and background colors on your color palette
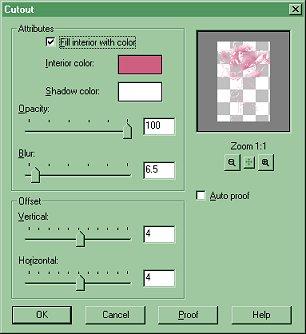
In this tutorial I chose dark pink for the foreground: red-210 green-97 blue-136 and for the background - a lighter pink: red-244 green-208 blue-222 (choose any colors that you want, but make sure that the background is the lighter color and in the same color scheme for this type of engraving effect- greens, blues, purples...would all be pretty) . 2) Image/New - make the size 200x200 and select 'background color' from the pull down screen 3) Choose the Text Tool - find your Buds & Blossoms dingbat, make it size - 90, antialias and floating checked, color selected is the dark pink...... and type the letter- 'd', click OK and then move it to center it on the image 4) Image/Effects/Cutout
use the settings above - fill interior with color checked and use the color of the dark pink, shadow color - white, opacity 100, Blur 6.5, Vertical and Horizontal 4 5) Image/Effects/Drop Shadow
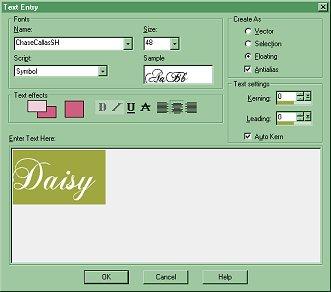
use settings above..... shadow color - black, Opacity 45, Blur 37.2, vertical & horizontal 4 (remember these settings are for this color and this dingbat - you need to experiment and find what works best with the project you are working on - that's part of the fun....) 6) Selections/Select None 7) Choose Text Tool again
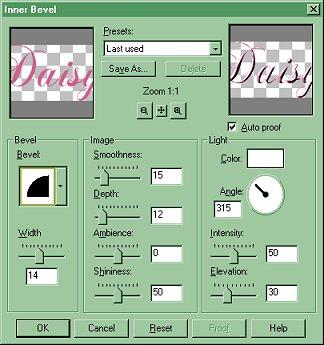
Choose the text you want to add your name with - dark pink color still selected... 8) Image/Effects/Inner Bevel
use the settings above - choose the bevel that's shown and width 14, smoothness 15, depth 12, ambience 0, shininess 50, Angle 315, intensity 50, elevation 30 9) Image/Effects/Drop Shadow
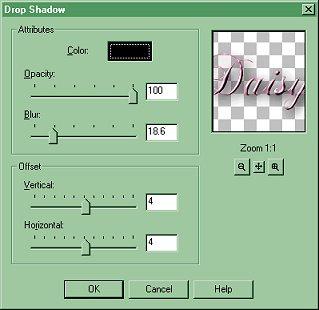
this time for the drop shadow use color - black, opacity 100, blur 18.6, h&v 4 10) Selections/Select None 11) Choose Selection Tool use this to draw around the part of the image that you want to keep
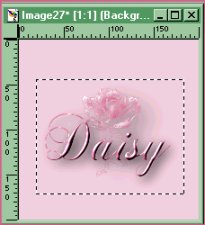
12) Image/Crop to Selection the excess should now be cut away 13) Toggle the foreground and background colors using the arrows:
after clicking on the arrows, the dk pink should now be on the bottom 14) Image/Effects/Buttonize - height and width 10, opacity 65 15) Image/Add Borders
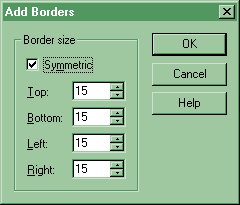
symmetric checked and fill in the first number with 15 - the rest will fill automatically 16) Choose the Magic Wand Tool and select the dark pink border 17) Image/Effects/Mosiac-Glass
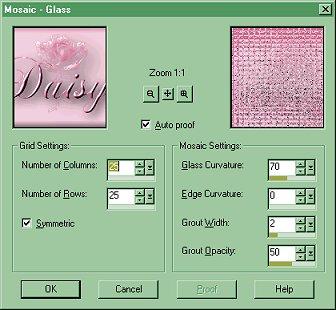
columns and rows 25, symmetric checked, glass 70, curviture 0, grout width 2, opacity 50 18) Image/Effects/Buttonize use same settings as in step#14 19) Selections/Select None 20) Save As - the name you want to call it and in a place you want to keep it.......viola! :)
this may seem long but I was trying to make something that you would enjoy learning and something that would use alot of the tools that are so basic in our everyday PSP....:) .'Daisy'
Copyright � 2000 by DaisyChainLover, all rights reserved
This site is sponsored and maintained in its entirety by Artists4psp Copyright � 1998-2001 by Artists4PSP, all rights reserved Artists4PSP Home Page | Join our Group | Contact: LdyArchrr
|

