|
. . 1. Choose a graphic you want to use for this tute. Pictures with waterfalls are really pretty and have great results!! For this tute I'm using this picture:
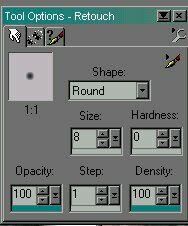
2. With the selection tool . 3. Next you will be making the fringes and this is how you do it: Using the Retouch tool
Click on the middle tab and select Smudge. . Start at the very edge of the bottom of your graphic, holding the left button down on your mouse, make small strokes downward like so:
Be careful of how far you go in because you may lose some of the picture. . 4. The next step is beveling. You can use your favorite bevel filter such as eyecandy or ulead web plugins to finish this off. Add a drop shadow and you're done!!!!! Here's mine!!!
Copyright � 2000 by Rav4GirlXoX, all rights reserved
This site is sponsored and maintained in its entirety by Artists4psp Copyright � 1998-2001 by Artists4PSP, all rights reserved Artists4PSP Home Page | Join our Group | Contact: LdyArchrr
|


 (the
hand with pointing finger), use these settings:


