|
. . I'm not the best at tutorials because i tend to go into too much detail, but i have seen several very good tutorials about tubing circulating but sometimes i think some things are left out, especially about checking for the little bad areas that are accidentally left. I'm no expert for sure, but this is how i do tubes and how i check for the little bad spots that are sometimes left in the process. Different people do different things.. i think...and on here are several options that you can decide for yourself which is best for you. There is probably no one sure fire way that is perfect all the time.. so be open to doing different things from time to time. . first off tubing is really sort of simple.. you paste whatever you want to tube onto a transparent background. You do this so that when you cut away all the unwanted stuff, using the lasso tool or sometimes the eraser, you will be left with a graphic on a transparent background. You then save as .psp or export as a .tub. That is it.. short version.. really easy. One thing you need to be aware of when tubing is that you want it smooth looking if possible.. and you do not want to leave little trashy parts that will show when you or someone else uses them. Often the tubes will look fine on white, but when you put them on a dark background LOOK OUT...you say..wow..where did all that come from. example...this is copied and pasted.. so there may be some blurring
this is minnie mouse's ear. notice on the white it looks good, but on the red there is a little white marring the picture. on the third pic i put a shadow..see how the white shows up between the shadowing ??? well..you do not want this..little eraser or another little cut will fix this up fine..but easier now than when you are about to make a tag. sooo this is an important step in tubing. you can do it when you start..or at the end..but at some point you need to put your "tube" on a dark solid background to look for these spots. you can do this at the very beginning by opening a red new image (or any color besides white...that may make things show up). The image should be little larger than the picture or graphic you want to tube. now put a transparent layer over the red. This is the transparent layer you are going to do your cutting on. When you finish you will copy and paste to a NEW IMAGE and you will have your tube on a transparent background to be saved as .psp or exported as .tub. The red will be under the transparency and will have no effect on your NEW IMAGE. ( if it does..then you forgot the layer..or you are working on the wrong layer...whey you cut..the red should stay..only the background of picture goes)
marching ants are on the first one...second one i clicked on invert..see how the ants moved to the very edge of the form....third one..delete..no more background. ... Really easy if you did not miss the edge in a lot of places you are finished.
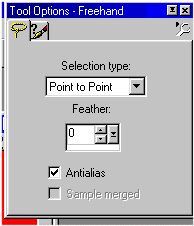
If it were me, I would now paste this onto a solid color like red to make sure there are no little spots i missed. (unless it was already on red, then you know already) If you can go all around the outline like this..it sure makes tubing fast. If the item does not have a lot of little ins and outs..i may do this, but if it does..or if it is really large..i then cut piece by piece... (i usually end up slipping or something..and suddenly find the end had joined the beginning right thru my graphic and i have to start all over) I often just do it little bits at a time. I start from out on the edge..bring the tool into the edge of my graphic..then cut a bit..then go out to the edge again and click delete to cut away one small portion. Then I repeat the process all around my graphic. the settings I use for my tool is this:
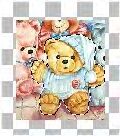
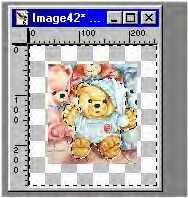
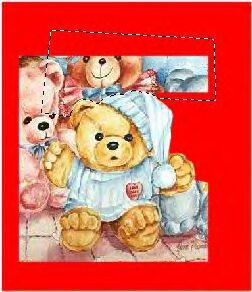
i leave antialias checked for a smoother look. some people like to use feather set at one or two for a little smoother look, but i seem to do best when i have it at 0. the more you set the feather, the more it cuts into the graphic a little..but it will be graduated in opacity which is why you get a smoother edge, but sometimes i think the last edge is a little too light and shows up whitish. you have to play with this and see what you like. sometimes you have to do different things for different graphics. once you have your area marked that you are going to cut away..you press delete. the more you press delete the more it will cut away the lighter portions the antialias leaves. one delete may or may not leave little trashy parts..so you may want to press it one more time..or one more..again..this may depend on the graphic and the background you are dealing with. See the example below..this is cut and pasted so there is some blurring . you see how i have already cut away one section and i have the "marching ants" around the next section i will cut away (press delete) NOTE: you can use the magnifying glass to enlarge the picture so you can see the line as you click yourself around your graphic.
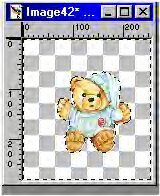
I would keep on clicking little sections and deleting piece after piece. when i'm finished i would look at my edges to see if i cut away what needed to be cut. NOTE: if you ever go..OH MY...i cut off his arm... then go back to your original find that arm, cut it out and paste it over what you have been tubing....lining it up just right. now..cut out around the edge this time and leave the arm... you do not have to redo the entire thing. I do this sometimes with hands or feet. I tube them..i think that does not look right..and then i redo. Sometimes i end up using the eraser around the edge instead of the cutting tool. if it looks too jagged with the eraser, you can cut what you have to and then use the opacity settings to cut a little more that will leave it lighter and make the edge smoother. if the graphic has a black line all the way around it, and you accidentally cut some away, use your paint brush to paint a little back. once you have your tube the way you like it..copy and paste to a new image. all the excess will be gone and you will be left with just your image for exporting as tub or saving as .psp this is what i ended up with after clicking around my bear.
i hope this helps.. robin
Copyright � 2000 by Graphix4fun, all rights reserved
This site is sponsored and maintained in its entirety by Artists4psp Copyright � 1998-2001 by Artists4PSP, all rights reserved Artists4PSP Home Page | Join our Group | Contact: LdyArchrr
|


