|
"Creating Masks" Tutorial by
Masks allow changes to show through where the mask is black and block changes from ocurring where the mask is white. However, because masks are greyscale images, the changes can show up partially in an image where the mask is grey rather than black or white. If the mask is a lighter grey, the changes will be less visible. Where the mask is darker grey, the changes will be more evident. To get a feeling for how masks work, you can create a new mask. Follow these steps to create an image with a simple mask: . 1. Open a new image at 500 x 200 pixels with the resolution set for 72 pixels per inch, the background color set to white, and the image type set to 16.7 million colors. 2. Create a new layer by clicking the Add New Layer button at the bottom of the Layers palette. You can open the Layers palette (if it's not already visible on your screen) by clicking on the Toggle Layer Palette button in the toolbar. 3. Set the foreground color to blue: Either click in the foreground color swatch and set the color or choose the color from the color picker. You can choose any shade of blue, or another color altogether. 4. Use the Text tool to enter some text. I enter the word "MASK" in 100-point, bold, Arial Black. 5. Choose Selections, Select None, to deselect the text. 6. Choose Masks, New, Show All to create a new mask. However, you won't see any changes to the image at this point. 7.Choose Masks, View Mask. You still won't see any changes because you chose Show All. With the ShowAll option, the mask is completely white, and no changes to your image occur. (Show All refers to showing the image- or more specifically, to showing the image through the mask, in effect creating a totally white mask- not the mask.) 8. Choose Masks, Edit. Now any changes you make to the current level affect the mask rather thanthe object(s) on the layer. 9. Choose the Selection tool and set the Selection Type to Rectangle in the Controls palette. 10. Draw a rectangular selection that encompasses the top third of the image. 11. Select the Flood Fill tool. 12. Set the foreground color to black and click in the selection to fill it with black. . Whoa! What happened there? The selection was filled, all right, but it wasn't filled with black. It was filled with a reddish color, right? What you're seeing is the mask itself. You're seeing the mask because you've toggled on the View Masks option. You can also tell that you're viewing the mask and the image through the mask because the word *MASK* appears on the images title bar. To turn off the view of the mask, choose Masks, View Mask. Hey! What happened this time? The mask has disappeared but so has the top third of the text. The text hasn't really disappeared; rather it has been "masked" out and is now invisible. Now, follow these steps: 1. Set the Selection tool again and draw another selection that encompasses the middle third of the image. You may have to click the Selection tool outside of the currently selected area first. 2. Set the foreground color to a medium grey. 3. Select the Flood Fill tool again and fill the selected area with grey. . Okay, okay, what's going on here? the grey color doesn't show up and this time the text seems to fade out to a pale blue (or a paler version of the color you used for the text).
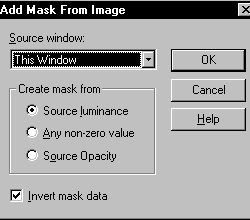
To see how the mask looks now, Choose Masks, View Mask again. Now the top third is filled with red; the middle third is red but you can see the text through it; and the lower third is not red at all, and the text is completely visible. This step proves my earlier explanation about how the black portion of a mask allows the lower layer to show through completely, the grey portion allows some of the lower layer to how through, and the white portion of a mask allows none of the lower layer to show through. Now, to save your mask, simply choose Masks, Save to Disk or choose Masks, save to alpha channel. Saving the mask to disk saves the mask separately; saving to an alpha channel saves the mask along with the image. If you save your mask as an alpha channel, though, you'll need to save your image in PSP, TIF, or TGA format to preserve the channel. If you choose to save the mask to disk, you will be prompted for a file name. Leave the default extension .msk so that PSP will recognize the file when you decide, at a later date, to load the mask. You can also take any image you have and turn it into a mask. Just open the image you want to make a mask of, click on Masks, New, From image. This brings up this screen. Source luminance is the default setting.
Now, save your mask as before by going to Masks, Save to Disk, and naming your file using the file extension .msk. There you have the basics for understanding masks and how they work!
Copyright � 2000 by [email protected], all rights reserved
This site is sponsored and maintained in its entirety by Artists4psp Copyright � 1998-2001 by Artists4PSP, all rights reserved Artists4PSP Home Page | Join our Group | Contact: LdyArchrr
|


