|

This tute is a mixture of several tutes all in one
:o)
I am only showing the steps I used
in making this tag.
Open the image you want to use for this tute.
Don't worry about the size cuz you can resize it later.
This is the one I used:

Go to Image<Deformation<Circle. Click OK

With the Selection tool set at Circle (Nothing checked) start in the
middle of your image and go out but don't go past the circle of your
image.
Go to Selections<Invert. Click on the Scissors Icon or
Edit<Cut.
Then go to Selections<Invert again. Just the circle will have ants.
Now you want to resize your circled image so that it fits inside of a
400x400 image with plenty of room around it. Remember to Sharpen!
Go to Edit<Copy.
Open a new Image 400x400 Transparent. Now go to Edit<Paste...as New
Layer. Your circled Image should be there.
Next click on the Retouch tool: (Round, Size: 8 Step: 1 Smudge)
Start at the bottom part of your circle and make short strokes downward.
Do as much as you want or as little as you want.
When you are finished with that part click on your layer palette and
select Layer 1. Now you are working with the background of your image and
you can flood fill solid color, gradient or use a pattern. (Just keep in
mind, when we get to the perspective shadow step, you will need a
background light enough to be able to see the shadow.) I used a picture of
water as my background and made a seamless pattern with just a small
selection of it.
After you create your background and are happy with it go back to your
layer palette and click on Layer 2.
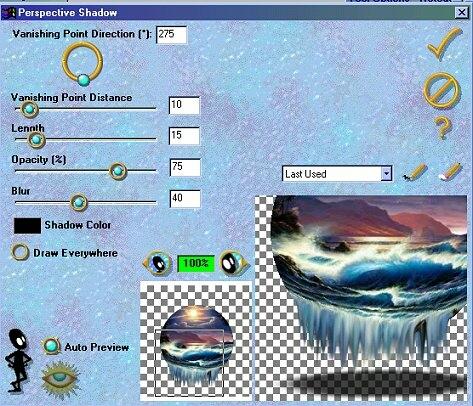
Then go to Image<Plugins<Eyecandy<Perspective
shadow.
I used these settings:

Almost done!!!
Go to Layers<Merge All (flatten).
At this point, you can buttonize, add tubes
or apply you're own personal touches.
In the example I used Inner Bevel:

Save and NOW you're done :o)
Have FUN!!!!!!!
~Denise~
Copyright © 2000 by Rav4GirlXoX,
all rights reserved
| I, Rav4GirlXoX, grant Ldy
Archrr permission this day, October 20, 2000 to post my
Denise's Hanging Sphere tutorial on her website. The tutorial
itself was written by me based on how I perceived the graphics
being made in PSP. |
This site is sponsored and
maintained in its entirety by Artists4psp
Copyright © 1998-2001 by
Artists4PSP, all rights reserved
Artists4PSP
Home Page | Join
our Group | Contact: LdyArchrr
|

