I figured out something new for me in psp! Heart shaped text! Oh I'm having fun now...look out lol decided to take a shot at those watermarks too...I really don't like it...I think the ones I've done this way is all I'm going to do lol It's been a long time since I've tried to write a tutorial! I'm not too good at this, but I
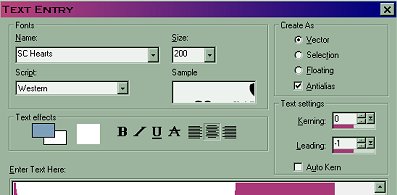
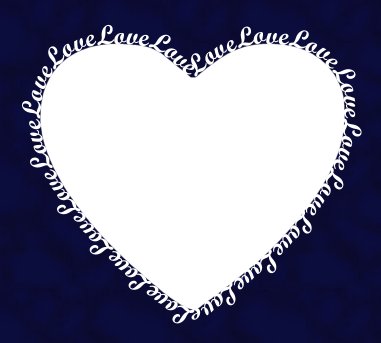
 wanted to share what I learned.

I'm going to try to show how I made heart shaped text, in psp6, with vector text, using dingbats for the heart shape. You can use any solid heart shape dingbat character.

This isn't much different than making text on a curve, only it's harder to fit the text to a shape I've found, than it is on a curve! For now I will just show you how I did one tag.

Heart Shaped Text in PSP6 with Vector Text

created by: ArticGraFx


I will attach both fonts I used, and the pattern for using in sculpture.
The pattern goes in PSP6/Patterns folder.

Download Materials used for this Tutorial


Open a new file  500x500, transparent background.
Using the text tool enter lower case "m" from the font SCHearts

Using these settings:
color white
size 200
and the important part...
create as Vector
antialias checked
kerning doesn't matter at this point, it's just one letter


Now you'll have a big white heart with handles on it.
You can adjust the size of the heart with these, but I'm just going to drag it over to the top/right corner. Not too close to the edge, leave some room.

Click on the Vector Tool.

Now right click on the heart shape and select
convert to curves/as character shape.


Right click again, this time select node edit.
Your heart will turn into a black line with a bunch of nodes (handles) on it.

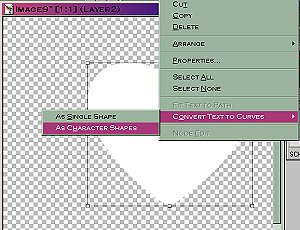
You can play with these to make your own shapes from scratch. Which I'm not too good at...so I was happy to figure out I could use dingbat shapes!

Now right click again, and choose
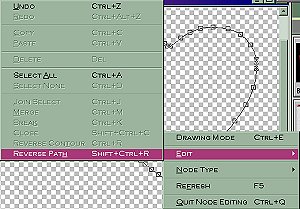
 edit/reverse path


Now click back on your text tool.
When you hold your mouse over the heart shape,

(your cursor turns into the little text symbol (A) with a curve under it. )

You may want to save now, make a copy and keep your vector heart settings in a file to use again later.

Now add a new raster layer to put your text on, and name it text.

Pick two colors from a tube or picture you want use in your tag.
I'm going to use this one below.

Ok that was the easy part, now for the fun.


Now we're going to make our heart shaped text!

Click on your new raster layer with the text tool, and start experimenting. You need a fairly bold font to read 
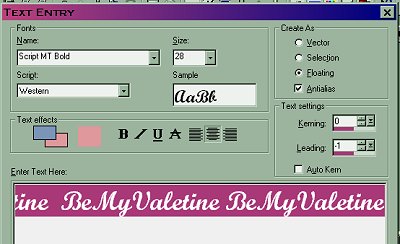
the text, but I wanted script too, so I chose Script MT Bold, at size 28. (after trying a few sizes that would fit)
If it's too large it will overlap in a mess, and if too small of course it won't wrap all the way around.

Type in
BeMyValentine (space)
BeMyValentine (space) (space)
BeMyValentine (space)
BeMyValentine with no space at the end.

The double space in the middle will be at the top of the heart...where the letters like to smush together.

Choosing a size that fits with an even number of words and spaces works best. (Like if you wanted to enter the one word Love, enter it an even amount of times...12 or 16 etc)

Now make sure you've unchecked vector, and checked floating again.
This way you have the selection around your text to edit it.
Using kerning can help you fit the text also...spacing the letters closer or further apart. Ok, click ok! Heart shaped text!


Now you can edit the text with plugins or flood fills etc.

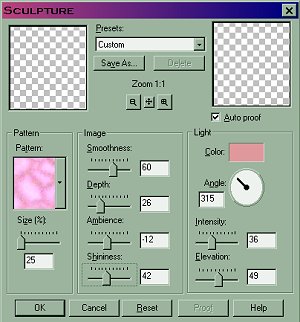
I used sculpture on this angel tag, with these settings, using the color I saved from my text.
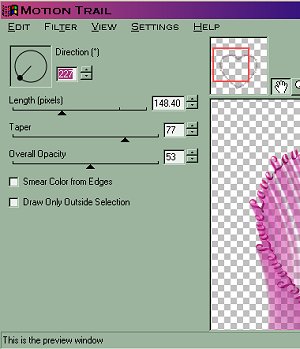


When you are happy with your text, before adding a drop shadow...

delete the selection.

Now right click on the text layer in the layer toolbox and go to duplicate,
this adds a copy of the same text on another layer on top.

I do this so I can add a motion trail to the text from underneath,

I used Eye Candy 4000 with these settings.


On the same text layer, I went to Edgeworks filter/Glitter

with the setting at 45.

And then Image/Blur/Glaussian Blur at 1.00
This just gave the motion trail a bit more color.

Now go to your Copy of Text layer and add a drop shadow to that layer. It will make the text stand out.

Ok, I think this is getting way tooo long here! lol!
I'll try to be shorter...

Paste your picture as a new layer in between the two text layers.
The motion trail behind the tube...
the drop shadowed text on top of the tube.
Size the picture to fit mostly inside the heart shape.

All nicely in there? Ok, now go back to the heart layer,

right click and choose convert to raster.

If the picture hangs out of the heart shape too much...

Use your magic wand and click on the transparent background around the heart. Switch layers (with ants still marching) up to your tube/picture layer and hit cut.

Almost done...you can leave the heart white.. or you can invert the selection and add similar settings you used on your text.
I used sculpture again, but made it lighter, and the pattern larger....so it looked more like fluffy clouds than a pattern.

You may want to sharpen the contrast on the top text layer...

or add a drop shadow to your tube etc...
Ok I think that's the end!


Add a layer for a background color, crop, merge all layers and resize,

Your tag is done!
I hope you enjoy this!
Happy Valentine's Day!


More Heart Shapes by ArticGraFx

tube attached looks like this below

Some tags for you made using the above tube!

(Just right click and save to your computer)


More Heart Shapes by ArticGraFx

Here's a couple more heart shaped text tags...told ya look out lol

tube attached looks like this below

(has transparent background,

but needs to be used on a dark color because of drop shadow on text.)


Some tags for you made using the above tube!

(Just right click and save to your computer)


The one at the bottom is a nekkid one...don't look if you don't like =)


Copyright © 2000 by Articfx3, all rights reserved


I, Articfx3, Give my permission to Ldy Archrr aka Artists for PSP to place any and all tutorials that I have made on her site.. this 18th day of October 2000. These tutorials were made solely by me and permission is mine to give.

This site is sponsored and maintained in its entirety by Artists4psp

Copyright © 1998-2001 by Artists4PSP, all rights reserved

Artists4PSP Home Page | Join our Group | Contact: LdyArchrr