A half decent Philips or Posidrive No.1 Screwdriver.
A Soldering Iron that has a tip that is good for fine soldering, don't use a tip thats the size of a spade.
A few centimetres of solder, use finer than (1mm) 18 SWG if possible.
A bit of patience and a steady wrist. It also helps if you can see what you are doing.
READ THROUGH THE INSTRUCTIONS FIRST SO YOU KNOW WHAT YOU HAVE TO DO !!!!
Firstly disconnect the PSX from the mains, there are dangerous voltages within the PSX, Remember you want to live to test out your newly modified PSX.

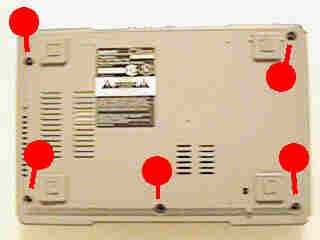
Turn unit over and remove 5 the screws. from the base.Turn unit right-side up, and lift the cover off.

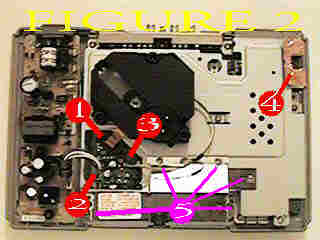
Disconnect the flat copper ribbon cable FIG 1 by getting hold as close to the part that is inserted into the circuit board and pulling straight up. Do this very carefully if you damage this carbon cable you will need a new laser unit, last I heard these don't come cheap.
Now disconnect collection of wires FIG 2 by pulling straight up.
Last but not least gently disconnect green connector FIG 3 (3 grey + 1 white wire) by pulling straight up. Some people take the laser unit off now but it is better if you leave it where it is and take it off when you remove the bracket that is resting on.
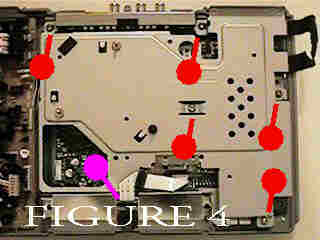
Remove the 5 screws holding the thin metal bracket in place. Lift off up the bracket and controller/memory card housing. Disconnect the ribbon cable by pulling straight up.

Remove the 5 screws holding the bracket in place.
Note that when ever you take out screws the holes are marked with an arrow so you know how to put the thing back together. Lift off the bracket. Also peel back any copper screening.

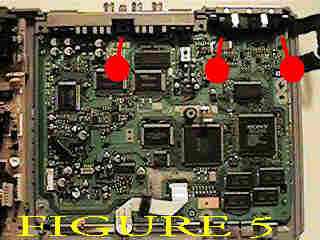
You have now got a clear view of the circuit board, (Great you think !!)
The problem is you need to solder the chip on the underneath of the circuit board. Remove the 3 screws along the top edge. Lift off the circuit board.

Right once you have got to this stage you are ready to install the chip.
Your pic chip if you bought it off me already has wires soldered on to it so I will not go into how to do that but you can easily see from the diagram below what the pins are.
Now all we have to do is solder the wires from the pic chip to the system board.
Add a small amount of solder onto the tip of the soldering iron, place the wire at the location to be soldered, and simultaneous touch the location and the wire with the wet soldering iron. Try to smear the solder on the wire and let it solidify. After you have solder all four wires into place you may want to isolate you chip from the rest of the circuit board. You can do so by wrapping it in some electrical tape. I don’t think it’s necessary to secure the chip to the board. Once you have soldered all the points and double checked to make sure you have done it right you will need to reassemble your PSX. Before you do this insulate your chip with electrical insulating tape.
During reassembly make sure you do not trap any of the wires going to the Mod chip between screws etc.