The study passes through two stages
1) The stage of "rough" /screening/ testing the light-sensitivity
of many single points in the central eye-field.
The number of points can be changed according to the duration and precision
of the test / Programme adjustment/ the examination of every point is in
this succession.
Is there patient's reaction at?
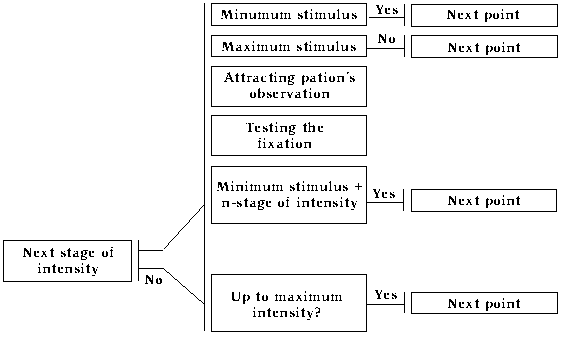
Every point of the central eye-field is tested in the sequence of this
algorithm at the end of the 1.stage all the points that have not been seen
with maximum intensity /absolute scotoms/ are tested again.
2) Stage of fine /exact/ testing of the eye-field.
The aim is there to be determined more accurate the size and the profundity
of the faults , found during the first stage . It means that the most deeply
are tested the points surrounding the eye-field part with changed light-sensitivity.
2.?.2. Kinetic fixation
The algorithm of this version is quite similar to the static fixation's
one. The test contains two stages and the second can be canceled.
The fixation point is white square. The special feature of this modus
is that the fixation point moves from the center of the screen in any destination
and at any distance The patient's look should follow the marker, so it
guarantees his look's fixation at the moment of the test object's appearance.
The position of the stimulus /test-object/ on the screen is refigured in
connection with the position of the fixation point and the screen center.
After the appearance of the stimulus and the reaction time, the fixation
point returns to the screen's center.
In this method we use the abilities of the flickerkampimetry.
The algorithms of studying and analyzing of the results are quite cloze
to the previous method's, so that the special feature and the main difference4s
are in the way of presenting the test-objects. The modus of static kampimetry
uses as test-objects fixed white points with different intensity. The test-object
used for Flickerkampimetry is vibrating net.
The object's size is 1x1 cm, it's white changeable intensity and vibrating
frequency 50Hz.
?his method also functions with static and kinetic fixation, and the
study passes through the same two stages- "rough" and "fine" testing.
Possibilities and priorities of the system.
1 Computer requirement
AT486 DX2, 8Mb RAM, 14"- monitor, Windows95 mouse pad, printer.The
systems are recorded on 4 flexible disks and are easy to be installed.
2 Adjustment
Most of the parameters can be easily changed:
- Background intensity
- Examined eye-field/ the whole or only a part of it/
- Reaction time
- Number of examined points
3 Presenting the results
The results are presented graphically/2d and 3d/, statistically,
and as a numerical data. You can save the results and the personal information
about the patients. Due to this you con create own database.
Diagnostic possibilities:
1 Static kampimetry of the central and paracentral eye-field
1.1 Static mesopikal kampimetry
1.2 Screening static kampimetry
1.3 Static kampimetry of a part of the central eye-field
1.4 Static kampime try with kinetic fixation
2 Flicker kampimetry of the central and paracentral eye-field
2.1 Flicker mesopikal kampimetry
2.2 Screening flicker kampimetry
2.3 Partional Flicker kampimetry of the central and paracentral eye-field
2.4 Flicker kampimetry with kinetic fixation
Diagnostic groups, expedient for examining of the central and eye-field:
1. Glaucoma
2. Chorioretinal lesions
3. Lesions of the optic nerve's disk
4. Lesions of the intracranial part of the optic nerve
Installation
1. Computer configuration
AT486 DX2, 8Mb RAM, 14"- monitor, Windows95 mouse pad, printer
2. Installing 4 flexible disks-1. -3. installation, 4.unlocking disk
Follow these instructions:
1 Insert disk #1
2 Start the "SetUp.Exe" programme
3 Insert disk #4 and start "Key.Exe" programme
4 Start PC-KampiPro programme
Windows start>Programmes>PC-KampiPro>KampiPro
Adjustment
To adjust the programme press "Adjustment" button or F8 and
follow the instructions
1. <Sound> button
You can switch on/off the sound /instructions, advices, sound effects/
of the programme
Caution! If your Pc does not have sound
card installed, please switch off the sound
2<Exit> button
Applying the adjustment
3 Black panel with circumferences
These circumferences are used to define the size of the eye-field.
The size depends on the distance between the examined eye and the fixation
point. To be correctly defined, ask the patient to fix the central point
monocular. Afterwards drag the outer circumference, place it over the point
and press the left button. Holding it move to left or right - the bigger
point should get situated in the temple.
4 The first slide
Moving the first slide, you can change the brightness of the background.
In the left angle the brightness is presented in %.
5 Second slide/precision/
It is used for adjusting the precision - better precision - more points
to examine. The duration of the test is connected with the number of the
tested points.
6 The third slide
Use it to fix the reaction time of the patient after the appearance
of the stimulus. When examine people older than 60 years, it is necessary
the reaction time to be longer. The possibilities are: 1, 2 and 3 seconds
N.B. During the whole test the stimuli
appear at different intervals. The interval is equal to the reaction time
plus 0.1 - 1 sec.
The test carry-out
1 Imprinting personal information
Every time you carry out new test, you should fill in the patient's
personal information.
Use the mouse pad or TAB button. The date field must be filled in in
the same way as in Start>Settings>Control Panel>regional Settings>date.
At the end choose the tested eye.
2 Choose the method of studying
You can choose one of the two methods - static and kinetic fixation
with F4 button.
3 Choose the test precision at the second stage-F2 button.
4 Starting the test
To begin the examine click on Start Test or F1 and follow the instructions.
To start testing click on Start or press Enter
Saving the results and creating database
To save the results click on <Save results> or F5. If it
is correctly done you will hear an announcement or read a message.
Printing the results
To start printing the results you see on the screen, press
Print or f7
Representing old results from the data base
To start working with the data base click on <Reading results>
or F6 button. Choose the result you are interested in and if you want you
can correct it. Every result can be:
1 Deleted - click on Delete or press Ctrl+Del. In the window
you can choose "Yes" or press enter and you will delete the result. If
you choose "No" or Esc you cancel the command.
2 Saved as a file - click on <Writing> and you save a concrete
result as a file.
3 Loading a file - press load, read the file and if it is necessary
save it in the database.
4 Restored - click on Restore so that a result in the database
is seen on the screen and can be modulated.
5 Canceled - click on cancel and the programme is closed without
changing the results
Database
After deleting a result in the database, its place remains
on the disk, so database becomes larger. To get real size database please
start "Packtable.Exe" from "\Program files\PC-KampiPro
Deinstalling the programme
1 Restart your PC
2 Delete the directory "PC-KampiPro" with all its subdirectories.