
Helpful functions

Repeat = This is placed in the structure menu and is very useful when
you want to repeat a certain part. To use this function all you have to
do is select repeat from the menu and a box will appear. The box is very
user friendly and basically asks how many repeats you want. Once this is
set, click OK and Cubase will execute the request. Remember, before you
can go to the repeat page, you must highlight the part you want to repeat.
Ghost copies = This is another way to repeat a part. To execute this function
you have to select the desired part, hold down Ctrl (only on PC version)
and drag. This will make an exact copy of the part. In order to edit ghost
copies they must be converted in to normal parts. To do this, enter the
edit page of the ghost copy, click straight out of it and reply Yes to the
question, "convert ghost copy to normal part".
Quantization = This is a very useful little tool and is used to correct
slightly off timing without using the edit page. To use this, go to the
Q in the tool box and activate it. Then click again on the part and all
the notes will be shifted to the nearest beat. If a piece is well out of
time then this function may not be able to correct the mistakes and you
may make them worse.
Solo = This is another handy little function and basically does what it
says. It solo's the highlighted track. Very useful if you want to hear a
particular track by itself.
Mute = More or less the exact opposite of the solo button. Mutes the highlighted
track.
MIDI Processor
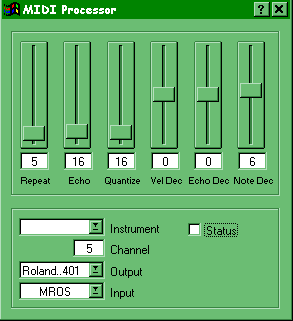
The MIDI processor is probably one of the easiest modules to use in the Cubase program, and is probably one of the most fun and useful aswell. The whole processor is basically a delay unit with a bit more to offer that can be applied to any MIDI parts in a piece of music. The module is quite small compared to some of the others with only 6 faders to play with. The faders are as follows;
· Repeat
· Echo
· Quantize
· Vel Dec
· Echo Dec
· Note Dec
The above names are that of the faders and they all work in the expected
way. Up, increases the value and down decreases the value.
Repeat
The fader repeat is very straight forward with the number being the amount
of repeats there will be. ie, 3 = 3 repeats etc. The original note is included
in the number so if you have a repeat of 3, then you will hear the original
note plus two more.
Echo
This fader on the module controls the speed at which the repeats occur.
The lower the number, the quicker the repetitions are and vice versa.
Quantize
The repetitions can also be quantized in the MIDI processor, and this is
done by using the quantize fader. The quantize function basically alters
the times of the repetitions. They can be set to repeat on every beat or
whatever you want. This function is not very accurate but this can be corrected
by using the normal quantization of Cubase (Q).
Vel Dec
This fader is used to affect the velocity of the generated notes. The repetitions
of a natural echo are not as loud as the original sound and this can be
simulated here. The readings will either be in + or -. If the number is
a minus then the repetitions will be quieter than the original note, but
if the number is a plus then the repetitions will be louder. This may not
sound very natural but can be very interesting to play around with. The
repetitions get quieter gradually and if the setting is -12 then the final
repetition will be -12 of the original note.
Echo Dec
This fader controls the gap between the repetitions. The fader can be set
to make the repetitions speed up as they get quieter or vice versa. This
can create some rather strange effects but it can be great fun to play with.
Note Dec
This is the final fader on the MIDI processor and this is where the whole
sound can be changed dramatically. The note dec fader basically transposes
the repetitions up or down, depending on the setting you want. Patience
is needed here as you may need to change the other settings to compliment
this. The last three faders on the MIDI processor can all be effectively
turned off so that if they do not suit the type of delay you want you don't
have to put up with them.
Before you can actually start using the MIDI processor there are a couple
of things that you need to do first;
· The status field must be activated (tick).
· The channel must be matched up with that of the main window.
· The output must be set to MROS or the processor will not work.
Example
The example that we have provided of the MIDI processor shows an original
drum track, followed by the same track effected by the MIDI processor. The
settings for the processed track are as follows;
· Repeat = 3
· Echo = 0
· Quantize = 1
· Vel Dec = -10
· Echo Dec = 0
· Note Dec = 0
The Arpeggiator

The arpeggiator is another of the Cubase modules, and like the MIDI processor
is very simple to use. The general way of working of the arpeggiator is
also very similar to that of the MIDI processor. Like the MIDI processor,
the arpeggiator needs to be set to MROS in order to work. The channel of
the part must also be matched up before use.
The basic arpeggiator program doesn't really have that much to it but the
options are;
Mode
This is where the type of arpeggiator is chosen. They are all pretty self
explanatory (up only, down only, random, normal, invert). No editing is
required for these as they are all presets of the arpeggiator.
Quantize
Like almost all of the Cubase modules there is a quantize section, and works
in the same way as all the others. The speed of the arpeggio's can be altered
here with all the expected options like 8, 16, 8T, 32T etc. Again these
are just presets of the module and no fiddling is required.
Edit
This is where you can chose which notes in the chord you want to send to
the arpeggiator. The maximum is four and the minimum is one. They must be
activated before they will be effective. Each different note can be assigned
a different arpeggio style if required.
Examples
The MIDI file for the arpeggiator consists of six different arpeggio's one
after the other. We have tried to use a varied selection to show the extent
of the arpeggiator.
Logical Editor
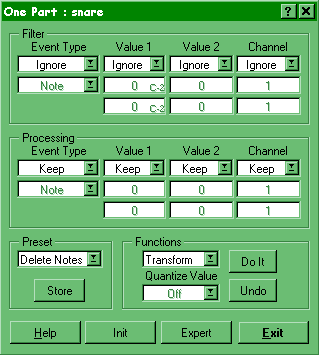
This is one of the larger modules in the Cubase program and is also one
of the most fun to play around with. Later versions of the program have
presets available in the function menu but for precise editing you will
need to go to the logical editor in the edit menu.
The editor consists of a filter, a processing section, a presets section
and a functions section.
The filter section is the first you will come across and this is where you
chose which notes will be effected by the processor. The options in the
filter are;
· Ignore
· Equal
· Unequal
· Higher
· Lower
· Inside
· Outside
These are all pretty self explanatory and they can be selected by clicking
on them. Underneath the selected box is where you decide where the processor
will be effective. For example, if you chose higher and set the box to D2,
then everything above D2 will be effected (except D2). For settings like
inside and outside you have to chose a zone where the processor will be
effective, you will need to make settings in both the boxes under the title.
Now comes the processor section. This where you chose which type of processing
you want to use. The functions of the processor are;
· Delete Notes
· Delshrt Notes
· Random Notes
· Fix Velocity
· Random Velocity
· Fade Out Velocity
· Push Forward
· Push Back
· Double Tempo
· Half Tempo
· Flip
As with the filter section, the processing options are very straight forward
and can be accessed in the same way. These can all be activated via the
functions menu on the main page but they cannot be altered unless you go
through this module.
Now you have chosen the type of processing you want to use, you have to
go to the functions section. The options here are;
· Quantize
· Select
· Delete
· Transform
· Insert
This part of the logical editor is very important and is often forgotten
about. In order to be able to execute the processing you have to set this
to transform. If you leave the setting to delete you will delete all the
settings you have made. After you have done this all you need to do is click
on Do It and exit the editor.
Examples
As this is a large module for Cubase we have decided to include two examples
of the logical editor.
The first example is a piano piece played normally followed by the same
piece flipped around an axis. This is where you select a note to be an axis
that the rest of the notes will flip around. The axis in this example is
A3. To create this effect we set value 1 in the processor to flip and set
the desired axis in the box underneath. The results can vary according to
the piece and the axis so a little patience is needed here.
The second example of the logical editor is a drum track played straight
followed by the same track containing a dynamics change on the snare and
hats. The dynamics were set at 0-127 in the value 2 section and the filter
was set to higher than C1 so that the bass drum would carry on and the snare
and hats would fade in gradually.
Master Track
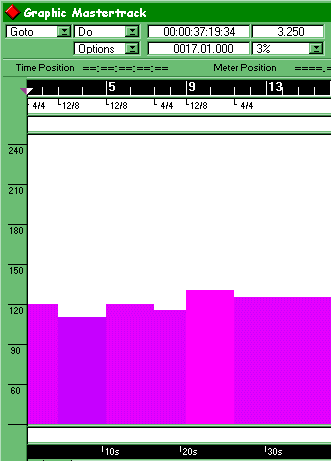
This is the section of Cubase that sets the tempo and time signature
of a piece. The page is joined to the main page via the master track button
in the bottom right corner of the controls. Without this pressed down, the
changes made in the master track will not occur on playback.
When Cubase is running, the default settings for the master track are
Tempo = 120 and Time signature 4/4. These can be changed from the main page
but to enter hit points later in the piece you will need to be in the master
track list, in the edit menu. Once you have opened this page, there will
be two readings (tempo + time signature) which represent the settings for
the start of the piece. Above this there is an IN button. If you click on
this, another reading will appear on the screen. This reading will either
be a tempo reading or a time signature reading. This depends on what you
have it set to (the default is tempo so click next to it to change to time
signature). Once you have introduced a new reading you can set it to what
ever setting you wish. The left locator on the main page must be moved to
the desired point in the piece so that when you introduce a new reading,
the change will take place at that point. Once you have set up all the changes
you want, exit back to the main page and the master track will take effect.
Example
The midi example for the master track is six different drum patterns one
after the other, all with different tempo's and time signatures. In the
master track in the edit menu you can see when all the changes occur and
what they change to. The drum patterns are all very different to make the
changes more noticeable.
Step By Step Drumbeat
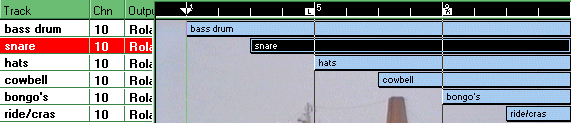
This section is all about creating drumbeats using the edit page, and
how to go about creating you own beats from scratch. Creating drum beats
from scratch using editors is actually very easy and ensures that timing
stays precise, it also means that beats can be put together that would be
nearly impossible to play by hand. The section below shows how to go about
creating your own beats, accompanied with a step by step example and the
techniques used. The whole beat was made from scratch in the edit page.
This was used as opposed to the drum editor as the edit page is more flexible
and much nicer to use.
Example
The pattern is very busy and fast and has many different rhythms crossing
each other, which provides the beat with a style somewhere between Latin
and funk.
When creating a drum beat from scratch in the edit page, it is always best
to work in steps. Working in this way may take a little longer than playing
a simple beat by hand, but the results that can be achieved by spending
that little extra time can be a huge improvement.
Bass Drum
This is probably the best place to start as the bass drum is the core to
most drumbeats. No matter what style of beat you are after it is always
a good idea to start simple and build on a basic pattern than to go all
out straight away and end up lost and confused. The bass drum also sets
the feel of the beat and everything else seems to follow the general timbre,
so extra time needs to be spent on this. The bass drum in the example started
off as a simple on the bar pattern and slowly beats were added and taken
away to give the fast but original texture. Using off-beats can help to
give an original rhythm. At the start of each of the bars in the example,
the bass drum plays a quick three beats which make the start of the bar
more noticeable and helps to give a distinctive feel to the beat. O nce you
are happy with the bass drum pattern it is time to move on to the snare
drum.
Snare Drum
The snare drum is the next drum to arrange. When working on the snare drum
you have to take the bass drum in to consideration aswell. The style of
the beat really dictates where the snare will go, as a wrong snare will
be easily spotted. A typical snare pattern would either have a hit on every
other beat or any of the beats that are not occupied by the bass drum. Most
of the time the snare will not be on the same beat as the bass drum but
as always there are exceptions (reggae). The snare for the example is a
very simple on the beat pattern with a slight flourish at the end of the
second bar. This is not just to excite the pattern up, it also acts as a
good marker for the end of the two bar sequence.
Hi-Hats
Now that the bass drum and snare drum have been completed it's time to have
a look at the hi-hats. Unlike the bass and snare drums, the hi-hats are
very free and can be placed almost anywhere and on any beat. The problem
is getting the hi-hats to feel right. The most common hi-hat patterns are
4,8 and 16. Although all of these will fit in to the pattern none of them
will really work for the drum beat in the example. For this pattern the
hi-hats follow the bass and snare with the occasional change towards the
end of the bar. This type of hi-hat style is fine for the beat but it does
leave it a bit bare. This is where additional percussion comes in. Again
though, when arranging the hi-hats it is much easier to build on a basic
pattern and take time getting it right. With a little imagination, the hi-hats
can make all the difference.
Ride/ Crash Cymbals
Ride cymbals are often used instead of hi-hats, this is because they have
the same job in a standard beat. However, they can be used along side the
hi-hats so long as they musically work with each other. The ride cymbal
in the example is playing a simple clave rhythm, which basically sits at
the back of the beat. In many beats, the ride replaces the hi-hats so the
rhythm needs to be complimenting incase the hats drop out at any point.
The crash cymbal is generally used to signify the end of a bar or pattern
and this is the case in the example. The only crash in the beat is at the
end of bar 1. This is because too many crashes can be very overpowering.
The crash was placed in bar 1 as opposed to bar 2 to provide a contrast.
At the end of bar 2, there is a snare flourish and the two different ending
to the bars makes the beat more interesting.
Cowbell/ Bongo's
Now that the main beat has been written it is time think about filling the
beat up and making it appealing to the listener. This is what is known as
extra percussion. These parts of the pattern basically enhance the feel
of the beat and give it character. Although these "extra percussion"
parts are not as important as say the bass or snare, they can make the beat
come to life and stand out. The main thing to be aware of is not to go to
far, as a beat can just as easily be spoiled by extra percussion parts.
For the example the two chosen instruments were the cowbell and the bongo's.
Both of these have a very distinctive sound so you do need to be careful
not to make them to prominent in the beat. The cowbell was used very sparingly
due to the sharp, piercing nature of the sound so a quick three beats in
both the bars was all that was needed. This basically fills the piece a
bit more and adds to the funk/Latin feel of the beat.
The bongo drums have to be dealt with a little differently to the cowbell.
Unlike the cowbell the bongo's have a reasonably soft tone, so they can
be used to add another rhythm in the background without being to dominant.
In the example the bongo's play to a 16 beat rhythm but only play in short
blasts. This because if they are playing all the way through they may start
to draw the listener away from the main beat. It is easy to get carried
away and to over do it with the bongo's so it's best to be cautious.
