

| Programmer to ProgrammerTM | |||||
 |
|||||
|
|

|
||||
|
|
|
|
|
|
|
|
|
|
| |||||||||||||||||||
| The ASPToday
Article March 5, 2001 |
Previous
article - March 2, 2001 |
||||||||||||||||||||||||||||||
| |||||||||||||||||||||||||||||||
| ABSTRACT |
| ||||||||||||||||||||||||||||||
|
| |||||||||||||||||||||||||||||||
| Article Discussion | Rate this article | Related Links | Index Entries | ||||||||
| ARTICLE | |||||||||||
In any computer system, if you're passing information around between two or more parties, you have to assume that anyone can intercept and read your message. The question is: if someone does intercept your message, how do you ensure that it remains useless to them once they have it?
The answer is: Cryptography. As you're probably aware, this is the process of scrambling, or "encrypting", messages so only their intended recipients can read them. Various cryptographic algorithms have been around for the past thousand years or so, but today the most effective technique used in e-business is Public Key Infrastructure, or PKI.
All cryptography works using the principle of a key. Anyone who has access to the key is able to unlock, or decrypt the message. Imagine Faye wants to send Zoe this message:
Hi Zoe,

My credit card number is 4111 1111 1111 1111.

Cheers,
Faye
In order to send the message, Faye uses her key to scramble it. After scrambling, it might look something like this:
qANQR1DBw04D8Pda6dltTB4QEAD07PnEw+rgZpne71CqATu0PItq2s05AeAPSEOO
vjelfnBdnjGYbns71PGWUM1CE38kGCBYlcJjpVTphA5lD9AShdxIHZ0ea8xebSJP
l+sWyUXCJvgBOvyEV7SLVA1yAKIYE9N+LIN/9J8iX081NC6LFBGe5kM0gkTBBDAC
To get the message into that state, a mathematical operation is applied to each of the characters in the message in turn. Before encrypting the message Faye has gone away and created a "key". This key is used as part of the math operation, so in effect the message becomes dependant on the key. A key is usually a single number of a certain size - but we'll discuss this some more in a moment.
When Zoe receives the message, neither party knows for certain if the message has been intercepted. In order to unlock the message, Zoe needs her own copy of the key.
She then uses this same key in different mathematical operation, which again works on each character in the message in turn, this time reversing the original operation. Once this is done, she's able to read the message. The principle of cryptography is that only a single key can unlock the method. Using any other key results in the new message being just as meaningless as the first.
The complexity, or rather the "length" of the key determines the strength of the cryptography - a very short key is easier to crack than a very long key. A common way to break cryptography is to use a brute force method of simply trying every possible key.
Imagine you know that the key used in the encryption was only 8-bits in length. This means you know they key has to be a value between 0 and binary "11111111 ", or 255. To crack this key, you simply have to try and decrypt the message with every number between 0 and 255. Most modern computers can do this in a matter of seconds.
The longer the key, the less feasible this method becomes. A 16-bit key can contain a possible 65,536 separate values. A 32-bit key can contain a possible 4.2 billion values, and so on. The more values that have to be processed using this brute-force method, the longer it takes. Specifically, time increases exponentially with the length of the key.
Assuming you can process 16 keys a second, a 32-bit key will take 8.5 years to run through. (Of course, if you guess it on the second day, you're laughing!) Imagine how long a 2048-bit key would take to crack.
Today, common cryptography uses typically uses keys between 512- and 4,096-bits in length. Most people intercepting a message encrypted with this type of key will not attempt to use a brute-force method. Rather, they will try and obtain the key using theft or coercion.
In the method we've described so far, everything is dependant on a single key. If someone intercepting the message also has the key, your message is no longer secure. As well as making the key as long as possible, we have to limit the total number of keys that exist. If you have to share a key between many people, each one of those people becomes a security risk. (This is analogous to giving everyone you know keys to your house.)
Imagine again that Faye wants to e-mail Zoe. Faye has a key to encrypt to the message, but she doesn't want to give the key to Zoe. This happens to be the same key that Faye uses for other secure communications and giving it to Zoe (who she doesn't know very well) makes the key more vulnerable. As we've just implied, the more people who have the key, the less secure your communication is.
The solution to this problem is to split the key into two halves. One half is private and remains Faye's property. She guards this with her life and never lets anyone have it. The other half is public and, to show utter contempt to anyone who may wish to intercept her private communiqués this public key is distributed to as many people as possible. This is "public key infrastructure" encryption, or PKI.
PKI's trick is this: messages can be encrypted using a freely available public key, but can only be decrypted using a secure private key. Together, these two keys are known as a "key pair".
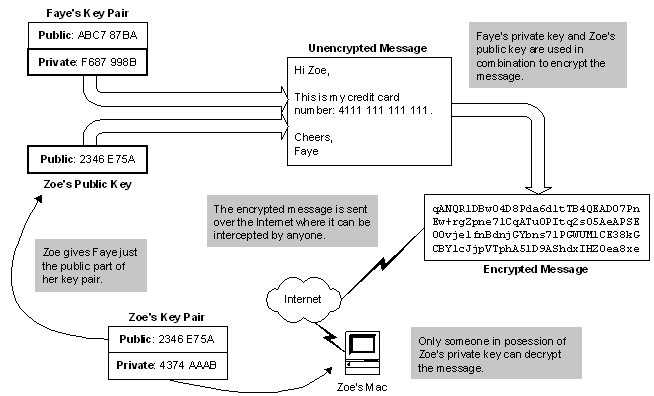
Imagine Faye wants to e-mail Zoe the message we saw before. To do this, Faye must first obtain Zoe's public key. This public key is a very-long prime number (of the order of 2,048-bits, which can hold up to 3x10[616] possible values). She then combines Zoe's public key with her private key, which again is a very long prime number. These two prime numbers multiplied together makes an absolutely vast prime number. (Using a brute-force method to guess this key would take several powerful computers several millennia to guess, by which time Faye would probably have got a new credit card!)
This new number is the key specifically for messages from Faye to Zoe and is used in the mathematical operation that actually encrypts the message. When Zoe receives the message, she uses her private key to perform the reverse operation and decrypt the message. This diagram illustrates the process:
One thing worth mentioning - it used to be the case that encryption software that used strong keys, developed in the United States could not be exported. This is no longer the case. The strong encryption technology used in browsers like Internet Explorer and Netscape along with dedicated encryption software can now be used internationally.
Secure Socket Layer, or SSL, is the de facto standard for secure communication over the Web. Using SSL, data that's passed between server and browser is encrypted using PKI techniques. That way, anyone intercepting packets as they move across the Internet cannot interpret their results. Using SSL is particularly important when transferring sensitive personal information, such as credit card numbers on an e-commerce site, portfolio data on share trading sites or statement information on banking sites.
To use SSL is a commercial setting, you need to obtain a certificate from a Certification Authority, or CA. This is an organization whose responsibility it is to distribute certificates to people who need them. In all cases, CAs perform checks on the organization to ensure they are legitimate. VeriSign is by far the largest CA offering services to e-business today. However, there are alternatives.
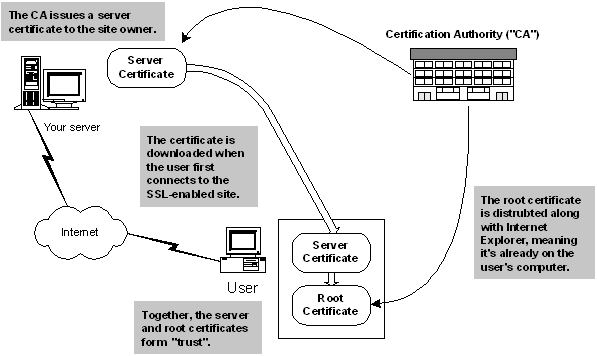
When a user connects to your site, they download a server certificate that you've obtained from a certification authority. The question is: how does the user know that the certificate has come from a trustworthy source?
The server certificate you place on your server is marked as having come from a specific CA. This "mark" matches one of the root certificates already on the user's computer. These root certificates are issued by the CA, but given to Microsoft to distribute with IE and Windows, and given to Netscape to distribute with their browsers. When a server certificate is downloaded to the user's computer, it is matched against a root certificate. If no match can be made, an error is flagged to the user indicating that the certificate may not be trustworthy. The user can then indicate whether she wants to continue using the site.
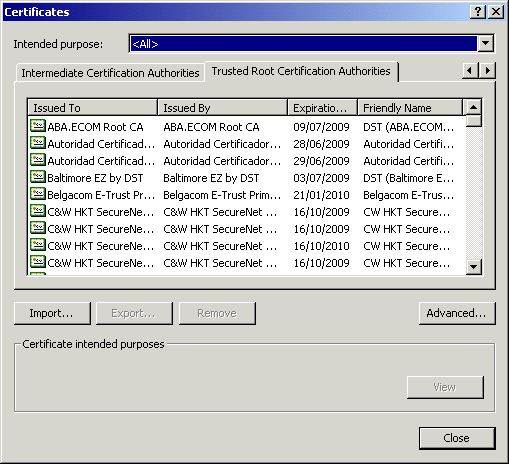
You can see which root certificates are installed on your computer from within Internet Explorer. Select Tools - Internet Options from the menu, then change to the Content tab and click the Certificates button.
SSL support has been built into IIS since version 3.0. In version IIS 5.0 (the one supplied with Windows 2000), a separate "key manager" application had to be used to configure the keys used on the server.
We're going to use VeriSign to obtain a test certificate for our server, although there is a number of CAs out there so shop around. (Although, to be fair VeriSign bought up another large CA called Thwate in the last year. For users in the UK, you may want to look at BT TrustWise at http://www.bttrustwise.com/?WROXEMPTOKEN=1093595ZMpxzDIBnVCbm1F822K - although they just resell VeriSign certificates.)
Before we can obtain a certificate, we need to get a certificate request issued by IIS. To do this, open the IIS management console and locate the web site you want to obtain the certificate for. Right-click and select the site's Properties. Change to the Directory Security tab and click Server Certificate.
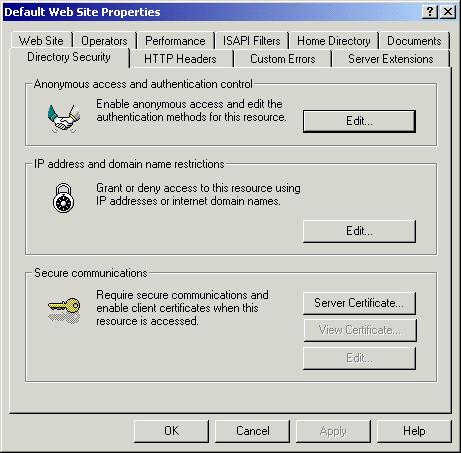
This will start the Web server certificate Wizard. Click Next to get off of the introductory page.
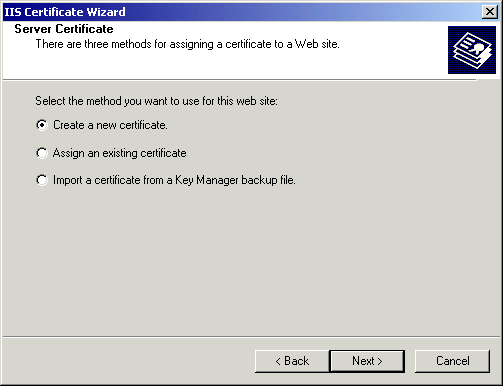
On the next page, make sure Create a new certificate is selected and click Next.
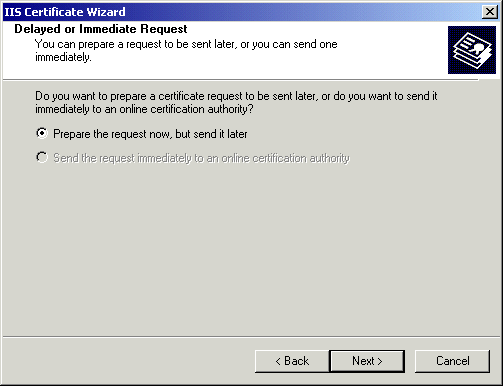
Next, you want to prepare the request now, but send it later, as shown here:
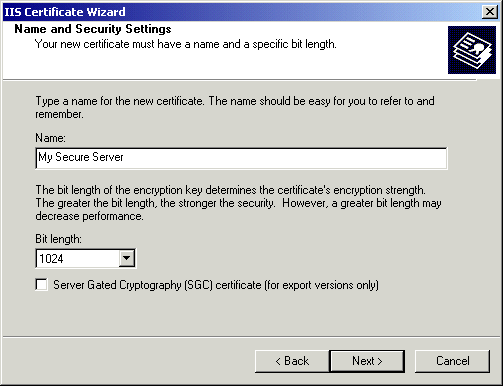
Next you must supply the name of the server and length of the key you want to use to secure the server with. The name you supply can be anything - it's not until later that you specify the DNS name of the server. For the bit-length, choose at least 1,024, but be aware that choosing higher values will decrease your server's performance. The shorter the key, the easier it is for the server to handle. However, 512-bit keys aren't very secure.
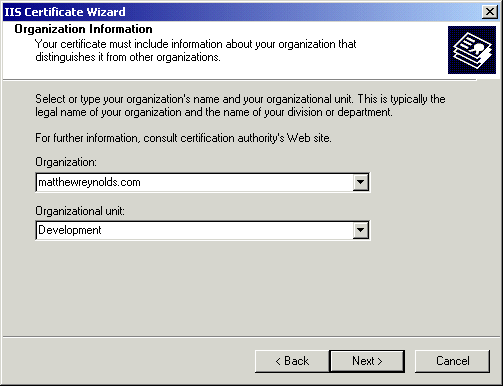
Next, enter your organization name and some identifier for the department making the request.
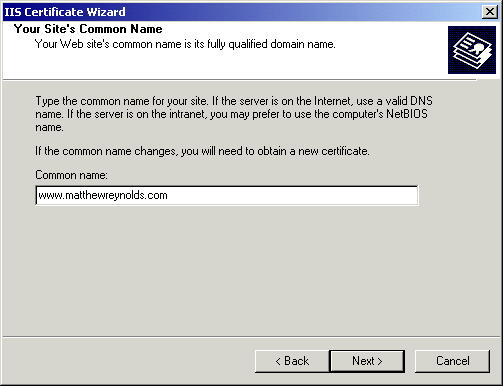
Next, you must enter the common name of the server. This is the name that user's will use to get to your server, so choose carefully. For example, if you enter just "matthewreynolds.com " here any user visiting the secure "www.matthewreynolds.com " will receive an error. Some people choose to create a "secure " subdomain, like this: "secure.matthewreynolds.com ". How you do it is completely up to you.
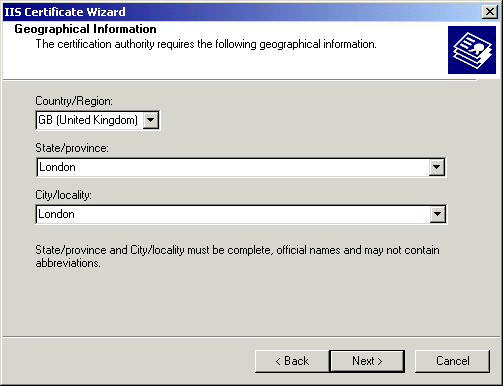
Finally you have to enter some geographic information:
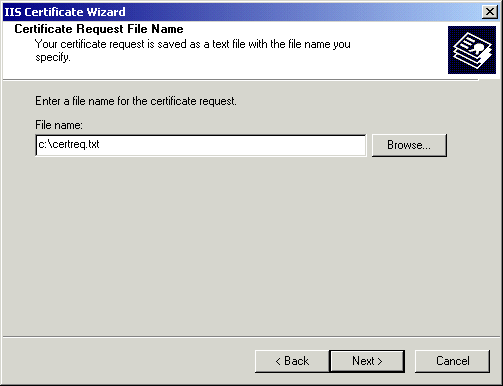
As the last stage, you have to supply a file name where you'd like the certificate to be saved.
To get your test certificate, visit http://www.verisign.com/products/site/index.html?WROXEMPTOKEN=1093595ZMpxzDIBnVCbm1F822K and locate the link that will allow you to "try" 128- or 40-bit SSL server IDs. You'll initially be asked to fill out some marketing information (and be warned - you will get a few e-mails from them over the coming months if you do this). Make sure, though, that you supply valid e-mail addresses throughout, as this is how you'll be receiving the certificate to install.
On the "Before you start " page, click Continue. This will bring you to the "Generate CSR " page, which we've already done, so click Continue again.
Next, we have to submit the file we created using the IIS Wizard. Browse to its location on your disk and double-click it. Copy out the contents and paste them into the form on the VeriSign site. Submit the form.
The site will now check the details in the certificate and present them to you on the site. It will also ask you to provide a technical contact, which in this case is you. Fill out the form and click Accept.
That's the last stage - and now you'll have to wait for VeriSign to e-mail the certificate through. It will take a few moments, so now is a good time to get yourself a coffee!
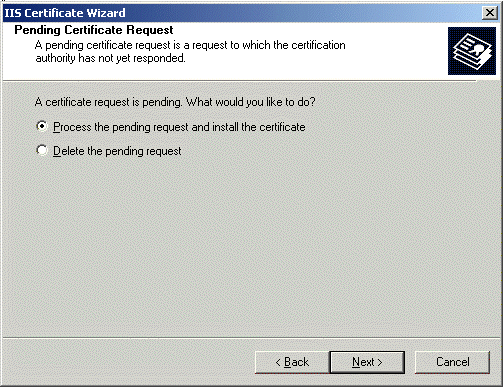
Once the certificate has been received, you need to go back into the IIS management console and open the Certificate Wizard again. This time, the Wizard will ask if you wish to "process the pending request":
For the next stage, copy the certificate out of the bottom of the e-mail and paste it into Notepad. Save the file somewhere on your machine. You need to get everything between the BEGIN CERTIFICATE and END CERTIFICATE directives, like this:
-----BEGIN CERTIFICATE-----
MIICbTCCAhcCEHSOXkLHvg8EvYTb7Ns2bv4wDQYJKoZIhvcNAQEEBQAwgakxFjAU
BgNVBAoTDVZlcmlTaWduLCBJbmMxRzBFBgNVBAsTPnd3dy52ZXJpc2lnbi5jb20v
cmVwb3NpdG9yeS9UZXN0Q1BTIEluY29ycC4gQnkgUmVmLiBMaWFiLiBMVEQuMUYw
RAYDVQQLEz1Gb3IgVmVyaVNpZ24gYXV0aG9yaXplZCB0ZXN0aW5nIG9ubHkuIE5v
IGFzc3VyYW5jZXMgKEMpVlMxOTk3MB4XDTAxMDEwMzAwMDAwMFoXDTAxMDExNzIz
NTk1OVowgYUxCzAJBgNVBAYTAkdCMQ8wDQYDVQQIEwZMb25kb24xDzANBgNVBAcU
BkxvbmRvbjEcMBoGA1UEChQTbWF0dGhld3JleW5vbGRzLmNvbTEUMBIGA1UECxQL
RGV2ZWxvcG1lbnQxIDAeBgNVBAMUF3d3dy5tYXR0aGV3cmV5bm9sZHMuY29tMIGf
MA0GCSqGSIb3DQEBAQUAA4GNADCBiQKBgQDdqN4NImB8rzvckQ1yBtOyTMB98Njd
+bW/hNuJnmZW3sND7IhbhfMaQm8A0EhYEDq4QXdWH2WSjemGUeNMnhiFkkogjhlS
+zW78nIsFIkGIc+eeNWfvT7Np7aOFkYZoz7AcHxjFC4rumuiMJB0X4y2pAki61nu
T2qiDhI+5/kYNQIDAQABMA0GCSqGSIb3DQEBBAUAA0EAnl0OijO9NkYvplgKkxvO
GvqU7pgbO2Nl1sFWIfs57toTKH5e/D1MwEyytJ3+Z/MkrsbwDf2qyXUW7eHCd2W4
zg==
-----END CERTIFICATE-----
Back on the Wizard, browse to the location of the file you just saved and click Next.
Next, the Wizard will confirm the information you just entered:
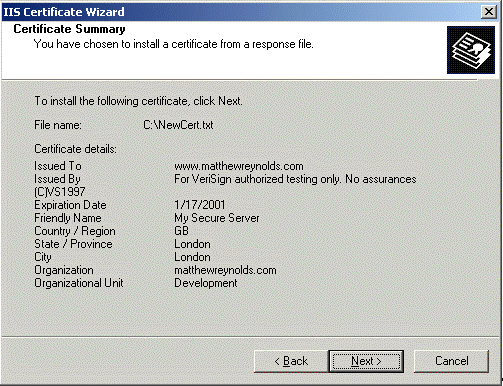
Before you can test the server to make sure it's working, you need to install the "Test CA Root " root certificate. This is used to indicate to IE that you trust any test certificates you download. This step needs to be repeated for each of the machines in your department you'll be using to test the certificate with.
To get the new root certificate, visit this page: http://digitalid.verisign.com/server/trial/trialStep4.htm?WROXEMPTOKEN=1093595ZMpxzDIBnVCbm1F822K. (If that link is inactive, follow the instructions in the e-mail that you received along with the certificate.)
After downloading the certificate, click the Install Certificate button:
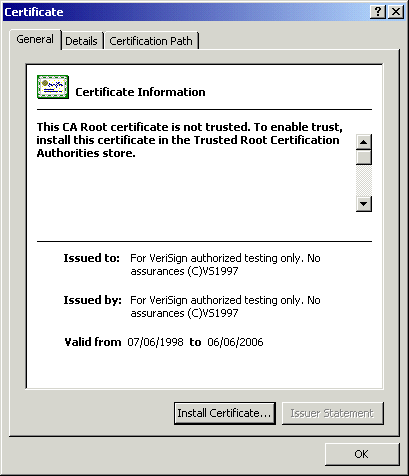
This will start the Certificate Import Wizard. Click Next through all of the pages, accepting the default options.
To test the server, simply navigate to the Web browser using the https directive, like this:
https://localhost/
This will, most likely, throw an error about the name of the site not matching that which the certificate was issued to. This isn't a problem in our case, so just click Yes.
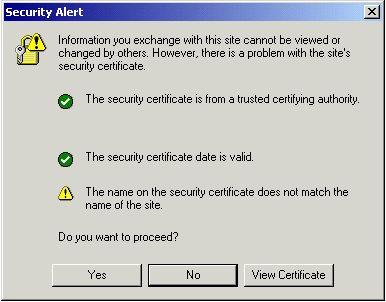
Now when you look at the page, you'll notice the familiar padlock icon on the status bar.
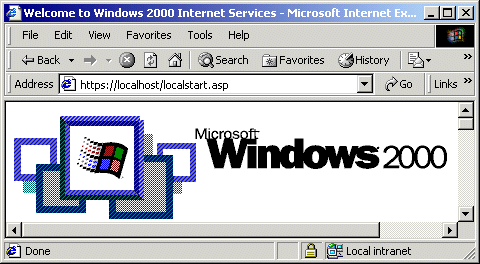
The way SSL has been implemented in IIS is very cool. That's literally all you have to do to get all of your content served over an encrypted connection!
One thing that's very important to grasp when using SSL is that processing a secure Web page is far harder than processing one that is not secure. The work IIS has to do to encrypt the page is considerable and, for this reason, don't go and make every page on your server secure. Be selective with what's important. For example, it's important to capture a user's password on a secure page, but inviting them to subscribe to an e-mail newsletter is not.
So far, we've looked at SSL as a method for securely transmitting Web pages for online banking, share trading and the like. However, SSL is equally handy for secure transmission of XML.
Imagine you have an XML page on your server that looks like this:
<books>
   <book>
      <title>Beginning PGP 4.0</title>
      <isbn>1861003730</isbn>
   </book>
   <book>
      <title>XML IE5 Programmer's Reference</title>
      <isbn>1861001576</isbn>
   </book>
</books>
We don't have to do any work at all to get this page working over SSL:
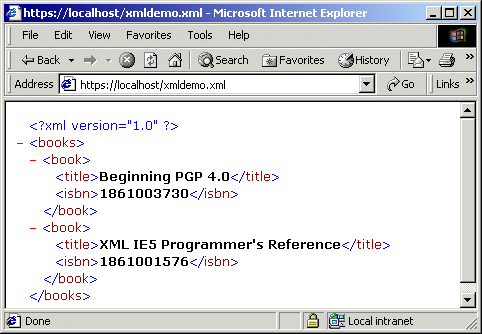
So we know we can pass XML data over SSL very easily, but how do we ensure that the data can only be accessed over SSL? Well, to do this we simply have to convert the XML page to an ASP page and perform a check to make sure the page is running securely.
We can discover if the page is secure using the HTTPS server variable. Remember, though, that we need to use the Response.ContentType method to tell the client that it's receiving XML data. Here's the code:
<%
   ' set the content type...
   Response.Buffer = True
   Response.ContentType = "text/xml"

   ' are we secure?
   If Request.ServerVariables("https") = "on" Then
%>

<books>
   <book>
      <title>Beginning PGP 4.0</title>
      <isbn>1861003730</isbn>
   </book>
   <book>
      <title>XML IE5 Programmer's Reference</title>
      <isbn>1861001576</isbn>
   </book>
</books>

<% Else

      ' render a link to the secure page...
      Response.ContentType = "text/html"
      Response.Write "<a href="""
      Response.Write "https://" & _
                  Request.ServerVariables("server_name") & _
                  Request.ServerVariables("script_name")
      Response.Write """>Visit the secure page</a>"

      End If %>
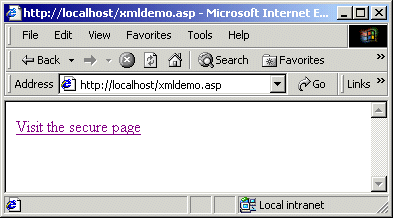
Now if the "https " variable is set "on ", we can display the XML data as normal. Otherwise, we render a link back to the secure page:
I hope this article has provided you with a useful in-depth look at cryptography, and it's uses in web-security. As you will agree, it really is quite easy to implement a secure site by following simple steps like those detailed above. For more information, take a look around the Verisign website.
|
| |||||||
| |||||||||||||||
|
| ASPToday is brought to you by
Wrox Press (http://www.wrox.com/). Please see our terms
and conditions and privacy
policy. ASPToday is optimised for Microsoft Internet Explorer 5 browsers. Please report any website problems to [email protected]. Copyright © 2001 Wrox Press. All Rights Reserved. |