
| Programmer to ProgrammerTM | |||||
 |
|||||
|
|

|
||||
|
|
|
|
|
|
|
|
|
|
| |||||||||||||||||||
| The ASPToday
Article February 23, 2001 |
Previous
article - February 22, 2001 |
||||||||||||||||||||||||||||||
| |||||||||||||||||||||||||||||||
| ABSTRACT |
| ||||||||||||||||||||||||||||||
|
| |||||||||||||||||||||||||||||||
| Article Discussion | Rate this article | Related Links | Index Entries | ||||||||
| ARTICLE | |||||||||||
Most HTML controls such as text boxes, option buttons, tables, labels etc can be bound to a single data element in an XML data source. This is made easy because these controls have only one item of data to display, but things are not quite so easy with list boxes because they contain many possible data values, from which the user will select one. Most sample code and articles skirt round this by hard coding the possible values into the HTML code. This article explains how to read a series of values from an XML source and to make one of them the selected item using a variety of techniques including XSL and JavaScript. It also covers a number of general issues and techniques for binding XML data to HTML controls. This is then developed further to explain how to implement linked list boxes (where clicking one list box updates the contents of the other) without costly round trips to the server. The emphasis is on using XML, XSL and HTML in the browser to create a dynamic screen without having to refresh data each time from the server.
You have probably visited one of those websites where you've clicked on a list box of options and ended up waiting an age for the screen to update itself. You then realize that you selected the wrong option, or just want to see all the options available and end up getting frustrated and giving up altogether. Of course, the reason for the large delay is that the page has been designed so that it has to go back to the server to get the new page, which all takes time. Quite possibly the page was developed on an internal web server with one connection, where response times were not an issue.
Developers have recognized this problem and implemented client side code wherever possible to avoid costly round trips to the server. A specific problem is the case of two linked list boxes, where changing the contents of one list box (the parent list) updates the contents of the other (the child list). One way that this has been resolved in the past has been to query the database in a VB component or ASP page to return an ADO recordset. This data is then converted to the text necessary to create a JavaScript array on the client. Further JavaScript is written to handle the array and the whole lot is written to the client using Response.Write . This method involves quite a bit of code and reformatting of the data into an array. Fortunately XML provides a way of handling this situation without changing the data, and with minimal code.
This article explains various ways of populating list boxes with XML, and focuses on client side XML using Internet Explorer 5.0. Later versions of Netscape 6 are due to support XML and XSL (at the time of writing previous versions of this browser does not have sufficient XML support for all of the features outlined here). See reference 1 for further details of XML support in different versions of Netscape Navigator and Internet Explorer. This article starts off by showing how to populate a single list box and then moves on to show how to update the contents of the screen based on which list box item the user clicked, using client side processing only.
It is important to note that as with all solutions using XML the techniques outlined here are ideal for intranet and extranet sites where the target browser can be defined. For Internet sites where the target browser may not support XML, an alternative strategy is required so that web content can still be viewed in non-XML browsers. This is outside of the scope of this article, but the usual solution is to test for the target browser type and version and if necessary process the merging of XML and HTML on the server before submitting the page to the client. For further details refer to "TO write code to test which browser is currently in use" - http://www.asp101.com/articles/wrox/3218/32180402.asp?WROXEMPTOKEN=843862ZBoNohrGyCUTYnXvRdkz
For clarity, in the entire sample code in this article, the XML data source has been embedded into the asp page, though there is no reason why the XML data source couldn't be external to the HTML. In practice the chances are that the XML data will be retrieved from a database. For further details of how to retrieve XML data from a database using ADO, take a look at "To access data from a database in XML using an ADO data source":
Most introductory articles on using XML in ASP pages show you how to populate various controls with data from a separate XML data source using the built in facilities in IE5 to bind the data on the browser. To bind data you would use code like this:
<HTML>
<HEAD>
   <TITLE>XML List Boxes 1</TITLE>
</HEAD>

<BODY BGCOLOR="#dedeee">
<!-- This demo shows how an XML Data Island can be merged
with HTML on the browser using IE5
Julian Watson, www.EurodataComputing.co.uk. Feb 2001 -->

<!-- XML Data Island -->
<XML ID="xmlRecipients">
<?xml version="1.0" ?>
<recipientlist>
   <recipient>
      <name>Fred Bloggs</name>
      <address1>Company Ltd</address1>
      <address2>The Business Park</address2>
      <address3>Dublin</address3>
   </recipient>
</recipientlist>
</XML>

<!-- HTML -->
<FONT face="Arial">
<TABLE DATASRC="#xmlRecipients">
   <TR>
      <TD>Name  </TD>
      <TD><SPAN DATAFLD="name"></SPAN></TD>
   </TR>
   <TR>
      <TD>Address 1  </TD>
      <TD><INPUT DATAFLD="address1"></INPUT></TD>
   </TR>
   <TR>
      <TD>Address 2</TD>
      <TD><INPUT DATAFLD="address2"></INPUT></TD>
   </TR>
   <TR>
      <TD>Address 3</TD>
      <TD><INPUT DATAFLD="address3"></INPUT></TD>
   </TR>
   <TR>
      <TD>Address 3</TD>
      <TD>
      <SELECT DATAFLD="address3">
         <OPTION value="Kilkenny">Kilkenny</OPTION>
         <OPTION value="Dublin">Dublin</OPTION>
         <OPTION value="Cork">Cork</OPTION>
         <OPTION value="Limerick">Limerick</OPTION>
      </SELECT>
      </TD>
   </TR>
</TABLE>
</FONT>
</BODY>
</HTML>
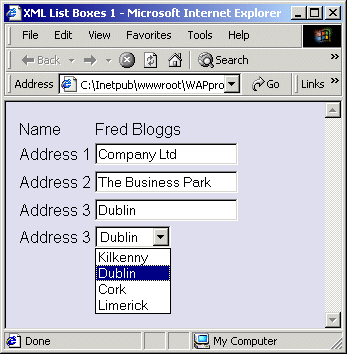
The code contains an area of XML data (known as a 'Data Island') and the rest is standard HTML with a couple of new attributes - DATASRC and DATAFLD . The DATASRC specifies the XML Data Island to be used (we could have more than one) and then the individual fields are bound to a data item using DATAFLD .
The results can be seen here:

There's nothing special about this code, and most introductory articles on XML include a variation on this sample. The DATAFLD attribute can be used for other HTML controls too - there are, however, a couple of interesting points to take note of:
You may also have noticed that the values in the list box have been hard-coded into the HTML - only the selected value is obtained from the XML data. This is not very good practice as we are blurring the distinction between data and presentation code - one of the stated benefits of XML! Unfortunately, data binding in this way does not allow the elements of a list box to be populated from an XML data source. However, help is at hand and we can use a couple of XML based techniques for populating these values.
The first uses JavaScript code on the client to loop around the recordset populating the list box. The second technique uses XSL.
We can use some client side JavaScript to populate the list box from an XML data source. There are now two data sources, one for the list of possible values for the list box and the other for the list box value to be selected. The JavaScript loops around the xmlCity data source adding each data item to the list box. It also sets the selected item in the list box using the address3 data item in the xmlRecipient data source.
<HTML>
<HEAD>
   <TITLE>XML List Boxes 2</TITLE>
</HEAD>
<BODY BGCOLOR="#dedeee">

<!-- This demo is the same as XML List Boxes 1 except that it
uses JavaScript to populate the list box rather than
values hardcoded into the HTML
Julian Watson, www.EurodataComputing.co.uk. Feb 2001 -->

<!-- XML Data Island -->
<?xml version="1.0" ?>
<XML ID="xmlRecipients">
<recipientlist>
   <recipient>
      <name>Fred Bloggs</name>
      <address1>Company Ltd</address1>
      <address2>The Business Park</address2>
      <address3>Dublin</address3>
   </recipient>
</recipientlist>
</XML>

<XML ID="xmlCity">
<citylist>
   <city name="Kilkenny">
   </city>
   <city name="Dublin">
   </city>
   <city name="Cork">
   </city>
   <city name="Limerick">
   </city>
</citylist>

</XML>
<!-- HTML -->
<FORM>
<FONT face="Arial">
<TABLE DATASRC="#xmlRecipients">
   <TR>
      <TD>Name  </TD>
      <TD><SPAN DATAFLD="name"></SPAN></TD>
   </TR>
   <TR>
      <TD>Address 1  </TD>
      <TD><INPUT DATAFLD="address1" id=text1 name=text1></INPUT></TD>
   </TR>
   <TR>
      <TD>Address 2</TD>
      <TD><INPUT DATAFLD="address2" id=text2 name=text2></INPUT></TD>
   </TR>
   <TR>
      <TD>Address 3</TD>
      <TD><SELECT id="CityList" name="CityList"></SELECT>
   </TD>
   </TR>
</TABLE>
</FONT>
</FORM>

<!-- JavaScript -->
<SCRIPT>
function Initialise()
{
// populate the listbox. This JavaScript
// is automatically run when the page is first displayed
recCity=xmlCity.recordset;
recSelected=xmlRecipients.recordset;
objCityList=document.forms[0].CityList;
objCityList.options.length=0;

// step through the recordset populating the list box
while (!recCity.EOF)
   {
   objCityList.length++;
   objCityList.options[objCityList.length-1].text=recCity.fields("name").value;
   if (recSelected.fields("address3")==recCity.fields("name").value)
      objCityList.options[objCityList.length-1].selected=true;
   recCity.moveNext();
   }
}

Initialise();

</SCRIPT>

</BODY>
</HTML>
The example above is useful for demonstrating how XML data can be navigated using traditional ADO recordset type commands. However, a list box can also be populated using an XSL transformation which gives a rather more elegant and succinct solution to this requirement. The code is shown below:
<HTML>
<HEAD>
<TITLE>XML List Boxes 3</TITLE>
</HEAD>
<BODY BGCOLOR="#dedeee">

<!-- This demo shows how a list box can be populated from an
XML Data Island using an XSL style sheet.
Julian Watson, www.EurodataComputing.co.uk. Feb 2001 -->

<?xml version='1.0' ?>
<XML ID='xmlDataSource'>
<SQL>
   <ITEM>Salmon</ITEM>
   <ITEM>Mackerel</ITEM>
   <ITEM>Tuna</ITEM>
   <ITEM>Cod</ITEM>
</SQL>
</XML>

<?xml version='1.0' ?>
<XML ID="xslSelectOptionsList">
   <xsl:stylesheet xmlns:xsl="http://www.w3.org/TR/WD-xsl">
      <xsl:template match="/">
      <SELECT id='optFish' name='optFish'>
         <xsl:for-each select="SQL/ITEM">
            <OPTION><xsl:value-of/></OPTION>
         </xsl:for-each>
      </SELECT>
      </xsl:template>
   </xsl:stylesheet>
</XML>

<TABLE>
   <TR>
      <TD class=right>Fish     </TD>
      <TD class=left><DIV id="optFish" name="optFish" ></DIV></TD>
  </TR>
</TABLE>

<SCRIPT>
function Initialise()
{
optFish.innerHTML = xmlDataSource.transformNode(xslSelectOptionsList.XMLDocument);
}

Initialise();

</SCRIPT>

</BODY>
</HTML>
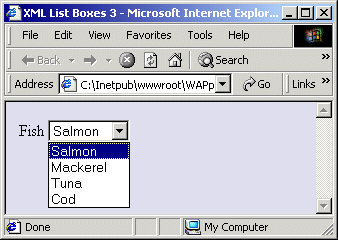
Here we have standard HTML, an XML data source, some XSL, and a small amount of JavaScript. The <DIV> tags in HTML define an area on the screen, which we can then refer to in JavaScript. The single line of JavaScript simply binds the XML and XSL to create the list box.
The result looks like this:

A common requirement on a web page is to have two list boxes that are linked - changing the selected item in the first list box updates the contents of the other. An example of this is a cinema booking page, where the user selects a particular film from a list box. In the next list box is a list of the start times. The two are linked in a hierarchical (parent-child) format - different films will have different start times.
The old way of doing this would be either to submit the form back to the server every time the first list box was clicked or to reformat the data into a JavaScript array and add some specific client side processing. Neither is particularly satisfactory, but fortunately there is an easy solution using JavaScript to populate the list box using the native XML data without conversion into arrays.
The code is shown below and is an extension of the code for the single list box in a previous section:
<HTML>
<HEAD>
   <TITLE>XML List Boxes 4</TITLE>
</HEAD>

<BODY BGCOLOR="#dedeee">

<!-- This demo shows how two list boxes can be linked using an XML data
source with HTML on the browser using IE5. Clicking on one list box updates
the contents of the other without having to go back to the server.
Uses JavaScript on the client.
Julian Watson, www.EurodataComputing.co.uk. Feb 2001 -->

<!-- XML Data Island -->
<?xml version="1.0" ?>

<XML ID="xmlDataSource">
<foodlist>
<fooditem>
   <name>Nuts</name>
   <foodtype>
      <food>Peanuts</food>
   </foodtype>
   <foodtype>
      <food>Cashew Nuts</food>
   </foodtype>
   <foodtype>
      <food>Coconuts</food>
   </foodtype>
   <foodtype>
      <food>Hazelnuts</food>
   </foodtype>
</fooditem>
<fooditem>
   <name>Drinks</name>
   <foodtype>
      <food>Tea</food>
   </foodtype>
   <foodtype>
      <food>Coffee</food>
   </foodtype>
   <foodtype>
      <food>Water</food>
   </foodtype>
</fooditem>
<fooditem>
      <name>Salad Dressings</name>
   <foodtype>
      <food>Balsamic Vinaigrette</food>
   </foodtype>
   <foodtype>
      <food>Caesar</food>
   </foodtype>
   <foodtype>
      <food>Thousand Island</food>
   </foodtype>
   <foodtype>
      <food>Mayonnaise</food>
   </foodtype>
   <foodtype>
      <food>Salad Cream</food>
   </foodtype>
</fooditem>
<fooditem>
      <name>Salads</name>
   <foodtype>
      <food>Waldorf</food>
   </foodtype>
</fooditem>
<fooditem>
   <name>Chocolate</name>
   <foodtype>
      <food>Milk</food>
   </foodtype>
   <foodtype>
      <food>Plain</food>
   </foodtype>
   <foodtype>
      <food>White</food>
   </foodtype>
   <foodtype>
      <food>Fruit</food>
   </foodtype>
</fooditem>
</foodlist>
</XML>

<!-- HTML -->
<FONT face="Arial">

<TABLE>
<TR>
   <td><select id="ParentList" name="ParentList" onClick="ProcessParentListClick()"></select></td>
</tr>
<TR>
   <td><select id="ChildList" name="ChildList"></select></td>
</tr>
</TABLE>

</FONT>

<!-- JavaScript -->
<SCRIPT>

function Initialise()
{
// populate the two listboxes
recParent=xmlDataSource.recordset;
ParentList.options.length=0;

// step through the recordset populating the parent (first) list box
while (!recParent.EOF)
   {
   ParentList.length++;
   ParentList.options[ParentList.length-1].text=recParent.fields("name").value;
   recParent.moveNext();
   }
// populate the child list box
ProcessParentListClick();
}

function ProcessParentListClick()
{
// search through the parent recordset to find the correct child recordset
recParent.MoveFirst();
bFound=false;
while (!recParent.EOF && !bFound)
   {
   bFound = (recParent.fields("name").value == ParentList.options[ParentList.options.selectedIndex].text);
   if (!bFound)
      recParent.MoveNext();
   }

// now populate the child recordset
if (bFound)
   {
   // get the appropriate child recordset
   recChild=recParent.fields("foodtype").value;
   recChild.MoveFirst();
   ChildList.length=0;
   // populate the child (second) listbox
   while (!recChild.EOF)
      {
      ChildList.length++;
      ChildList.options[ChildList.length-1].text=recChild.fields("food").value;
      recChild.movenext();
      }
   }
}

Initialise();

</SCRIPT>
</BODY>
</HTML>
The first thing to notice is that the XML is now hierarchical. There are a number of fooditems each of which has a number of foodtypes . The XML data would typically have been obtained from two tables in a database with a one-to-many relationship. The hierarchy of the tables can be shown diagrammatically:

The HTML simply contains a table with two list boxes. The first one has an onClick function defined for it. At the bottom of the code are two blocks of JavaScript. The first block is not contained in a function so gets called when the page is first displayed and the second block is the OnClickonClick function.
You can see from the code that XML can be treated just like an ADO recordset using familiar MoveNext , MoveLast , EOF , BOF functions etc. The first block of code defines the recordset and then loops through it adding an extra item to the list box and setting it to the appropriate value. Finally it calls the onClick function to populate the child list box with an initial set of values.
The onClick function is slightly more complicated. It loops through the recordset until if finds a match with the currently selected item from the list box. Once found it accesses the appropriate child recordset and iterates through that to populate the child list box.
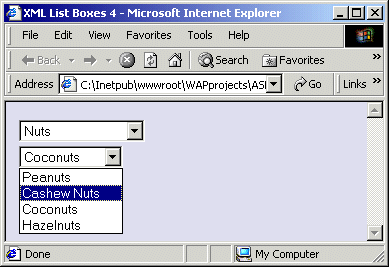
The result is displayed below. Clicking on Nuts in the first list box displays all types of nut in the second list box.

As you might have guessed, it's also possible to achieve linked list functionality using an XSL transformation rather than iterating through recordsets using JavaScript.
The code for this is below:
<HTML>
<HEAD>
   <TITLE>XML List Boxes 5</TITLE>
</HEAD>

<BODY BGCOLOR="#dedeee">

<!-- This demo shows how two list boxes can be linked using an XML data
source with HTML on the browser using IE5. Clicking on one list box updates
the contents of the other without having to go back to the server.
Uses JavaScript on the client.
This is the same as XML List Boxes 4 except that it uses XSL to navigate the
XML recordsets rather than JavaScript.
Julian Watson, www.EurodataComputing.co.uk. Feb 2001 -->

<!-- XML Data Island -->
<?xml version="1.0" ?>

<XML ID="xmlDataSource">
<foodlist>
<fooditem>
   <name>Nuts</name>
   <foodtype>
      <food>Peanuts</food>
   </foodtype>
.
[same as XML in previous section]
.

</foodlist>
</XML>

<XML ID="xmlParentSelectOptions">
   <xsl:stylesheet xmlns:xsl="http://www.w3.org/TR/WD-xsl">
      <xsl:template match="/">
      <SELECT id='ParentList' name='ParentList' OnChange = "ParentList_onchange()">
         <xsl:for-each select=".//fooditem/name">
            <OPTION><xsl:value-of/></OPTION>
         </xsl:for-each>
      </SELECT>
      </xsl:template>
   </xsl:stylesheet>
</XML>

<XML ID="xmlSelectOptions">
   <xsl:stylesheet xmlns:xsl="http://www.w3.org/TR/WD-xsl">
      <xsl:template match="fooditem">
      <SELECT id='ChildList' name='ChildList'>
         <xsl:for-each select=".//food">
            <OPTION><xsl:value-of/></OPTION>
         </xsl:for-each>
      </SELECT>
      </xsl:template>
   </xsl:stylesheet>
</XML>

<!-- HTML -->
<FONT face="Arial">
<TABLE>
<TR>
   <td><DIV id=ParentArea name=ParentArea></DIV></td>
</tr>
<TR>
   <td><DIV id=ChildArea name=ChildArea></DIV>
</td>
</tr>
</TABLE>
</FONT>

<!-- JavaScript -->
<SCRIPT>
function Initialise()
{
ParentArea.innerHTML = xmlDataSource.documentElement.selectSingleNode("/").transformNode(xmlParentSelectOptions.XMLDocument);
ChildArea.innerHTML = xmlDataSource.documentElement.selectSingleNode("fooditem").transformNode(xmlSelectOptions.XMLDocument);
}

function ParentList_onchange()
{
sSelect = "fooditem[name = '" + ParentList.options(ParentList.selectedIndex).text + "']";
ChildArea.innerHTML = xmlDataSource.documentElement.selectSingleNode(sSelect).transformNode(xmlSelectOptions.XMLDocument);
}

Initialise();

</SCRIPT>

</BODY>
</HTML>
The XML is the same as before (so has not been completely reproduced), but there are now two blocks of XSL, which are used to populate each of the two list boxes. Like the JavaScript method in the previous section there are two procedures, which perform a similar function - though rather more succinctly. The first procedure gets run when the form is first displayed and contains two lines. Each line simply invokes the two XSL blocks, which generate the two list boxes from the XML data. The second block is a function, which gets called every time the parent (first) list box is called. It re-applies the second block of XSL to repopulate the second list box based on the new contents of the first.
Note that the HTML does not contain any references to list boxes at all, instead it has two DIV areas. The DIV tags have a label associated with them and this provides a means for referring to those areas in the JavaScript.
The screen has not been reproduced here, as it will look exactly the same as in the last section.
The five samples in the article can be downloaded and run in Internet Explorer 5. Note that they are html files and because they contain only client side code a webserver is not required. Simply save them on disk and double click on the file to load it and process the code for display in your browser.
|
| |||||||
| |||||||||||||||
|
| ASPToday is brought to you by
Wrox Press (http://www.wrox.com/). Please see our terms
and conditions and privacy
policy. ASPToday is optimised for Microsoft Internet Explorer 5 browsers. Please report any website problems to [email protected]. Copyright © 2001 Wrox Press. All Rights Reserved. |