Scenario NBI: The Battle of Fuentes des Onoro
(by Richard Brooks)
1.0 Fuentes des Onoro May 5 1811: Attempting to relieve the siege of Alameda and
free General Brenier and his 3000 men, French Marshal Massena has decided to attack again
today, despite yesterday's bloody repulse at Fuentes des Onoro.
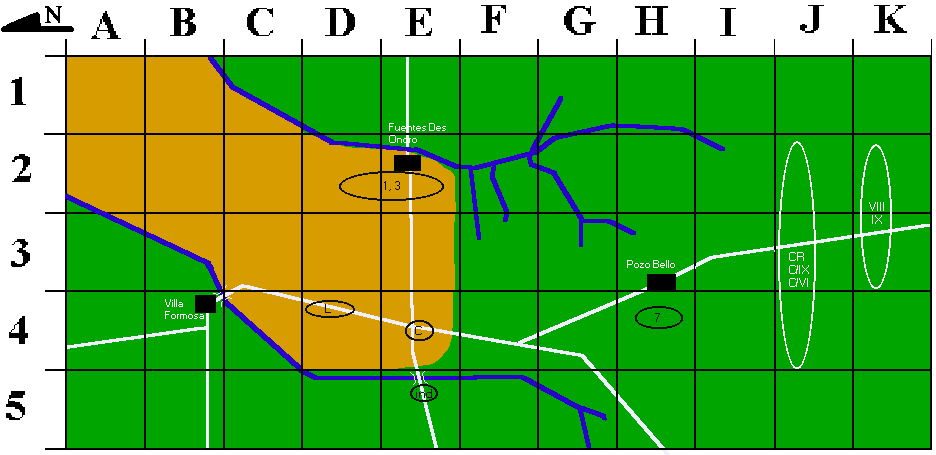
Map Notes:
1.1 Fuentes des Onoro has a "+3" Combat Modifier and is
also Fortified, all other buildings are "+2". Fuentes des Onoro and Villa
Formosa can hold 4 infantry bases plus 1 Artillery base, Pozo Bello can only hold two
Infantry bases.
1.2 Both the Dos Casas (the eastern most) and Turones rivers (the
west one) are unfordable and may only be crossed at bridges or fords (by units in
limbered, column or march column formations).
1.3 Order of Battle for Fuentes des Onoro:
- (3) Allied Army: [9M]
- Wellington: 17" G (10) +3D
|
- (3) French Army of Portugal: [10M]
- Massena: 14" E (10) +2
|
- Independent Brigade (________)
- 1B/Ind 20 PtLN [10D]
|
- (2) VI Corps: Loison 8" G (6) +0 [3/5F]
|
- (1) 1st Division VI Corps: Marchand 3" A (5) +0
- 1B/1/VI 20 FrLT [10D],
- 2B/1/VI 20 FrLN [10D]
|
- (1) 1st Division: Spencer 4" A (5) +0 [2F]
- 1B/1 16 BrLN [6D],
- 2B/1 16 BrLN [6D],
- 3B/1 16 BrLN [6D],
- 4B/1 16 BrLN [6D]
|
- (1) 2nd Division VI Corps: Mermet 4" A (6) +0
- 1B/2/VI 16 FrLN [8D],
- 2B/2/VI 20 FrLN [10D],
- 3B/2/VI 20 FrLN [10D]
|
- (1) 3rd Division: Picton 5" E (8) +2 [2F]
- 1B/3 16 BrLN [6D],
- 2B/3 16 BrLN [6D],
- 3B/3 16 PtLN [8D]
|
- (1) 3rd Division VI Corps: Ferey 4" G (8) +0 [1F]
- 1B/3/VI 20 FrLN [10D],
- 2B/3/VI 16 FrLN [8D]
|
- (1) 7th Division: Houston 4" A (6) +0 [1F]
- 1B/7 20 BrLN [8D],
- 2B/7 20 PtLN [10D]
|
- (1) Cavalry VI Corps: Lamotte 3" A (6) +0 [1F]
- 1B/C/VI 12 FrLC [5D]
-
-
|
- (1) Light Division: Crafurd 5" E (8) +2 [1F]
- 1B/L 16 BrLT [6D],
- 1B/L 16 BrLT [6D]
|
- VI corps Artillery
-
- VI Fr 4# (4 guns),
- VI Fr 4# (4 guns)
-
-
|
- (1) Cavalry Division: Lumley 3" G (7) +1 [1F]
- 1B/C 12 BrC [5D],
- 2B/C 12 BrC [5D]
|
- (2) VIII Corps: Junot 9" G (7) +0 [1F]
|
- (1) 1st Division VIII Corps: Soginac 6" A (6) +1
- 1B/1/VIII 20 FrLN [10D],
- 2B/1/VIII 20 FrLN [10D]
|
- Army Artillery
-
- Br 6#,
- Br 6#,
- Br 6#,
- Br 6#,
- Br 6#,
- Br 6#
-
-
-
-
-
-
-
-
-
-
-
-
-
-
-
-
-
-
-
-
-
-
-
-
-
-
-
-
-
-
-
-
-
-
-
-
-
-
-
-
-
-
|
- VIII corps Artillery
-
- VIII Fr 4# (4 guns),
- VIII Fr 4# (4 guns),
|
- (2) IX Corps D'Erlon 9" G (6) +1 [3F]
|
- (1) 1st Division IX Corps: Claperede 4" G (7) +1
- 1B/1/IX 16 FrLT [8D],
- 2B/1/IX 20 FrLN [10D]
|
- (1) 2nd Division IX Corps: Conroux 3" A (5) +0
- 1B/2/IX 24 FrLN [12D],
- 2B/2/IX 24 FrLN [12D]
|
- (1) Cavalry IX Corps: Fournier 4" A (5) +0
- 1B/C/IX 12 FrLC [5D]
|
- IX Corps Artillery
-
- IX Fr 4# (4 guns),
- IX Fr 4# (4 guns)
|
- (2) Cavalry reserve: Montbrun 4" E (8) +2 [2F] *
- 1B/CR 12 FrLC [5D],
- 2B/CR 12 FrLC [5D]
|
- French Army Artillery
-
- FAP Fr 4# (4 guns),
- FAP Fr 4# (4 guns),
- FAP Fr 4# (4 guns)
|
* Montbrun can command all French Cavalry
1.4 Game Length/Sequence: 0700-1330 hrs (15 Turns). The British
set up first, The French are the First Side.
- 1.5 Massena must decide PRIOR to British setup
where he will commit the VI Corps' 3rd and Cavalry divisions if with VI corps or the
remainder of the French forces. If they enter with VI corps Loisin has a fatigue of 5 if
not he has a fatigue of 3 and the 3rd and cavalry divisions have a fatigue of 1 each and
are under the direct command of Massena, if they opt to be with the rest of the French
army the cavalry brigade setups with with the cavalry and the 3rd division is with the VII
and IX corps in K2 or K3
- 1.51. The British player MUST have a detachment of two infantry
bases (from the Seventh Division) in Pozo Bello at the start of scenario, and he MAY have
garrison of 4 infantry bases in Fuentes des Onoro. All british units must be facing to the
east at scenario start.
-
- 1.6 Reinforcements: Massena must decide before
British setup if VI corps will attempt to enter on turns 1, 2 , 3, 4, 5 or 6. It enters
deployed into any or all of areas D1, E1 or F1. (The Designer
suggests that it come no earlier than turn 4, if it does it usually gets severely damaged
before the rest of the army attacks the plateau, but the decision is up to Massena.)
- 1.6.1. If you only have a 9x5' table the
french cavalry enter along the South edge on turn 1 deployed into area I2,I3 and/or I4,
while the Infantry and Massena enter on turn 2 deployed into area I2 and/or I3.
1.7 Options: The French start with the Initative, Both sides get
6 Free Rolls.
1.8 Special Rules: No British unit except for
the Light Division may attempt to Force March or and no unit either side may Voluntarily
Rout prior to turn 4.
1.9 Victory Points:
| Location |
British |
French |
| Pozo Bello |
40 |
25 |
| Fuentes des Onoro |
110 |
65 |
| Bridge B4 |
75 |
50 |
| Bridge E5 |
90 |
55 |
| Crossroads E4 |
100 |
65 |
| Road End H5 |
25 |
15 |
1.10 Historical Fuentes des Onoro: Mistakenly believing that
Massena would again make a frontal assault Wellington kept the bulk of his forces in and
behind the town of Fuentes des Onoro, with the newly arrived seventh division on his
right, to guard against a diversionary attack from that area. Marshal Massena had realized
he could not take the town by direct action alone and being informed of how far the
seventh was from the bulk of Wellington's army decided to drive into the gap between the
two destroy the seventh, then launch another direct assault on Fuenters des Onoro while
also sweeping North and West from Pozo Bello taking all the bridges over the Turones
driving the British up to Alameda (which Brennier was holding) then crush them against the
bend of the Coa River.
The attack started on time and the garrison of Pozo Bello was quickly destroyed,
and it seemed the outnumbered and unsupported Seventh would soon follow but the Light
Division quickly arrived and was able to extract the Seventh from its predicament, the
British Cavalry was also extremely well handled this day, whereas the French was not.
Fuentes des Onoro traded hands several times but in the end was still British. Having
failed to achieve much so far, Massena was content to let the battle dissolve into an
artillery duel, which the outnumbered and smaller French guns lost. Wellington was later
to comment on this battle "If Boney had been there, I would have lost."
Back to main page