NB VIII.0  The Battle of Orthez 1814 (Richard Brooks)

February, 27th, 1814: The previous 2 weeks had seen Marshal Soult conceding a great deal of territory to Wellington he had been manoeuverd out of three excellent defensive positions, he decided no more and elected to make a stand near the town of Orthez, deploying his army in strong position on the ridge north of Orthez he awaited the Anglo-Portuguese army's attack.

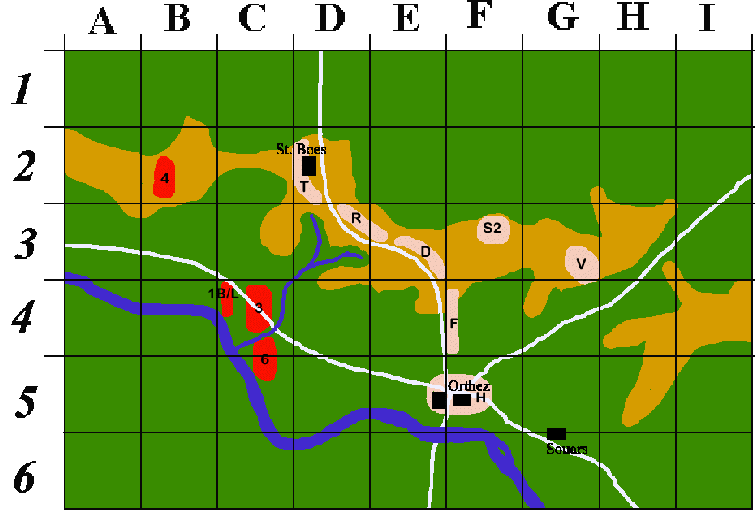
VIII.1 The Orthez battlefield:

orthez.gif (20016 bytes)

VIII.2 Map Notes: St. Boes has a +3 combat modifier and is fortified. Orthez's buildings are +2 and Souars is +1 there is a Bridge in E5/6. the Gave de Pau River runs from A3 to G6 and is Uncrossable except at the Bridge, its tributary (B4-D3) is fordable as 1 inch of rough ground.

VIII.3 Orders of Battle for Orthez:

British Army [7M/10M/12M/13M/14M]
(4) Wellington 17" G(10) +3D
BA Br9#
BA Br9#
BA Br9#
French Army [12M]
(4) Soult I : 14" E(10) +2
FA Fr12#
FA Fr12#
3rd Division (3)
(1) Picton: 5" E (8) +2
1B/3 20 BrLN [8D]
2B/3 16BrLN [6D]
3B/3 16PtLN [8D]
Cavalry Division (S2)
(1) Soult II: 4" A(6) +1
1B/C 16FrLC [12D]
2B/C 12FrLC [7D]
3B/C 12FrLC [7D]
6th Division (6)
(1) Clinton 4" A(6) +1
1B/6 16  BrLN [6D]
2B/6 16 BrLN [8D]
3B/6 16 PtLN [8D]
Left Wing [3F]
(3) Clausel 11" G(6)+1
L Fr12#
L Fr12#
Light Division (L)
(1) Alten 4" G(6) +1
1B/L  16 BrLN [8D]
2B/L 16 PtLT [8D]
Villatte's Division (V)
(1) Villatte :3" G(5)+0
1B/V/L 20 FrLN [12D]
2B/V/L 20 FrLN [12D]
Cavalry Division (C)
(1) Payne: 3" A (6) +0
1B/C 16BrLC [8D]
2B/C 12BrLC [6D]
3B/C 12BrLC [6D]
Harispe's Division (H)
(1) Harispe: 4"A (6) +1
1B/H/L 20 FrLN [12D]
2B/V/L 16 FrLN [10D]
3B/V/L 16 FrLN [10D]
Left Wing  [2F//3F]
(3) Beresford: 10" E (7) +1
Middle Wing [3F]
(3) Derlons 11" G (5) +1
M Fr12#
M Fr12#
4th Division (4)
(1) Cole: 4" G(8) +1
1B/4 16 BrLN [6D]
2B/4 16BrLN [6D]
3B/4 20PtLN [10D]
Darmagnac's Division (D)
(1) Darmagnac:4 A (5) +0
1B/D/M 16FrLN [10D]
2B/D/M 16FrLN [10D]
3B/D/M 16FrNGI [10D]
7th Division (7)
(1) Walker 3" A(5) +0
1B/7 20 BrLN [10D]
2B/7 16 BrLN [6D]
3B/7 16 PtLN [8D]
Foy's Division (F)
(1) Foy:4"E(8) +2
1B/F/M 20FrLN [12D]
2B/F/M 20FrLN [12D]
Right Wing [4F]
(3) Hill 10" E (8) +1
RW Br9#
RW Br6#
RW Br6#
Right Wing [3F]
(3) Reille: 11" E(5) +1
R Fr12#
R Fr12#
2nd Division (2)
(1) Stewart 3" A (4) +0
1B/2/RW 16 BrLN [6D]
2B/2/RW 16BrLN [6D]
3B/2/RW 16BrLN [6D]
4B/2/RW 20 PtLN [10D]
Rouget's division (R)
(1) Rouget:4" G(8) +2
1B/r/R 20FrLN [12D]
2B/R/R 20FrLN [12D]
Portuguese Division (P)
(1) LeCor 3" A (5) +0
1B/P/RW 20 PtLN [10D]
2B/P/RW 16 PtLN [8D]
Taupin's Division (T)
(1) Taupin: 3" A(5)+0
1B/T/R 16FrLN [10D]
2B/T/R 16FrLN [10D]
3B/T/R 16FrNGI [10D]

VIII.4 information chart: make you own.

VIII.5 Special Rules:
VIII.5.1 Game Length:  0830 hrs to 1400hrs (12 turns). The Allies are the First side. The Allies have the initative.
VIII.5.2: The Bridge in E6 may only be crossed by one combat unit a turn as long as the French have a combat unit in either building of Orthez.
VIII.5.3 Reinforcements: (All Allied) 
0900hrs: General Hill plus the Portuguese and 2nd Divisions enter deployed into area E6. (Wellington goes to 10M)
1100hrs: 7th division enters deployed into area A2 having only half movement on the turn of entry. (Beresford goes to 3F, Wellington to 12M)
1130hrs: 2B/L and Alten enter deployed into are A3. (Wellington goes to 13M)
1200hrs: The cavalry division enters deployed in to are A3 (Wellington improves to 14M)

VIII.6 Victory Points:

Location Allied French
St. Boes    
Orthez (each)    
     
VIII.7 Historical outcome:Wellington's plan was to pin Soult's center while Hill attacked into and through Orthez, Beresford would attack through and around St.Boes the two wings would then encircle and destroy the French army. Things did not go well from the start the French resisted stubbornly in both towns especially in St.Boes where they drove back attackers from Cole's 4th division back past their start line and hill fared slightly better near Orthez. in the center Picton's troops were met with very accurate artillery fire and were soon edging back. Wellington seeing things were not going well committed his reserves by noon St.Boes had fallen and Foy had been driven back. Seeing a gap forming between the rest of his army and Haripse's Division Soult ordered Orthez vacated. With the capture of Orthez Hill was able to get the bulk of his troops north of the river and soon Soult was falling back to the North East.
Allied losses neared 2200 while Soult lost about 4000, plus many of his freshly drafted conscripts deserted their colours as soon as possible. Orthez had been a hard won victory for the Allies, even Wellington was struck by a musket ball, fortunately it struck his scabbard and he suffered nothing more than a bruised hip.

VIII.8 Lables: make your own.