v.0.5
Zindahsh's Tutorial
Let we begin our education with Quake III: Arena editor Q3Radiant v.1.0 (build 181). At first i want show you how you can easy work with this powerful level editor. Main idea of all BSP tehnology is brushes. Cubes, columns, curves all of this are brushes. You can edit vertexes and edges of all brushes by using E and V keys on your keyboard. To change textures use S key, and to apply something to entity use N key. If you don't see texture window press T key. To select any brush or object press Shift+Left Mouse Button. For building rooms use Make Hollow, and to make door aperture or any other holes use CSG Subtract. I advise to use standart view of editor (like on picture below). If you need to compile your finished map go to menu Bsp->... and choose compile type (vis=full/fast/no, light=extra/yes/no). Remember for final compile of your level must have top parameters. Now we try to create first room:
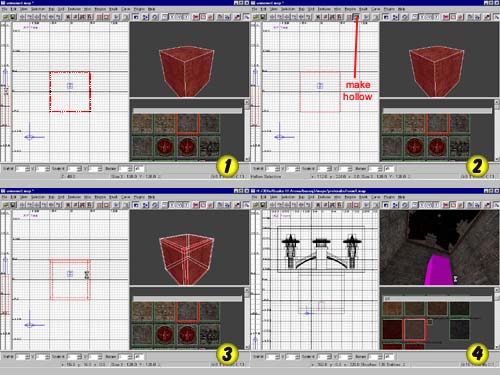
1. Click on main field and drag your mouse
(you will see red selection forming a square), now use Ctrl+Tab
to switch view window from XY Top to XZ
Front or just use long thin
window wo make from this plate simple cube;
2. Now press HOLLOW button on
your tool bar (it looks like one box, with another box inside) or
choose in menu Selection->CSG->
Make Hollow;
3. You've create room with walls, flour and ceiling;
4. On this shot i've create more than simple room, try to run BSP
file and you'll see more!

Now you have all for beginning our lessons!
1. Create simple brush (cube);
2. All sides of this brush must have a 'nodraw' texture
from COMMON dir in Textures->Load->Load
from List...;
3. Apply 'mirror' texture to one side of this brush by
using Ctrl+Shift+Left Mouse Button, which you
want to see as mirror, texture are in COMMON dir, was
loaded earlier;
4. Place MISC_PORTAL_SURFACE entity in front of
mirror (like on picture).

Now your mirror is ready.
NOTE! To create inside-wall mirror, you
don't need apply 'nodraw' texture to brush.
1. Start with new map, and load COMMON
texture dir;
2. You'll need the room with sky hole on ceiling;
3. Create brush from ceiling to floor (from sky to ground), and
apply to this brush texture 'rain'...

Now if you are compile your level you will see on it rain.
1. Create room with hole in floor;
2. Now create brush with texture 'nodraw' from COMMON
dir;
3. Apply to upper side of this brush 'pjgrate2' from BASE_FLOOR
dir;
4. Now duplicate this brush and apply 'clip' texture to
this copy of brush (now player will not to fall in this grate).
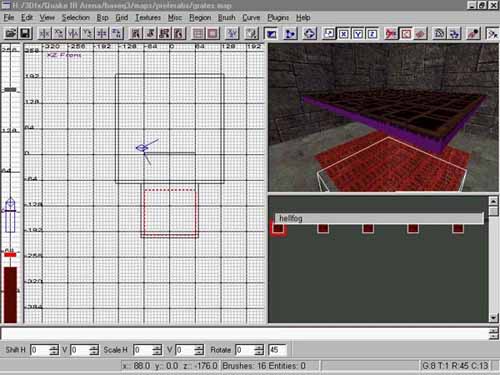
Grate is ready. For better effect place fog or lava to area under grate!
Main of editing Curves are vertex-editing and edge-editing. In this version i'll give you only two lessons.
Lesson 1:
1. Create brush 64x64 units and height 256 units, and go to menu Curve->Cylinder;
2. Now press V key and you will see vertex.
Choose one of them and try to move. To move multiple vertex just
click mouse button and not moving your finger move mouse. You
will select few entities and now you can drag them w/o any
problems.
Lesson 2:
1. Create brush 64x64x128 units, and in menu select Curve->Cone;
2. Now press V key and drag upper vertex to left
(not too far);
3. Select middle vertexes and drag them to right (not too far).
Now you have made the fang from old Q3A shots. Now just rotate it
and it's finished!
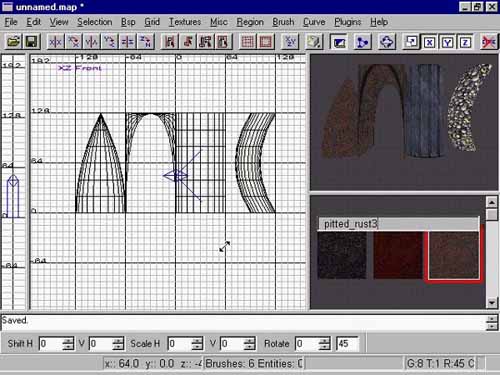
Lesson 3:
1. Create brush 64x64x128 units, and in menu select Curve->More
Cylinders->Square Cylinder;
2. Now press V key and drag vertexes like on
picture below; yu have the arch!

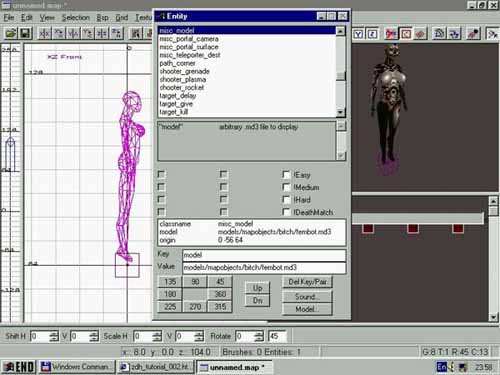
1. Create entity MISC_MODEL
and choose model from your quake3 dir;
2. Delete all letters in path except models/mapobjects/...;
3. Now reload map and you will see model;
4. To rotate model try to change the ANGLE in
entity edit window;
5. Now place your model to brush (cube) and apply texture 'clip'
(in game you can't walk through model).
Ok it's ready! Before you'll start to do it unzip ../models/ dir from your mapmedia.pk3 file to your ../baseq3/ dir!
1. Create room;
2. Add MISC_MODEL teleport, and place it in one
corner of room;
3. Now you need to place brush (cube, cylinder etc.) with texture
'trigger' into your model of teleport (in cylinder);
4. In entity edit window (N key) apply to this
brush TRIGGER_TELEPORT function and type 'target'
(key) and 'tXX' (value), where XX is number of teleport
destination;
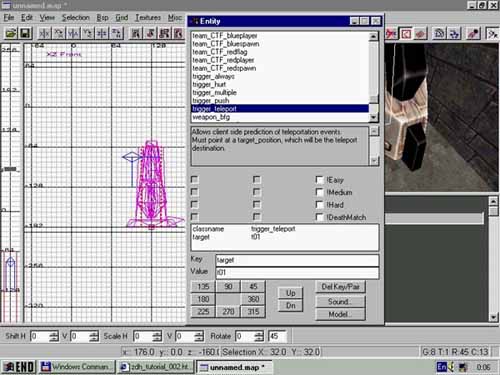
5. In other corner of room place on
floor the MISC_TELEPORTER_DEST;
6. Change in entity edit window functions 'targetname' and 'tXX',
where XX is number of teleport destination (need for multiple
teleports, like on q3dm17).

Now you see the line between teleport and
destination entity. If you want to have few teleports on level
with one destination point (like on q3dm17) you need to apply one
number to all teleport which you want to use so.
NOTE! Only one thing you must know - misc_teleporter_dest
entity always must be on the floor (not in the air) or it will
not work.
Creating of portals are easy thing. Portal in Quake3Arena looks like teleport and camera with display, where you can see your destination point. I shall bring an example of elementary portal, you could see such at a level q3dm7.
1. Create two rooms and in one of them place the portal model.
Place into display on this model brush with 'trigger'
texture, press N key and apply to this brush a TRIGGER_TELEPORT
function and change 'target' and 't01'. Now in
other room place over floor entity TARGET_POSITION
and select side where player will look when he step into the
portal (in Entity window), and apply 'targetname' and 't01'
(you will se the line between brush and entity). You've been
created a teleporter with destination point, one part of portal;
2. Now place front of portal display entity MISC_PORTAL_SURFACE
and apply 'target' and 't02'. In second room
place MISC_PORTAL_CAMERA entity with functions 'targetname'
and 't02' (that gives display to know where is the
camera)and apply 'target' and 't03'. In place
where you have a destination point create one more entity TARGET_POSITION
with parameter 'targetname' and 't03';
3. If you did all like in this tutorial, portal is ready!
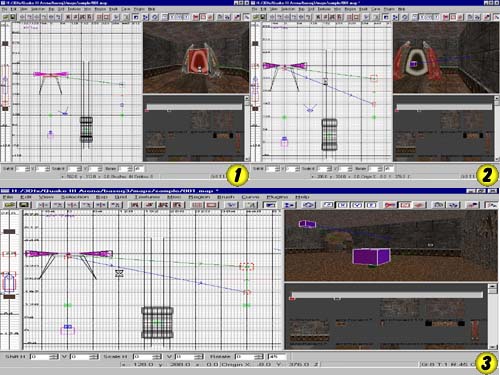
If you have not understood something, look preferab.
1. Create room and place there
a brush on about 64 units over floor;
2. Load SFX texture set, and apply to this brush texture
'hellfog_tim_dm14'.

NOTE! Fog must be in holes etc. If you try to place fog between two rooms you'll see what that looks like dense box... You must place fog only at floors or ceilings, fog walls are looking bad!
Lava, water, slime all of this are liquids. You can make cool things with this one.
1. You must place brush on floor, let's
make one half of room underwater;
2. Load LIQUIDS texture set, and apply to this brush
texture 'clear_ripple2'.
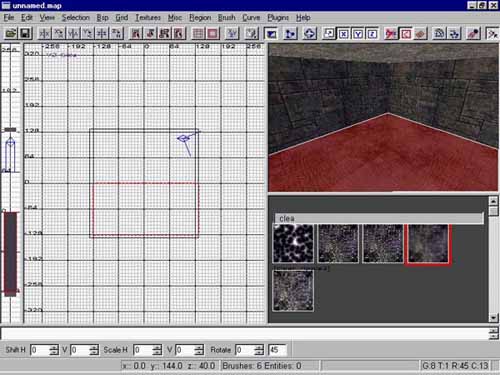
Now one half of room are underwater!
 |
If you want to
make your weapon to hang in air : If you want to make
items on levels respawn after some time of start map : If your level too dark
you can make next : |
JumpPads also known as Bouncey Pads, Acceleration Pads.
1. Create the simple brush as platform (cube);
2. Go to menu Brush->Arbitrary
Sided... and type sides of brush (16, for example);
3. Now add texture to this brush by loading the SFX dir
from Textures->Load->Load
from List...
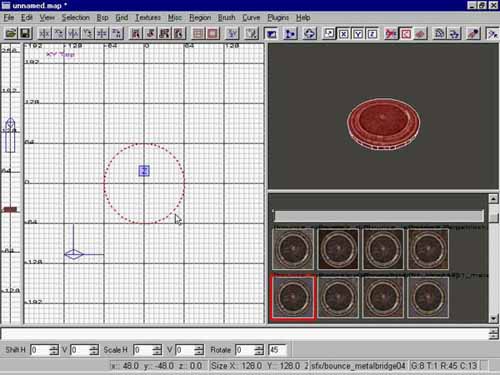
4. Now create one more brush, with 8 sides and apply the 'trigger' texture form COMMON dir;

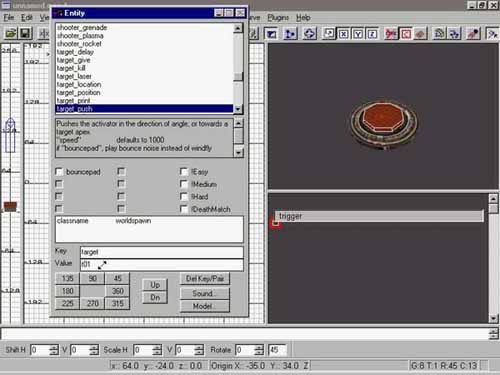
5. Apply this brush function TRIGGER_PUSH
by pressing N key on keyboard;
6. Now you must change TARGET and NAME_OF_TARGET
in windows by typing 'target' in "KEY"
window and 't01' (w/o any ' of course) in "VALUE"
window... (NOTE: for each BounceyPad you need apply different
values t01, t02, t03... etc.);
7. Create TARGET_POSITION
entity by clicking the right mouse button on your edit window;
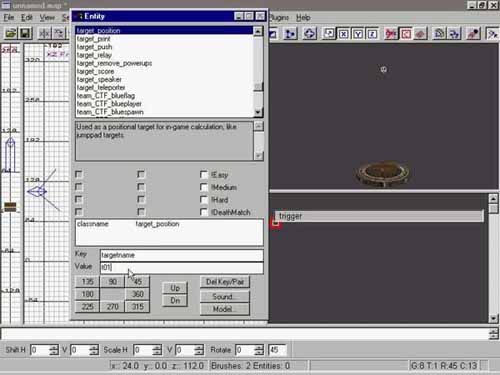
8. Press N key on keyboard to apply some
functions to this entity, as in STEP6 you need to type TARGETNAME
and NAME_OF_TARGET in windows "KEY"
and "VALUE". Type 'targetname'
in "KEY" window and 't01' in
"VALUE" window.
9. Past pushing [enter] key on keyboard you must to see the green line between brush with trigger texture and entity (trigger_position)...

The AccelerationPads looking like this Pad, only different form. The "TRIGGER_POSITION" entity are in place where you want to jump for, if you want to look how does it works try to load the q3dm17sample.map in your ../baseq3/maps/ directory, or load q3dm7sample.map.
1. Create brush 64x64 and apply 'nodraw'
texture to this brush;
2. Now load EFFECTS texture set and apply one of flare
textures to one side of brush;

NOTE! To complete this lesson you need to have the tutorial_media.pk3 file. To get it please click to get_the_preferab link below!
1. Create simple room;
2. Place brush into wall and apply 'skin1move' texture
from SKIN texture set;
NOTE! To complete this lesson you need to have the tutorial_media.pk3 file. To get it please click to get_the_preferab link below!
When you make the doors, you must remember what degree (1-360) show to Quake3 side that door will be opened. Value -1 allows a door to be opened up.
1. Create room of 256 units height and divide on
two parts by wall with hole (192 units);
2. Create brush of left door (height 192 units) and apply 'door02_k2b'
texture from GOTHIC_DOOR texture set, now press
N and apply function FUNC_DOOR, and
choose side that door will be opens in game (it's 180);
3. Now create right door, like in step 2, but now degree will be
opposite (i.e. 360);
4. Select both of doors and pressing N apply
function 'team' and 'dX' (where X is
number of these doors), on fields "KEY"
and "VALUE" (that will force doors to
be opened synchronously).

Ok, doors are ready! You can get preferab, there you'll find one more example.
1. Create room, and divide it by adding second
floor;
2. Place brush (plate) on the edge of second floor (i.e. in air,
but one side adjoins with 2nd floor), add two columns under lift
(that looks like TT);
3. Now select all parts of this lift, press N
key, and apply FUNC_PLAT function. Brushes will
group, and painted in blue colour. Lift is ready!
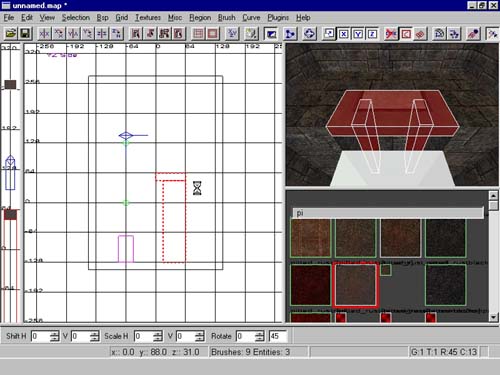
NOTE! Lift always must be on top when you in editor, or it will not work!
All these effects are created very simple! You also can create new effects (chains for example).
1. Create brush and apply 'nodraw'
texture to this brush from COMMON texture set;
2. Apply to one side of this brush (please only not to top or low)
texture 'proto_fence' from BASE_TRIM texture set.

I have created samples, so other examples can look independently.
Tutorial from 13 february 2000.
  Copyright (c)1999-2000 Zindahsh. All rights reserved.
 All other trade marks are the property of their owners.