Banners
When I paint banners, I try to make the actual banners interchangeable. By doing this,
I can try different banners as I paint them and it makes them easier to transport if I
have to put them into a flat box or something. Of course, if the standard bearer already
has a pole, I tend to stay with it.
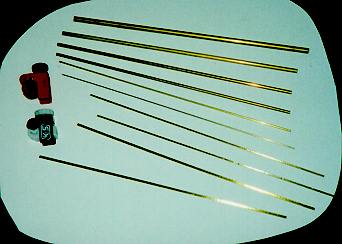 This is
just a sample of the types of brass wire and tube you can buy. The top few pieces are
brass tubing (each size will fit into the next larger size) and the pieces on the bottom
are actually brass I-beams which are nice for WH40K scenery. The tools to the left are
hobby pipe cutters which can be bought for under $5.00
This is
just a sample of the types of brass wire and tube you can buy. The top few pieces are
brass tubing (each size will fit into the next larger size) and the pieces on the bottom
are actually brass I-beams which are nice for WH40K scenery. The tools to the left are
hobby pipe cutters which can be bought for under $5.00
For flag type banners, I start with the standard bearer and cut off whatever the figure
happens to be holding. Then I use a pin vise to drill a hole through his hand. For the
banner pole, I use a piece of 1/16 inch brass wire. Cut the brass wire to the length
desired with a pair of wire cutters then use a file to round off the edges.
To make the banner socket that will fit over the pole, I use 1/8 inch brass tubing. Cut
the brass tubing with a model tube cutter. When you have your socket, use a file or your
wire cutters to slightly ream out the end that will be on the bottom of your banner. This
is necessary because the tube cutter will slightly crimp the end that was cut.
Now you're ready to make your banner. I find it easiest to draw it out on a piece of
paper in pencil first, cut it out, then paint it. Remember that when you plan your banner,
you need to leave a small tab on the end that will be folded around the socket. When the
banner is painted, glue the tab around the socket, and slide it onto the banner pole.
For the one sided, front view only, banners that Games Workshop seems to prefer, I use
a similar technique but with a horizontal crosspiece. For these I use 1/16 inch brass
tubing then cap the ends with a pin. Before the pin gets glued in however, it gets
threaded through a length of fine chain (you can buy this from any hobby store that has
supplies for model ships). This chain now can now be supported by threading another pin
through it and the standard pole (again using 1/16 inch brass tubing).
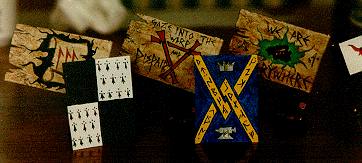 Here are some of my banners. None of them are
attached to a standard bearer now but can all be interchanged as my mood sees fit.
Here are some of my banners. None of them are
attached to a standard bearer now but can all be interchanged as my mood sees fit.
Alternatives
While I paint banners mostly on paper, there are many ways to make great looking
banners. Here is an alternative method from Paul Mitchell, also known in the Warhammer
world as "Flee B'ttn Varm'nt". ([email protected])
If you want a realistic frayed look to your banners particularly effective on orcs,
skaven, and undead, try using silk. It paints fairly well (although perhaps not as well as
paper) and frays wonderfully for a worn look.
You can get silk in any fabric store. You don't need too much. I buy white for obvious
reasons. It washes quite well but is really suited for those races that would maintain
grotty looking banners rather than nice looking ones (ie is probably inappropriate for any
of the good races). You can control the amount of fraying by rubbing some white glue on
the edges. I have never tried it but I suppose a good edge could be created with some
fabric glue (I still think it would be easier to use paper, this option would be quite
tedious).
I have also used the lead foil from wine bottles for banners. They are nice because you
can get them to bend realistically. Other people make color photocopies of banners from
their army books or from the White Dwarf. If you have access to a scanner, you can scan
banners from the same sources which allows you to easily alter their size or color to meet
your specific needs.