Conversions
Once you've mastered the basic skills, converting your miniatures are a great way to
show off your skill and customize your army. Conversions can be as simple as swapping
weapons and exchanging riders on a beast or as detailed as brand new war machine. There
are no limits except your imagination.
I've showcased some of my conversions and explained how I did them. There's nothing
difficult here that anyone else couldn't duplicate.
Verminlord
 The Verminlord
is actually a very simple conversion that is very eye-catching. I removed his doomglaive
and drilled a hole through his hand using a pin vise.
The trident which fits into the hole is scratch built. The shaft is a piece of brass wire
cut to length. The tines are made from three short lengths of wire inserted into a 1/8
inch length of brass tubing. This also makes the socket. The barbs were originally plastic
Space Marine combat blades glued onto the wire. Lastly, the banner is just a length of
paper glued around the socket, painted, and curled.
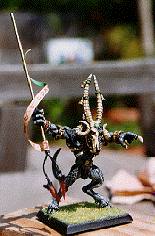
The Verminlord
is actually a very simple conversion that is very eye-catching. I removed his doomglaive
and drilled a hole through his hand using a pin vise.
The trident which fits into the hole is scratch built. The shaft is a piece of brass wire
cut to length. The tines are made from three short lengths of wire inserted into a 1/8
inch length of brass tubing. This also makes the socket. The barbs were originally plastic
Space Marine combat blades glued onto the wire. Lastly, the banner is just a length of
paper glued around the socket, painted, and curled.
Before I assembled the model, I drilled the hole through his hand then slightly changed
the orientation of the hand so that it would hold the trident in a more natural pose. This
is not a conversion per se, just gluing it into a different position. After the figure was
painted, I glued the trident in place and finished by painting the trident and attaching
the banner.
Dreadnought
 What Space
Marine commander couldn't use a dreadnought with both an assault cannon and a multimelta?
This too is a fairly easy conversion. First, when I assembled the model, I used modeling
putty to fill in all the gaps then I smoothed the flat surfaces with a file. This gave me
very even flat surfaces to paint all of my detail on.
What Space
Marine commander couldn't use a dreadnought with both an assault cannon and a multimelta?
This too is a fairly easy conversion. First, when I assembled the model, I used modeling
putty to fill in all the gaps then I smoothed the flat surfaces with a file. This gave me
very even flat surfaces to paint all of my detail on.
To make the assault cannon, I first cut the power fist off with a fret saw, then filed
down the stub, and drilled a hole in the center with my pin vise. The actual cannon is
made from 7 pieces of 1/8 inch brass tube, two pieces being slightly longer than the rest.
Six of the lengths were glued around the seventh. The center tube extends beyond the rear
of the cannon and is the pin which will be glued into the hold we drilled and the other
long piece forms the bottommost barrel. A normal pin was inserted into the center tube to
cap it and a band of lead foil was wrapped around the entire assembly. Once the cannon was
done, I glued it into the hole, primed the model, and painted it.
Hobbit knight
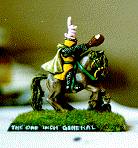 This knight
is a whimsical piece that I did for a friend of mine. The basic figure is a Grenadier
Halfling Knight with an upraised sword. I removed the blade, and replaced it with a short
brass pin. To make the chicken leg, I molded some Milliput around the brass pin and the
pommel from the sword. With the left over putty, I molded a flower by rolling sausages of
putty, tapering the ends, then combining and shaping them to form the final flower. Once
the putty was dry, I filed out a small divot in the chicken leg to make it look like the
knight had taken a bite out of it. Once it was painted, I had a Halfling character that I
thought was very in character.
This knight
is a whimsical piece that I did for a friend of mine. The basic figure is a Grenadier
Halfling Knight with an upraised sword. I removed the blade, and replaced it with a short
brass pin. To make the chicken leg, I molded some Milliput around the brass pin and the
pommel from the sword. With the left over putty, I molded a flower by rolling sausages of
putty, tapering the ends, then combining and shaping them to form the final flower. Once
the putty was dry, I filed out a small divot in the chicken leg to make it look like the
knight had taken a bite out of it. Once it was painted, I had a Halfling character that I
thought was very in character.