Painting miniatures - My way
Before I start the actual article about my painting techniques, I would like to
spend a moments thought of another concept, namely the planning of your
miniature's colour scheme. It's all too easy to enthusiastically paint away on
one or two areas of the model and then realize that you can't paint the cloak
bright red as you originally wanted to because the tunic is already a dark red
and the hair is also a browner shade of red. I'm saying this because I did it
myself not too long ago.
What I'm saying is that next time you pick up a model to paint, stop right there
for a moment. Take a few minutes and study the character and try to visualize
the finished product, the colours and contrasts you want your masterpiece to
have. Doing this will not only make your overall paintjobs look better but it
will also make it easier for you to come up with new stunning colour schemes
that you never thought of trying before.
Alright then, enough of my ramblings, let's get on with the article.
Oh, you can click on most of the pictures to see an enlarged version of it.
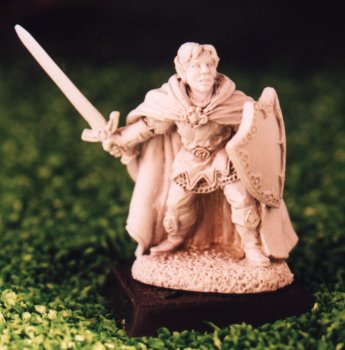
 Before doing anything else, I'll make sure I can actually hold the model all
through the painting process without scraping paint off every now and then. If
the models base is an actual part of the mini, like on this one, I glue it onto
a slottabase which I find easy enough to hold onto without slipping (just a drop
of glue, I want to be able to get the model off the base easily when it's
finished).
Before doing anything else, I'll make sure I can actually hold the model all
through the painting process without scraping paint off every now and then. If
the models base is an actual part of the mini, like on this one, I glue it onto
a slottabase which I find easy enough to hold onto without slipping (just a drop
of glue, I want to be able to get the model off the base easily when it's
finished).
I then undercoat the model white. "Why white? Why not black like everyone
else", I hear you say...Well, I'm sure there's plenty of people that will
claim that it's always better to undercoat your models black for this or that
reason. That's fine, I'm sure it works alright for them if they are comfortable
with it, everyone has different styles. I, however, find that a white undercoat
makes the colours stand out more and the result will be brighter. I like bright,
so I'll go with white.
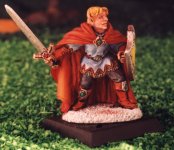
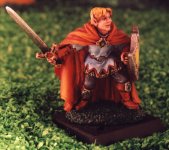
 Right, I was tempted to paint this model in a traditional elven adventurer kind
of way. You know, with the brown-red tunic, green cloak and all that. But then
(following my own advice in the first paragraph of this article) this model
struck me as being some kind of noble elven knight, fresh out of his childhood
home, eager to win a heraldic mark of his own for his shield.
Right, I was tempted to paint this model in a traditional elven adventurer kind
of way. You know, with the brown-red tunic, green cloak and all that. But then
(following my own advice in the first paragraph of this article) this model
struck me as being some kind of noble elven knight, fresh out of his childhood
home, eager to win a heraldic mark of his own for his shield.
So I picked some noble colours, like blue for the tunic (which I envisioned to
be blue-white in the end), red for the cloak (red is always noble) and a plain
yellow shield. I then picked out more neutral colours for the rest of the areas
so it won't interfere to much with the contrast I'm creating with the red/blue
thing. Of course he has to be blond, all elves are blond, aren't they? Green for
the gemstones was an obvious choice since the cloak was red and a there are
other red shades on this model as well. Green works particularly well with red.
I like to cover the whole model with it's base colours all at once rather than
painting one area at a time with shading and everything. This way I can correct
any major mistakes I made in the planning of the colours. At this stage it's
easy enough to replace a colour with another one if you don't like what you see.
 Ok, time for some shading!
Many people use washes for this. I rarely do. The only areas i wash is the
textured ones, like hair, chainmail (or any metal armor for that matter), golden
details and the like. I never wash plain areas like tunics or cloaks. This is
because when you highlight, it's often very hard to get the same shade of
colours in the hightlight as you have in the shading. Instead I start off with
the basecolours a bit darker and from there I only highlight. If i need more
darkness in the recesses, like on this cloak, I mix a little black with the base
colour and paint only the recesses with it. I never wash it.
So, I wash the chainmail with black ink, all golden detail with brown ink. For
the face and the hair, I water down brown ink with one part water and one part
ink or so. This ratio could differ depending on the brand of ink you use but the
point is that I don't want the wash to cover to much on these areas, only
outline the recesses. When it's dry I outline the hairline with brown ink to
create a deeper shade along the face.
Finally, I highlight the tunic with the base colour mixed out with white, alot
of white. In fact, in the end it's almost nothing but white. I think the
hightlighting part needs some extra attention here. Actually my hightlighting is
a variant of drybrushing, only it's not dry, it's wet. I like to keep my paint
thin, not too thin, but thin enough to allow me to paint a few layers before it
dries too much and get's all grainy. I generally brush off most of the thin pant
on a towel before applying it to the miniature. This way I can control how much
paint goes on the mini and I immediately see what shade of colour I got on the
brush before messing up my fine highlight. It's often hard to estimate the exact
shade of the colour you got on your brush so this procedure prevents any major
mistakes along those lines.
The thin paint gives me two distinct effects. One, when highlighting, the
underlaying colour shines through slightly and thus enhancing the blending
effect. Two, since the paint is thin, it's easier for me to mix layers of paint
together as I can paint a few layers at once before they dry too much. Also, the
thin paint in itself allows me to put on virtually how many layers of paint I
like without looking thick. This is also a reason why I undercoat white.
Painting a black undercoated model with thin, thin paint will make a lousy
highlight.
 Ok, the cloak is next for the highlighing part, only I use yellow to highlight
the red cloak instead of white. White will give you more of a kinky chaos pink
effect which is ok if you really want to go for that look. Yellow highlights on
the other hand will result in a fiery red colour which is more in character with
this model.
Ok, the cloak is next for the highlighing part, only I use yellow to highlight
the red cloak instead of white. White will give you more of a kinky chaos pink
effect which is ok if you really want to go for that look. Yellow highlights on
the other hand will result in a fiery red colour which is more in character with
this model.
I also highlight the red stripe around the tunic with orange and finally yellow
towards the points. I try to create variations of shades in every colour I use
and the results can sometimes be spectacular. At this stage I also do some
outlining between the tunic and the red seam. This is not blacklining, it's
brownlining. I use brown ink for this, which can be almost as dark as black when
used in recesses like this but makes a much softer effect towards the edges of
the outline. The effect looks good but you don't actually notice it's an
outline. 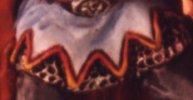
I also outline the chainmail with black towards the tunic to enhance the
contrast of the three colours used in this area. When looked upon with anything
other than a magnifying glass, these contrasts will make all the difference.
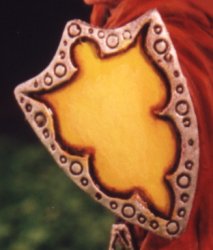
 |
 |
 |
| Base colour |
Shading |
Highlight |
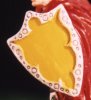
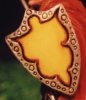
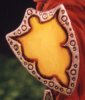
In this series of photo's you can clearly see the progression of the shield. I
painted the shield yellow and the edge chainmail. In the shading process I
outlined the edge with brown ink twice, letting it dry inbetween. I could have
stopped right there but to make the shield shine a bit more, I highlighted it
with a yellow/white mix, keeping the colour thin at all times.
I could have added a heraldic symbol to the shield at this time but it looked
good as it did and I also wanted to keep the character I had had in mind, a
fresh knightly elf yet to prove himself on the battlefield. Perhaps I'll add a
shieldmark at a later time when I have played a few battles with him.
 Time for some real fun now. I highlight the face on the ears, nose, forehead,
chin and cheeks. Painting faces deserves an article in it's own right and might
be covered in a later issue but for now I'll just say I highlighted it and
painted in the eyes (which also is an art of it's own).
Time for some real fun now. I highlight the face on the ears, nose, forehead,
chin and cheeks. Painting faces deserves an article in it's own right and might
be covered in a later issue but for now I'll just say I highlighted it and
painted in the eyes (which also is an art of it's own).
What else has changed in this picture? The blade of the sword was darkened
towards the hilt with chainmail colour mixed with black and then drybrushed with
the chainmail base colour so it would blend in with the original colour of the
sword.
The pants were shaded with a darker shade of grey towards the edges and then
highlighted with grey and white. Grey is especially hard to highlight because
it's cold. Cold colours will benefit more than others from keeping it thin while
highlighting, in fact, it's almost a requirement for successful highlightning.
 I pondered a moment how I
would paint the gemstones since they were recangular and not round. It didn't
take me too long though to realize I would paint them just like ordinary
gemstones, only the highlights would have to be straight, not circular as on
ordinary gemstones...duh.
I pondered a moment how I
would paint the gemstones since they were recangular and not round. It didn't
take me too long though to realize I would paint them just like ordinary
gemstones, only the highlights would have to be straight, not circular as on
ordinary gemstones...duh.
 So I started dark at the
top, working my way towards yellow highlights in 5 or so layers. Many painters
paint a small dot of white on top of the dark portion of the gem, slightly to
one side to represent light reflecting of a shiny surface. I don't. Why? Because
gloss varnish will give you the same effect if you have any kind of light in the
room when you are looking at your model. And if you don't, you won't see the
mini, will you?
So I started dark at the
top, working my way towards yellow highlights in 5 or so layers. Many painters
paint a small dot of white on top of the dark portion of the gem, slightly to
one side to represent light reflecting of a shiny surface. I don't. Why? Because
gloss varnish will give you the same effect if you have any kind of light in the
room when you are looking at your model. And if you don't, you won't see the
mini, will you?
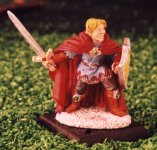
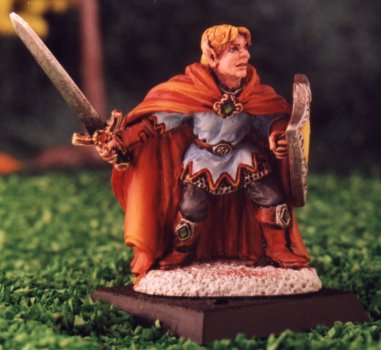
 Alright then, looking good so far. The model looks pretty much as I expected at
this stage, only the cloak turned out a bit more orange than I had planned but
hey, unexpected results is not necessarily a bad thing. It's time to finish of
with a good base job, so I paint the base dark green and let it dry.
Alright then, looking good so far. The model looks pretty much as I expected at
this stage, only the cloak turned out a bit more orange than I had planned but
hey, unexpected results is not necessarily a bad thing. It's time to finish of
with a good base job, so I paint the base dark green and let it dry. 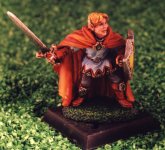 The base is drybrushed (and I really mean drybrushed this time) in two steps,
once with bright green and once with an almost yellow shade. I wipe the brush
off real good before drybrushing so the bright paint only sticks to the mostly
raised areas.
The base is drybrushed (and I really mean drybrushed this time) in two steps,
once with bright green and once with an almost yellow shade. I wipe the brush
off real good before drybrushing so the bright paint only sticks to the mostly
raised areas.
I finish off with a good varnish. I use the kind of varnish you paint on for two
reasons. The spray kind is too unpredictable for my taste and painting on
varnish has other advantes. If you paint it on, you can choose gloss varnish for
the gemstones and the armor and matt varnish for all other areas.
No matter what method you prefer, always do varnish. If you don't, your
masterpiece will quickly get pretty banged up if you use it in any other way
than storing it in a locked cabinet for display only.
That's it for this article. If you have any questions for me, suggestions about
topics you would like to see covered in here, mail to [email protected]
and tell me about it.
 Right, I was tempted to paint this model in a traditional elven adventurer kind
of way. You know, with the brown-red tunic, green cloak and all that. But then
(following my own advice in the first paragraph of this article) this model
struck me as being some kind of noble elven knight, fresh out of his childhood
home, eager to win a heraldic mark of his own for his shield.
Right, I was tempted to paint this model in a traditional elven adventurer kind
of way. You know, with the brown-red tunic, green cloak and all that. But then
(following my own advice in the first paragraph of this article) this model
struck me as being some kind of noble elven knight, fresh out of his childhood
home, eager to win a heraldic mark of his own for his shield.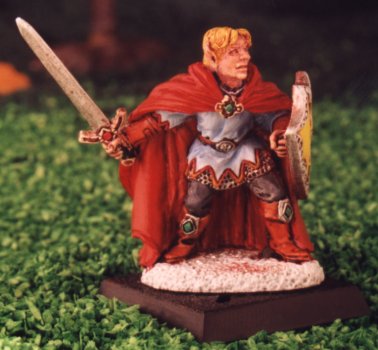 Ok, time for some shading!
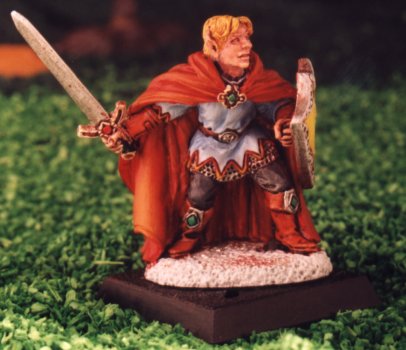 Ok, the cloak is next for the highlighing part, only I use yellow to highlight
the red cloak instead of white. White will give you more of a kinky chaos pink
effect which is ok if you really want to go for that look. Yellow highlights on
the other hand will result in a fiery red colour which is more in character with
this model.
Ok, the cloak is next for the highlighing part, only I use yellow to highlight
the red cloak instead of white. White will give you more of a kinky chaos pink
effect which is ok if you really want to go for that look. Yellow highlights on
the other hand will result in a fiery red colour which is more in character with
this model.

 Time for some real fun now. I highlight the face on the ears, nose, forehead,
chin and cheeks. Painting faces deserves an article in it's own right and might
be covered in a later issue but for now I'll just say I highlighted it and
painted in the eyes (which also is an art of it's own).
Time for some real fun now. I highlight the face on the ears, nose, forehead,
chin and cheeks. Painting faces deserves an article in it's own right and might
be covered in a later issue but for now I'll just say I highlighted it and
painted in the eyes (which also is an art of it's own). Alright then, looking good so far. The model looks pretty much as I expected at
this stage, only the cloak turned out a bit more orange than I had planned but
hey, unexpected results is not necessarily a bad thing. It's time to finish of
with a good base job, so I paint the base dark green and let it dry.
Alright then, looking good so far. The model looks pretty much as I expected at
this stage, only the cloak turned out a bit more orange than I had planned but
hey, unexpected results is not necessarily a bad thing. It's time to finish of
with a good base job, so I paint the base dark green and let it dry.  The base is drybrushed (and I really mean drybrushed this time) in two steps,
once with bright green and once with an almost yellow shade. I wipe the brush
off real good before drybrushing so the bright paint only sticks to the mostly
raised areas.
The base is drybrushed (and I really mean drybrushed this time) in two steps,
once with bright green and once with an almost yellow shade. I wipe the brush
off real good before drybrushing so the bright paint only sticks to the mostly
raised areas.