 Begin by shaving off all those mould
lines and casting flaws if there is any. Use a sharp short knife for this as covered in
the Tools section. Glue the miniature to the base.
Begin by shaving off all those mould
lines and casting flaws if there is any. Use a sharp short knife for this as covered in
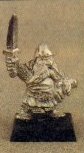
the Tools section. Glue the miniature to the base.This is a step by step guide to miniatures painting, for beginners mind you. There are many advanced techniques not covered here but you cannot expect to become an advanced painter overnight, so lets just start with the basics. For those who have been painting for a while and would like to know more, see my forthcoming advanced techniques guide :). Anyway, here goes. All of the pictures below was taken from White Dwarf 99 (some years back for those of you with a good memory).
Begin by shaving off all those mould
lines and casting flaws if there is any. Use a sharp short knife for this as covered in
the Tools section. Glue the miniature to the base.
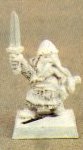 Prime the miniature white, that is
paint it with thinned down white paint. Don't use too much paint so the fine details gets
obscured and clogged down. What's important is to get a good surface to paint the base
colours on. Priming the miniature is important so the layers of paint you put on later
will stick to the miniature better. Some prefer black or other colours to undercoat with
but remember that white makes the figure more brighter looking. Anyway, the techniques
covered in this guide does not fully work if you use a dark undercoat.
Prime the miniature white, that is
paint it with thinned down white paint. Don't use too much paint so the fine details gets
obscured and clogged down. What's important is to get a good surface to paint the base
colours on. Priming the miniature is important so the layers of paint you put on later
will stick to the miniature better. Some prefer black or other colours to undercoat with
but remember that white makes the figure more brighter looking. Anyway, the techniques
covered in this guide does not fully work if you use a dark undercoat.
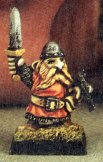
 Paint the chainmail, sword, helmet and
other metal parts black. Try not to get color on any other areas. Paint the boots light
brown. Paint flesh colour on the hands and face. Evaluate your flesh colour before you do
this, not all base flesh colours are suitable for use without some mixing. If it appears
somewhat pale, mix some red and orange with it to make it more healthy looking and some
brown if you want a more weathered effect on the skin.
Paint the chainmail, sword, helmet and
other metal parts black. Try not to get color on any other areas. Paint the boots light
brown. Paint flesh colour on the hands and face. Evaluate your flesh colour before you do
this, not all base flesh colours are suitable for use without some mixing. If it appears
somewhat pale, mix some red and orange with it to make it more healthy looking and some
brown if you want a more weathered effect on the skin.
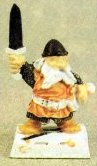
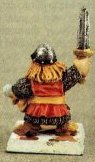
 Paint the tunic orange next. This will
eventually end up red.
Paint the tunic orange next. This will
eventually end up red.
 Now, pick up your most scruffy looking
brush, it doesn't matter if the bristles are bent for this technique. Load it with some
chainmail colour, wipe it of on a paper or piece of rag so that only a small, small
quantity of paint is left on the brush. Quickly but gently brush the bristles across the
sword and helmet. Note that although the brush appear to have no paint on it, some of it
sticks to these areas and creates a burnished effect of old steel. What you just did is
called Drybrushing. Gently repeat this process until the
desired effect has been reached. The top of the sword and top of the helmet should be
brushed somewhat more to create a highlighed effect.
Now, pick up your most scruffy looking
brush, it doesn't matter if the bristles are bent for this technique. Load it with some
chainmail colour, wipe it of on a paper or piece of rag so that only a small, small
quantity of paint is left on the brush. Quickly but gently brush the bristles across the
sword and helmet. Note that although the brush appear to have no paint on it, some of it
sticks to these areas and creates a burnished effect of old steel. What you just did is
called Drybrushing. Gently repeat this process until the
desired effect has been reached. The top of the sword and top of the helmet should be
brushed somewhat more to create a highlighed effect.
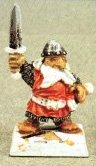
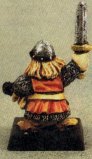
 Mix some red paint with water...that's
right, it's supposed to be thin. Paint this on the tunic, be careful not to take too much
paint on the brush or it will flow all over the miniature. The paint should be just so
thin so it flows into the recesses of the tunic, leaving the orange colour shining
through. What you just did is called a wash and is widely used to
create shadows on clothing, armor and other structured areas of the miniatures.
Mix some red paint with water...that's
right, it's supposed to be thin. Paint this on the tunic, be careful not to take too much
paint on the brush or it will flow all over the miniature. The paint should be just so
thin so it flows into the recesses of the tunic, leaving the orange colour shining
through. What you just did is called a wash and is widely used to
create shadows on clothing, armor and other structured areas of the miniatures.
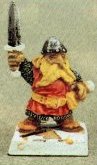
 Next paint the beard with a light
brown/yellow mix. Paint the belt and pouches a different shade of brown. It's not that
important how you mix it at this stage, the results will be fine with these techniques
either way. As your experience grows you will probably find your preferences of belt
colors and soforth.
Next paint the beard with a light
brown/yellow mix. Paint the belt and pouches a different shade of brown. It's not that
important how you mix it at this stage, the results will be fine with these techniques
either way. As your experience grows you will probably find your preferences of belt
colors and soforth.
 Paint the pommel of the sword golden.
Remember the wash we did with the tunic? Good. Do the same thing on
the beard, the hands, the face, the belt, pouches and boots, only you use watered down
brown colour this time.
Paint the pommel of the sword golden.
Remember the wash we did with the tunic? Good. Do the same thing on
the beard, the hands, the face, the belt, pouches and boots, only you use watered down
brown colour this time.

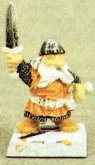
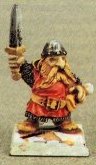
 Time for some highlighting
now. "What's that?" you ask yourself. After you wash your
miniature you'll notice the raised areas on the tunic and every other place you made a wash looks a bit blotchy as it's unavoidable that some paint sticks to
those areas no matter how thin your wash was. On all those areas, pick
out the raised areas with the base colours, gradually mixing it with white so that the
highest raised areas get's lighter shades of the base colour. It's common to use white in
the mix when you highlight. Red however is an exception. If
you mix white with red you'll end up with a pink tunic. Instead, mix yellow and perhaps
some light brown with the red base colour, that will create a brighter and more fiery
effect. Be sure to paint only the raised areas this time, you don't want any colour in the
recesses of the miniature. Highlight the face, the nose, the
hands also. Remember, only the raised areas.
Time for some highlighting
now. "What's that?" you ask yourself. After you wash your
miniature you'll notice the raised areas on the tunic and every other place you made a wash looks a bit blotchy as it's unavoidable that some paint sticks to
those areas no matter how thin your wash was. On all those areas, pick
out the raised areas with the base colours, gradually mixing it with white so that the
highest raised areas get's lighter shades of the base colour. It's common to use white in
the mix when you highlight. Red however is an exception. If
you mix white with red you'll end up with a pink tunic. Instead, mix yellow and perhaps
some light brown with the red base colour, that will create a brighter and more fiery
effect. Be sure to paint only the raised areas this time, you don't want any colour in the
recesses of the miniature. Highlight the face, the nose, the
hands also. Remember, only the raised areas.
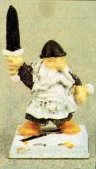
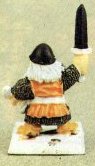
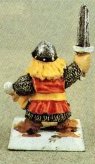
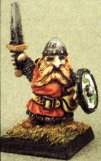
 Paint the shield in a
contrasting colour such as in the picture. If pattern painting seems to advanced for your
skills at this point, settle for something simpler. A plain green shield will look good
against the rest of the red dwarf. Just blend it a bit darker towards the edges of the
shield
Paint the shield in a
contrasting colour such as in the picture. If pattern painting seems to advanced for your
skills at this point, settle for something simpler. A plain green shield will look good
against the rest of the red dwarf. Just blend it a bit darker towards the edges of the
shield
 Paint the eyesockets black, wait for it
to dry and then paint the eyeballs in with white. Leave a black line between the skin and
the white, creating the outline of the eye. I know this is hard, probably the hardest
detail to get right because the eyes are so far in there and you'll need a really fine tip
on your brush. Then paint the pupil in. Make it reach from top to bottom of the eye,
connecting with the black line on both sides or the miniature will appear to stare. Many
people think you need a really really small brush to do this, that's a misconception.
What's important is that the tip is good. A 0/3 brush should do, any smaller than that and
there will be to few bristles on the brush to make the paint flow smoothly. Personally I
don't use any smaller brushes than 0/2.
Paint the eyesockets black, wait for it
to dry and then paint the eyeballs in with white. Leave a black line between the skin and
the white, creating the outline of the eye. I know this is hard, probably the hardest
detail to get right because the eyes are so far in there and you'll need a really fine tip
on your brush. Then paint the pupil in. Make it reach from top to bottom of the eye,
connecting with the black line on both sides or the miniature will appear to stare. Many
people think you need a really really small brush to do this, that's a misconception.
What's important is that the tip is good. A 0/3 brush should do, any smaller than that and
there will be to few bristles on the brush to make the paint flow smoothly. Personally I
don't use any smaller brushes than 0/2.
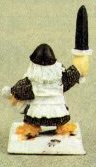
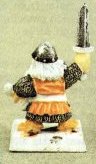
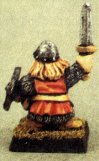
Glue flock to the base and paint it with a watered down brown mix.
 Drybrush
the base and wait for it to dry. Finish up the job by mixing a red/brown/black and paint a
thin line between areas. E.g between the swordblade and handle, between the tunic and the
beard, belt and tunic etc. This is called blacklining and makes
the piece stand out more by adding contrast.
Drybrush
the base and wait for it to dry. Finish up the job by mixing a red/brown/black and paint a
thin line between areas. E.g between the swordblade and handle, between the tunic and the
beard, belt and tunic etc. This is called blacklining and makes
the piece stand out more by adding contrast.
Tada! Finished :)
Load your brush with paint, wipe most of it off on a damp rag so that only a few pigments is left on the brush. Then quickly but gently brush across the desired areas. Notice how these few pigments stick to the miniature and create a kind of highlighting effect. This technique is good on hair, hands, armor of all kinds and weapons especially.
Washing is what you do when you water down the base colour, or a darker shade of it and apply it on top of the base colour. The mix must be thin enough to flow down the recesses of the minature and leave the base colour shining through on the raised areas. If you're feeling advanced at this stage you can use ink instead of watered down paint for this procedure. Any art shop should have a good selection of inks in different colours. The most useful however are red, green, yellow, brown, black (for blacklining, covered later) and blue. Inks flows smoother into recesses and leaves a more shiny result than watered down paint.
Highlighting is a technique that requires some practice to master. It's important to
have the correct amount of paint on the brush, if it's too much you'll get a somewhat dry
and powdery effect, if the paint is allowed to dry too much before the procedure is
finished it will look dry and crisp also.
I usually water it down a little bit, not as much as when you make a wash, just half a
brushful or so for 6-7 brushfuls of paint (A brushful is my term for dipping the brush in
the paint pot and putting it on my mixing plate instead). I then take _very_ little paint
on the brush, sometimes even wiping it off on a rag, and brush ALONG the raised areas, not
across them as you do when you Drybrush. This way the paint doesn't dry as quickly and
it's easy to erase any mistake you do with the highlight by brushing the fresh paint off
with a damp brush.
As miniatures only are 25 or so mm high, light does not create shadows on them as on normal clothing. I and many with me use blacklining to create a contrast between different parts of the miniature which creates the illusion of heavier shadow on these areas. Paint a thin black/red/brown line between all areas on the miniature, the beard and tunic, the swordblade and handle etc. I use black ink for this procedure as it flows better and it's easier to make thin straight lines. I recommend it for all who want's to be serious about this.