
| Setting Up Your PlayStation | not added |
Fallen Soldiers |
|
|
Title Screen |
|
Magical Spells |
|
|
Controlling Your Troops (page 4 explains Joypad, not included) |
|
Types of Magic |
|
| Preface |
|
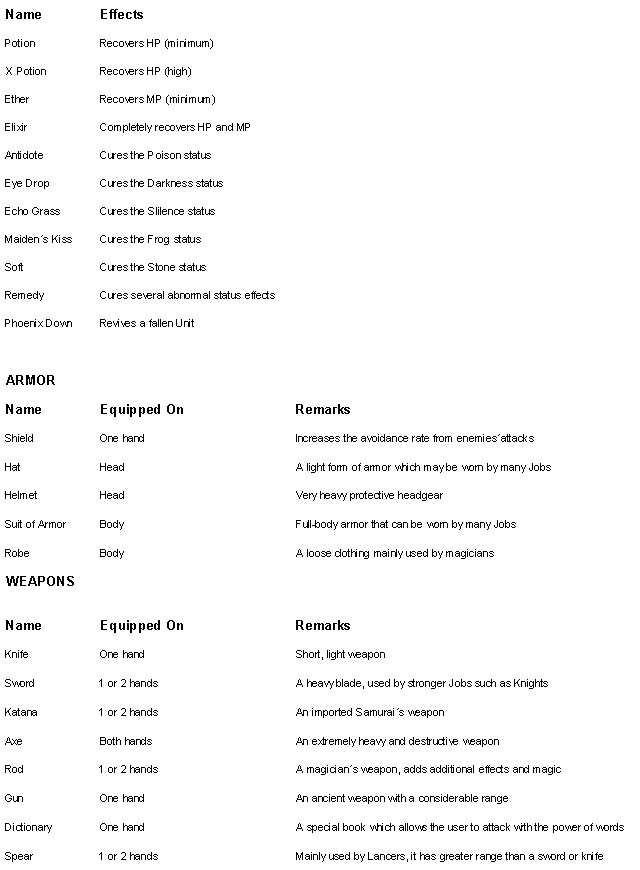
Item, Armor & Weapons |
|
| Main Characters |
|
Monsters & Mediators |
|
|
Enter the Adventure |
|
World Map |
|
|
Attack Teams |
|
Around Town |
|
| Status Screen |
|
Formation / Abilities |
|
|
Battle |
|
Jobs |
|
| Active Turn (AT) |
|
Credits | not added |
|
Topography |
|
Limited Warrenty | not added |
| NEW GAME | Select this to start a new game. |
| CONTINUE | Select this to continue a previously saved game. |
| TUTORIAL | Professor Daravon provides much useful information on how to play the game. |
| Return here anytime you need to clarify game procedures. | |
| SOUND | Adjust music and sound effects (mono/stereo/wide). |
By selecting
NEW GAME, a broad description of the story and characters is
introduced by the historian Alazlam. After this, you will have
a chance to enter the main character´s name and birthdate.
After completing
this entry, the opening movie will play and the story begins.
CONTINUE A SAVED GAME
By selecting CONTINUE, a screen for selecting the Memory Card is inserted, then select the data to be loaded. You can save up to 15 games on a Memory Card (if there is no other data for other games).
SAVING GAME DATA
Each time
you end a game session, or each time you complete a battle, it
is recommended that you save your game onto a Memory Card. From
the World Map Screen, bring up the Main Menu by pressing the ![]() Button. Select DATA from this menu, then select the Memory Card
slot your Memory Card is inserted into and press the
Button. Select DATA from this menu, then select the Memory Card
slot your Memory Card is inserted into and press the ![]() Button. Finally, select the block you wish to save your game
progress to.
Button. Finally, select the block you wish to save your game
progress to.
NOTE: one empty
block is needed to save a game.
| FOR BATTLEFIELD | FOR WORLD MAP | ||
|
|
Button |
|
|
|
|
|
||
| to display the Job level screen. Press again to display Ability acquired. |
|
||
|
|
|||
|
|
Button |
|
|
|
|
|||
|
|
Button |
|
|
| D-pad Buttons. | |||
|
|
|||
|
|
Button |
|
|
|
|
|||
| D- | pad |
|
|
|
|
|
||
| R1 | Button |
|
|
| R2 | Button |
|
|
| L1 | Button |
|
|
| L2 | Button |
|
|
| START |
|
|
| SELECT |
|
|
Throughout history, wars repeat themselves in various times and places.From these wars, legends of heroes are handed from generation to generation. Weathered by rumors and the passing of time, the truth may be forgotten, the reality buried under legends.
Many years ago, a war seethed and erupted within the land of Ivalice. It lasted for 50 years, finally ending when both sides laid down their arms. However, the war had exhausted the people´s strength and the country´s resources, and the situation within Ivalice gradually became worse.
The lords of the six ruling families united to guide Icalice back to prosperity. However, their delicate balance of power soon collapsed. One year after the 50-year war had ended, Ivalice´s Princess Ovelia was abducted. Prompted by this, conflict grew between two families: Gallione (ruled by Prince Larg, whose crest was one of a White Lion) and Zeltennia (ruled by Prince Goltana, whose crest was a Black Lion). The war between the two families would be known later as "The Lion War". Added to the backdrop of the Lion War was the problem of succession to Ivalice´s throne due to the suddon death of the King. Prince Larg is the elder brother of the Queen Ruvelia. Prince Goltana is the younger cousin of the dead King.
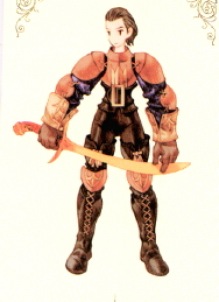
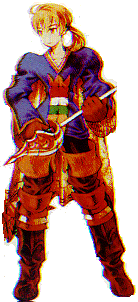
According to
historical record, a young hero named Delita suppressed the Lion
War soon after it engulfed Ivalice. There was also another young
man named Ramza who played a role during the Lion War, though
you will not see Ramza´s name in any history books. Now
the true story can be told...
|
|
|
|
|
When you begin
a game for the first time, you will be prompted to enter a name
for the character you will be controlling. The default name of
this character is RAMZA, but you have the option to change it.
Use the D-pad Buttons to highlight characters, and use the ![]() Button to enter. Use the
Button to enter. Use the ![]() Button to delete
characters and the START Button to confirm.
Button to delete
characters and the START Button to confirm.
After entering your character´s name, enter your birthdate on the next screen in similar fashion, using START Button to confirm. Your birthdate will affect your ZODIAC SIGN, which has an influence on your character´s performence during battle (see p.10).
After the
introductory movie and credits play, the story will begin at
Orbonne Monastery. Press START Button to skip the movie sequence.
Press the ![]() Button to advance dialog
screens during the story sequence inside the monastery. After
this, your character will enter his first battle. Fortunitely,
much of this battle will proceed without your input, the other
ally and enemy characters move automatically, giving you a chance
to see a battle sequence in action.
Button to advance dialog
screens during the story sequence inside the monastery. After
this, your character will enter his first battle. Fortunitely,
much of this battle will proceed without your input, the other
ally and enemy characters move automatically, giving you a chance
to see a battle sequence in action.
You will only
be responsible for your own character´s actions (see p.12
for battle commands).
Fear not, even
if you fall during this first battle, the story will proceed.
At the end of the battle, you will be prompted to save before
reaching the Formation Screen, where you will prepare for your
first real adventure.
The story progresses as you move throughout the land and win battles. In general:
-7-
The attack
team is a small group of Units (ally characters) that participates
in a battle and is formed before each battle begins. An Attack
Team contains up to 5 Units (excluding guest Units, which may
be added to theteam automatically). Each Formation Screen begins
with a set of raised Panels on which characters can be placed.
The Panels will be shaped differently depending on the battle
location.
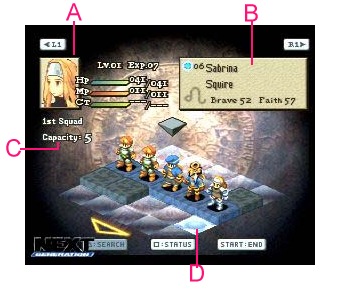
- Press the ![]() Button twice to remove a Unit from a Panel.
Button twice to remove a Unit from a Panel.
- Press the ![]() Button when an occupied Panel is selected to search for that
Unit´s Status information.
Button when an occupied Panel is selected to search for that
Unit´s Status information.
- Press the ![]() Button to bring up a Status Screen, which shows detailed Unit
specifications (see
Button to bring up a Status Screen, which shows detailed Unit
specifications (see
p.10).
- Press the ![]() Button to close the Status Screen.
Button to close the Status Screen.
- Press the START
Button when ready to enter the battle.
The Status Screen provides useful information
when setting up your Attack Team. A Unit's
status will also appear or can be called up
during battle or other actions.
A) Selected Unit's Portrait.
B) Units Level and Experience Points. Experience Points are gained during battle. When a certain number of Experience Points is reached, that Unit will go up a Level.
C) HP = Unit's Hit Points, which decrease as
Unit takes damage. If a Unit's HP reaches 0, they will fall.
D) MP = Unit's Magic Points, needed to cast magic spells.
NOTE: A Unit's maximum MP and MP will increase as the Unit's
level increases.
E) CT = Charge Time, the waiting time during battle before the Units turn comes again. When this bar is completely full, the Unit will be ready to accept commands.
F) A Blue Dot here indicates an ally Unit. Enemy Units are indicated during battle by an Orange Dot.
G) The number Indicates the Unit's Position within your entire party.
H) The Unit's Name.
I) The Unit's current Job. A Unit's Job influences which Abilities they possess (see p.23).
J) The symbol Indicates the Unit's Zodiac Sign. If the Unit attacks an enemy with a compatible sign, damage will be increased. If signs are incompatible, damage is decreased. Press the SELECT Button during battle to bring up a help menu and check Zodiac Sign compatibility.
K) Brave Points indicate the courage of the Unit. High Brave Points result in more powerful attacks and higher attack success rates. Low Brave Points produce weaker attacks, lower success rates, and may even result in the Unit turning "chicken" and running from battle.
L) Faith Points indicate the Unit's belief in the supernatural. A Unit with high Faith Points is more susceptible to magic spells, both Black Magic (attack spells) and While Magic (curative spells). A Unit with low Faith Points is more resistant to magic, helpful or harmful.
M) The Unit's ability to Move. Higher numbers indicate Units that can move further in battle
N) The Unit's ability to Jump. This determines if the Unit can leap or climb to higher areas during battle.
O) Speed indicates how quickly the Unit's CT (Charge Time) gauge will fill, or how often their turn to act will come up during battle.
P) Weapon Power is shown for weapons or shields in both the right and left hands. The first number indicates the overall power of the weapon or shield, while the percentage indicates the evasion percentage of the weapon or shield.
Q) AT = the Unit´s own attacking ability.
This combined with the weapon's attack strength is the basic attacking
strength. C-EV = the evasion percentage of the character. S-EV
= the evasion percentage of the equipped shield. A-EV = the evasion
percentage of the equipped accessory.
NOTE: The upper numbers (sword) indicate physical abilities,
while lower numbers (staff) indicate magical abilities.
Equipment can
be purchased or won in battle.
R) The item equipped in the Unit's right hand.
S) The item equipped in the Unit's left hand.
T) The item equipped on the Unit's head.
U) The item equipped on the Unit's body.
V) The accessory equipped on the Unit.
Abilities can be learned as Job Skills Increase.
W) Action Abilities, which can be selected during battle (each Unit can have 2).
X) Reaction Ability, which is automatically triggered when the Unit is attacked.
Y) Support Ability, which bolsters an existing Ability.
Z) Move Ability, which determines range, jumping ability, and adaptability to terrain.
Each battle forms a pivotal part in the Final Fantasy Tactics story. Your strategy in commanding Units to move and act determines the outcome.
Before each battle, the winning condition for that stage is displayed. Once you fulfill the winning condition, you’ve cleared the stage (the condition varies for each stage). Each battlefield is unique, and is made up of a grid of Panels, on which individual ally Units, enemies, or obstacles may appear.
A) The Altitude of the currently selected
Panel. Altitude affects the ability of a Unit to attack an enemy
at a higher or lower level.
B) Active Turn Menu.
C) The Cursor indicates the currently selected Panel.
D) The AT mark indicates which Unit has an Active Turn.
E) The Status of the Unit with an Active Turn (see p.10).
F) Charge Time Gauge (CT).
CHARGE TIME
During battles, each Unit’s ability to perform actions is
determined by Charge Time (CT). When the Unit’s CT
Gauge is full, the Unit, regardless if it is an ally or enemy,
will he able to perform an action. This is called an Active
Turn (AT). Only one Unit will reach AT at any given time.
The greater a Units Speed, the quicker their CT gauge will fill
and the more often the Units AT will occur.
As each Unit’s AT arises, their portrait and status will be shown at the bottom of the screen. Above their portraits, enemy Units will be labeled “Enemy” and guest Units will be labeled “Guest.” Enemy and guest Units will move automatically - you are responsible for commanding ally Units from your Attack Team.
A Unit may execute a maximum of one movement
(Move) and one action (Act) per AT. This will drain the CT Gauge,
which must refill before the next AT. However, if you choose only
to move, for instance, or to simply Wait without taking any action,
the CT Gauge will remain partially full, and the Unit’s AT
will come again more quickly.
When a Unit that you command reaches AT, the Active Turn Menu
will appear, offering these choices:
Move - If you
choose to move, adjacent Panels to which you may travel will he
indicated in blue. Use the L1, L2, RI and R2 Buttons to view the
entire battlefield. Use the Directional Buttons to direct the
Cursor over the blue Panel that you wish to move to, then press
the ![]() Button. After confirming the
Unit will move. Press the
Button. After confirming the
Unit will move. Press the![]() Button to cancel
a movement and return to the Active Turn Menu.
Button to cancel
a movement and return to the Active Turn Menu.
Act - Each Unit may be able to perform different actions depending on the Units Job, equipped Abilities, and the amount of experience points the Unit has (see p.23).
Typical Actions include attacking, using items,
or casting magic spells. After selecting Act, an Action Submenu
will appear, showing any options the Unit has. If actions are
grayed out, they cannot be executed. After selecting an action,
you will need lo select a target - for instance, a nearby enemy
to attack, or an ally to use a curative spell on. Move the Cursor
to the target Unit or Panel, press the![]() Button,
then confirm your action. Press the
Button,
then confirm your action. Press the ![]() Button
to cancel an action.
Button
to cancel an action.
Wait - If you choose not to perform both a movement and an action during your AT, or if you do not wish to move or act, select Wait. The less you do during an AT, the less the Units CT Gauge is depleted.
Status- Use this command to view the Status of the Unit with a current AT (see p.10).
Auto-battle - You can choose to have any (or all) of your Units act automatically by selecting this option. A sub-menu will appear, offering the following Auto-battle Options: Manual - Normal mode where you control the Unit. Fight for Life - The Unit will attack a selected target without concern for personal safety. If the target enemy is destroyed, the closest remaining enemy will be targeted.
Protect Allies
- The Unit will defend a selected ally without concern for personal
safety.
Save Fading Life - If possessing the Ability, the Unit
will recover all allies in order of declining.
Run Like a Rabbit
- The Unit will leave the battle and head for the safest spot.
To return an Auto-battle Unit to manual control, press
the ![]() Button during the Units AT, or
press the
Button during the Units AT, or
press the ![]() Button anytime during battle, then
select the Units name
from the Unit List menu.
Button anytime during battle, then
select the Units name
from the Unit List menu.
NOTE: after completing
a Units AT, you will be asked to set which direction the Unit
will remain facing. Use the Directional Buttons to select the
desired direction, then press the ![]() Button
to confirm. It is unwise to turn your back on the enemy, so choose
your direction carefully.
Button
to confirm. It is unwise to turn your back on the enemy, so choose
your direction carefully.
During a battle, the topography and the height of the land a Unit stands on can greatly affect its fighting abilities. Certain Units are more effective when standing on higher ground, while other Units may not be effective at all depending on the topography. You can obtain information on the topography by pressing the SELECT Button. Check the lay of the land before you move or attack. In general, having the “upper band” on your opponent will give you an advantage. Moving characters such as magicians and archers to higher positions is usually a good strategic decision as well.
MOBILITY
The mobility of a Unit (Move/Jump) as displayed on the status screen will vary from Unit to Unit. The topography of the ground, weather, and equipped accessories can influence a Unit’s mobility. Weapons and armor that a Unit is equipped with can also affect mobility - for instance, a heavy sword may weigh a Unit down, preventing them from jumping as far.
By equipping a Unit with special equipment (such as Feather Boots) or a special Move Ability, the Unit may be able to enter areas (such as lava and deep water) which are not normally accessible. Placing Units in unusual areas may allow you to attack enemies from advantageous positions.
If two Units are located on the same Panel,
but at different heights, (for instance, above and below a bridge)
the cursor will switch between the Units automatically. Press
the ![]() Button when the cursor is on the
Unit you wish to select. To change the selected Unit, press the
START Button.
Button when the cursor is on the
Unit you wish to select. To change the selected Unit, press the
START Button.
TREASURE BOXES AND CRYSTALS
If a Units hit points (HP) fall to zero, the Unit will fall in
battle. Use Cure magic or Potions to prevent this from happening.
Fallen Units are indicated by a red countdown timer starting at
2 or 3. A fallen Unit can be revived with a Phoenix Down or Raise
magic. If the timer reaches zero the Unit will disappear from
the battlefield on the following turn, and be permanently removed
from your party.
Depending on the Unit, a Treasure Box or Crystal will appear on the Panel they were on. If an ally Unit (excluding guest Units) moves to that Panel, they will pick up the treasure box, obtaining items. A Crystal can be claimed by any ally or enemy Unit, completely restoring HP and MP. A Unit which picks up a Crystal may be given the option to inherit Abilities of the fallen Unit. By inheriting Abilities, a Unit may be able lo obtain skills which would otherwise be unavailable (see p.23).
Fallen guest Units are protected indicated by sparkles above their body. They cannot participate in battle unless revived, but they will not disappear. Fallen Monsters (enemy or ally) may leave behind items such as Chocobo Feathers, indicating that they can be revived.
THE BATTLE’S END
The game will end if:
-Your party fails to meet the winning condition for that stage
-All of your Units fall in battle or are turned to stone
-Your main character’s spirit turns to Crystal
If the game ends, you will return lo the Title Screen, from which a game can be loaded from a previously saved position.
If the winning condition for the stage is met, the stage is cleared, and your party will obtain bonus money (Gil) or, at times, war trophies (items or weapons).
After each battle, your Units will all be fully
healed. Either a brief story segment will be displayed, or you
will return lo the World Map (see p.2l).
During a Unit’s Active Turn (AT), the Unit (if capable) can cast different magical spells (white magic, black magic, time magic, etc.). Casting spells requires Magic Points (MP). Select the magic Ability from the Act menu to display a list of available spells. Spells which appear in red cannot be used due to insufficient MP. Select a spell, then choose a target. Once a target is selected, a second menu will appear, allowing you to choose “Unit” or “Panel”. To cast the spell on a particular character, select Unit. To cast the spell on a set area, select Panel. In either case, magic spells often affect several adjacent Panels, which are indicated in green - so look at the surrounding area carefully before casting a spell!
MAGIC CHARGE TIME
Magical spells require a certain amount of charge time before
the spell can be cast. This magic charge time is separate from
the charge time (CT) used lo determine a Units active turn (AT).
While a Unit is charging a spell, time will continue to pass around
it. A Unit charging magic is marked by a C over the Unit’s
head. The more powerful a spell, the longer the magic charge time.
Once the spell’s charge time is full, the spell will be cast.
You can use magic charge time (CT) to your advantage. For example,
cast the spell on a specific area by using Panel, then lure the
enemy into it just as the spell is cast.
To check the magic charge time for a spell before it is charged, press Left/Right on the magic Ability on the Act menu to display after which Units turn the spell will be cast. If the turn reads “Now”, there is no magic charge time.
Spells marked with a curved arrow can be repelled
using “Reflect” magic.
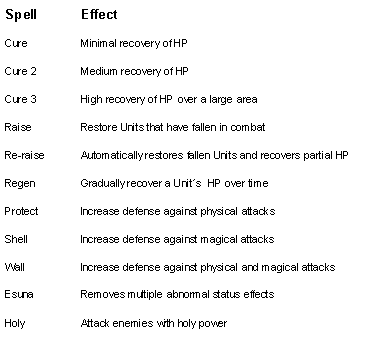
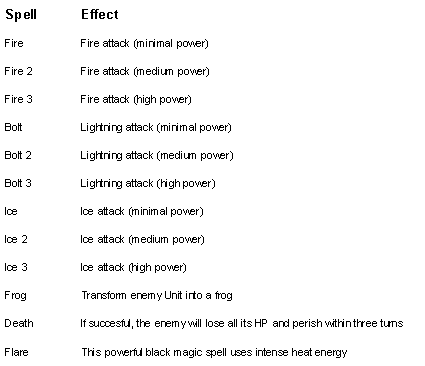
There are several types of magic, which are reviewed briefly here, along with examples of the types of spell for each. Different types of magic may only be cast by Units of certain Jobs, or certain experience levels - needless to say, magic users are an essential part of any Attack Team!
WHITE MAGIC - Curative magic, used to recover allies’ HP and eliminate various abnormal status effects.
BLACK MAGIC - Offensive magic, used to disable or destroy enemy Units.
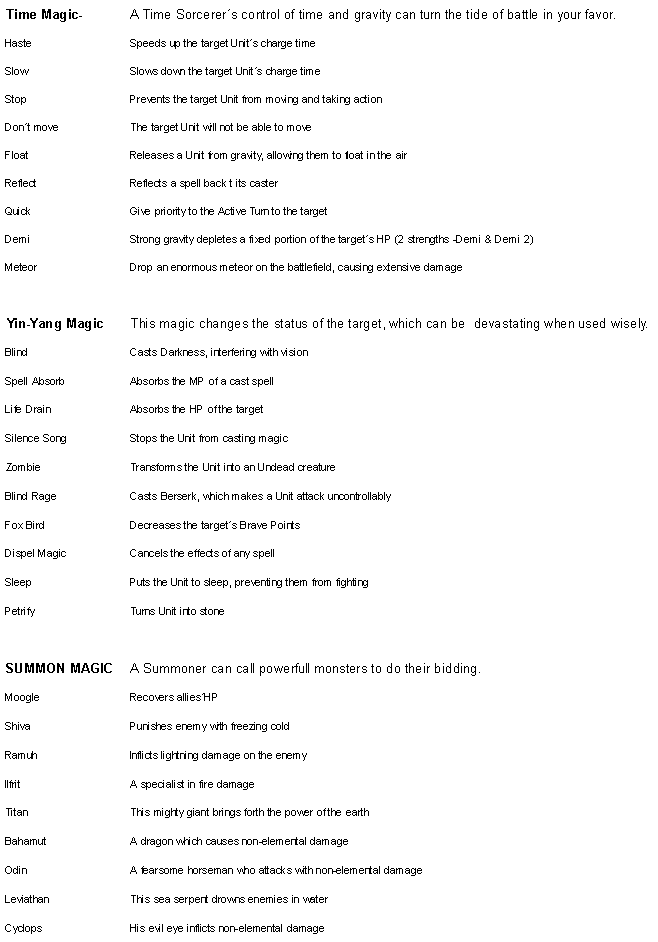
INVITING MONSTERS
If you have a Mediator in your party,
you can use their special “Invite” Ability to lure enemies
(including monsters) into becoming your ally. If the invitation
is successful, the enemy will join your party as a Guest. After
the current battle has ended, the monster will become an ally
and you’ll be able to control its movements. Though they
are difficult to lure, Monsters have powerful Abilities, and can
be great assets to your party. If Monsters are in your party,
they may even lay Eggs to produce new Monster allies!
NOTE: You may find other ways to lure Monsters into becoming your allies other than “Invite”.
Typical monsters that can be made into allies:
Chocobo This powerful bird has both attack and curative Abilities. Your human allies can also take advantage of their mobility by riding on them. As long as there’s a Unit riding it, the Chocobo´s AT will not come around.
Ahriman A one-eyed flying creature with an attack similar to the “Death Sentence”. It can also use its fearsome “Gaze” to reduce an enemy’s Brave Points until they run away in horror.
Bomb This flaming enemy actually revives itself by absorbing fire-based attacks. As a last resort, it can inflict enormous damage to surrounding enemies by “Self-Destructing”.
Ghoul An
undead monster, the Ghoul is impervious to Death spells. However,
it is susceptible to Fire spells, and is injured by normally
helpful Cure spells.
Each time you successfully complete a battle,
you will return to the World Map Screen.
Often, new locations will be available, allowing you to select
new areas to explore. The Date is shown In the upper left
corner of the screen. It normally takes one day to move from area
to area on the Map. Your party’s War Funds (total
Gil) is shown in the lower right. A blue dot indicates a stage
you have already cleared. Red dots signify areas not yet completed.
Green dots indicate that a random battle may occur if you pass
through that area. Use the Directional Buttons to move the Cursor
to different areas, then press the
 ![]() Button
to move.
Button
to move.
After a battle, it Is recommended that you
save your game and make any changes to your Unit’s Abilities.
Press the ![]() Button at the World Map Screen
to bring up the World Map Menu and the following choices:
Button at the World Map Screen
to bring up the World Map Menu and the following choices:
Move - A submenu will show all available locations. Use the Cursor lo select an area to move to.
Formation - Allows you to modify your party members’ Jobs and Abilities (see p.23).
Brave Story - The historian Alazlam can assist you in reviewing the events that have occurred in your adventure. Use the Record option to re-play story scenes that you have already seen. Select the scene from the menu to see it reenacted. Use the Person option to examine the various characters that you will encounter. As with other long menus, if yellow arrows appear on the right side of a menu screen, more information can be seen by pressing the Up or Down Directional Buttons.
Tutorial - The Tutorial is an invaluable reference for game rules and instructions. It contains information and animated examples under the categories of Organization, Battle, and Tips. There are a number of topics under each heading, and it is recommended that you explore them all. Previously viewed sections are highlighted In red.
Data - Allows you to save onto a Memory Card (see p.3).
Options - Many
gameplay options, such as Cursor speed and text display speed,
can be modified here.
Each town or castle on the World Map contains a bar, a shop, and a soldier office.
BAR
You won’t find much refreshment
here, but the bartender often knows of helpful Rumors about
important people and events. Take some time to chat and you may
learn something useful. You may even receive a valuable Proposition
in a bar - leading lo extra Gil for your party!
SHOP
These shops carry nearly everything
your troops need. Use the SELECT Button to see a description of
items before purchasing. Weapons, armor, accessories, and items
can be purchased by selecting them from a menu similar lo that
on the Status Screen (see p.10). Select the hands icon to purchase
swords, the body icon to purchase armor, etc. Scroll down to the
item you wish lo purchase, then choose the number of items to
buy. If you have enough Gil, the item(s) will appear in your inventory.
Since armor, weapons, and accessories must be equipped on your Units to be useful, an efficient way to purchase these items is to use the shop´s Fitting Room. Select an equippable item, choose Try it on from the shops menu, then choose a Unit to try on the item. Another screen will appear, showing the effects of the item. Positive effects are shown in blue, negative effects are shown in red. Make sure that an item’s benefits outweigh any drawbacks! If you’re not sure what to buy, select Best fit from the menu, and the Unit will be equipped with the finest the shop offers for a price. Select Quit fitting to purchase the selected items. Select Sell to sell items you don’t need.
SOLDIER OFFICE
Recruiting new party members is as
simple as selecting a male or female apprentice and paying for
their service. New soldiers are simple Squires, so you will have
to have them learn special Abilities (see p.23). If you have acquired
Monsters in your party (see p.20), you can select Change name
here lo rename your nonhuman allies.
At the Formation Screen, (accessible through the World Map Menu) a variety of modifications can be made to your Units. Select a Unit from your party by using the Directional Buttons or the L1 and R1 Buttons, then select an option from the menu:
Item - Allows you to equip the Unit with weapons, armor, or accessories. This menu operates as when in a Shop, but uses inventory items.
Ability - As your characters progress and gain experience, they will also earn Job Points (JP). Job Points can be exchanged here for Abilities. Abilities include battle skills, magical spells, counterattacks, etc. Each Unit has various Jobs from which it can learn new skills. Select a Job from the menu, then press left/right to change the type of Ability (Action, Reaction, Support, or Move Ability (see p. 10). Press up/down to select a specific Ability for the Unit lo learn. Abilities which are grayed out cannot be learned due to insufficient JP. If the Unit has enough JP, the new Ability is marked “Learned” and can be Set as one of the Unit´s battle Abilities.
Change Job - Units can change Jobs lo earn JP in different areas, learn new Abilities, and specialize skills (see p.24). Different Units with different levels of experience may have different Jobs to choose from. Certain Jobs will only become available later in the game. When your Units have gone up several levels and learned many skills. Some Units (such as Guest Units) will not have as many Job options. There is no “correct” way to change Jobs or learn Abilities, so experiment - and save your game often!
Remove Unit - If your party is full and you need to make space for new Units, or if you simply want to get rid of dead wood, use the Remove Unit command. Once removed, there is no way lo retrieve a Unit, so be careful who you dismiss. Certain Units (such as guest Units) cannot be removed from your party.
Order Unit - Select this option to display the Units in your party in the order of most to least, according lo amount of: HP, MP, CT, Level, Experience, Brave Points, or Faith Points. This may be helpful for selecting which Units should go on an Attack Team.
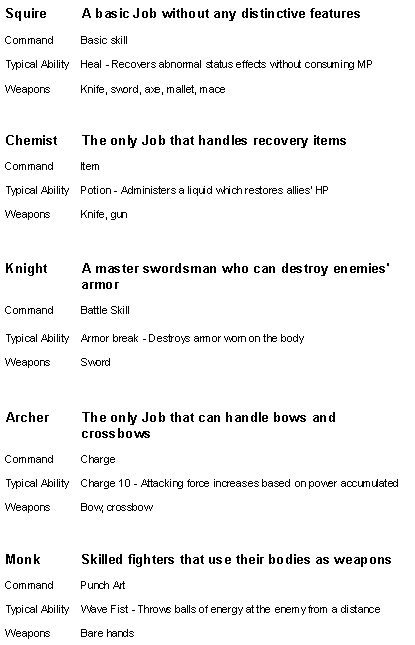
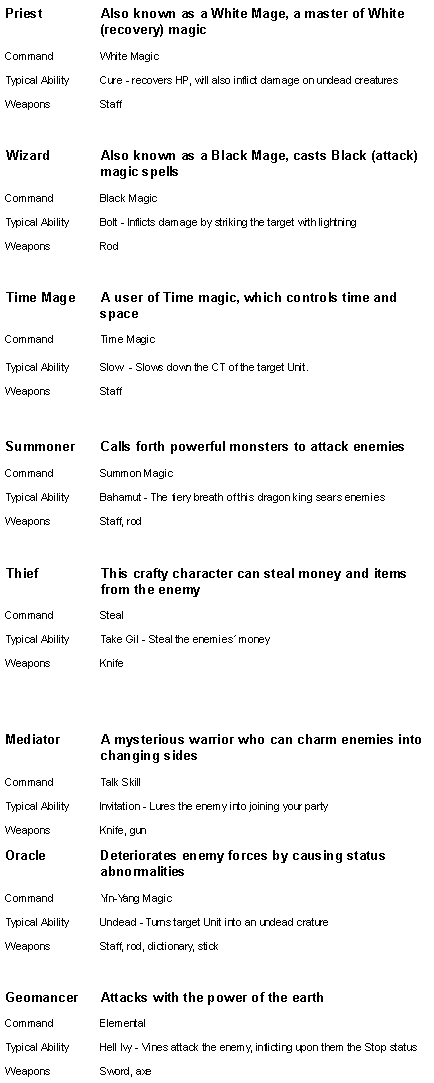
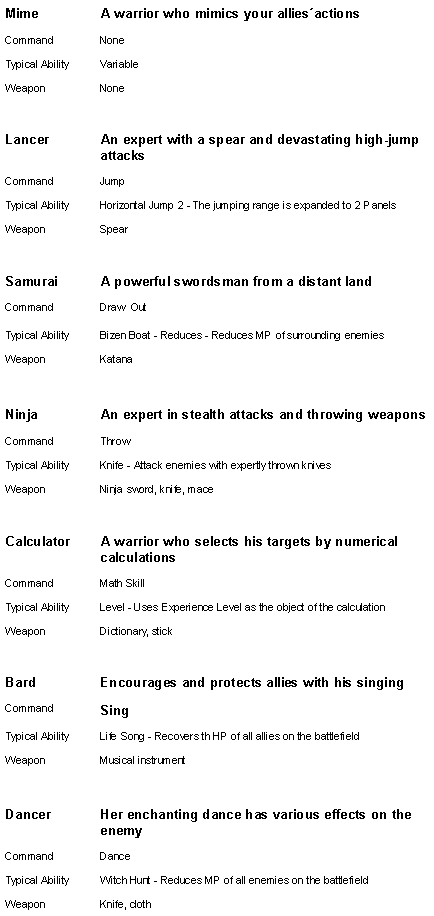
The main Jobs that appear in the game are introduced
here. By accumulating JP through combat, the level of each Job
can be advanced, and new Jobs will become available. The Commands
listed below are Ability categories that are typically unique
to that Job.
This manual was made by michail.
Mail me [email protected]