

ABC VideoRoll is a freeware video editor software for Windows users (sorry BeOS folk, you'll have to find your own alternative), available at http://www.abc-tv.com/ - you'll need to go through the free registration process to disable the nag screen.
Here I'm using it to splice together a few small shots created using Moho, the nifty (and inexpensive!) 2D spline-based animation software available from Lost Marble, and also adding a few sound effects.
This is just a quick overview for very simple usage of ABC VideoRoll - you may wish to peruse its documentation pages for more details on the advanced controls.
Firstly, get together the resources you are going to join together. I'll assume you already have the rendered scenes as AVIs from Moho (or other software), all at the same width and height, and some WAV sounds. It's a good idea if your rendered video was created using the Full Frames (Uncompressed) setting in Moho. It takes up a lot more disk space, but you won't lose any quality to the compression algorithms. When we finally save out the finished product, then we'll use one of the compression codecs, but not while working on it.
Start up ABC VideoRoll - if you get a message about DirectX Media 6, ignore it - that's for video capture from an input card, and I'm assuming you already have some rendered AVI files produced by your graphics program, such as Moho.
Load the clips : Firstly choose your layer in the Clip Deck, using the letters on the left, then click on the folder icon with the plus symbol on it, located next to the clip list. Browse to choose your files (don't forget you can type in *.AVI and hit Enter to browse for only AVI files, the same for WAV files, etc).
Personally, I have put video clips on the A layer, sound effects clips on the B layer, and background music clips on the C layer. However, I have no training and very little experience in this area, so that might not be the best arrangement. Remember when compositing multiple video layers that lower layers are painted last, so be prepared to be flexible with your arrangements here - for example you may want a background picture on layer A, animation video on layer B, and your sound on layer C.
Remember, X is your gallery, for storage of clips that you haven't set up on one of the visible layers yet, while T is a title layer specifically for generating title overlays. You can load a clip, e.g. a boing sound effect, to layer X, then paste it several times into another layer to repeat the clip.


Place your clips : Zoom in on the Timeline using the zoom buttons in the lower left corner. Drag your clips around with the mouse, or place them using the Parameters Deck. To change their order rather than just the relative position and overlap, you must drag them around in the Clip Deck, not the Timeline.
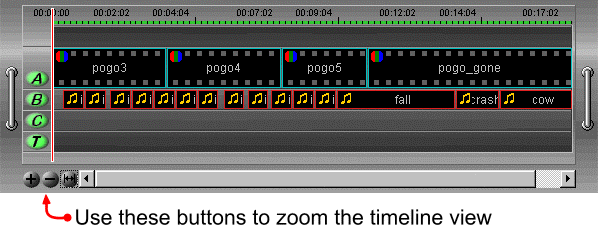
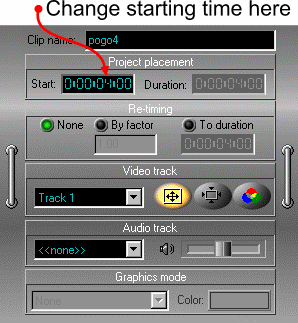
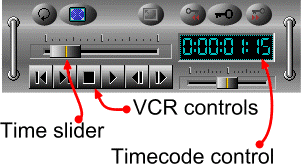
To find the time values to line up your sound effects, preview your clip using the VCR Deck and the Preview Screen. Apart from using the VCR controls, you can drag the Time Slider with your mouse, or just click on the video layer on the Timeline or the Time Slider or the rightmost number in the Timecode Control and then use the arrow keys on your computer keyboard to move backwards and forwards through the preview
Now is good time to save your file and all its settings so far. Hit the save button on the Main Deck, and save your project (as an .ABC file).

Output
Ok, you've got your animation clips and sound clips spliced together the way you want them on the timeline. Now is the time to render them all together as one large movie file with sound.
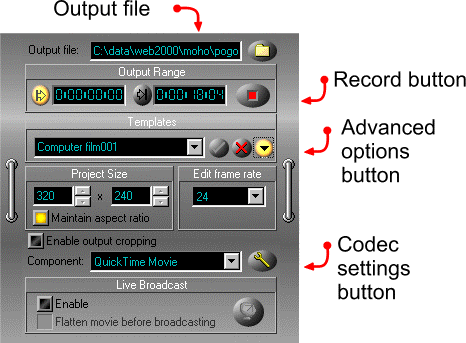
Click the Render button on the Main Deck.

On the Parameters Deck, give the output file a name.
Check the range to render is correct.
Check the advanced options to see if there is an existing template matching your output needs (resolution and frame rate). If not, change one of the existing templates and save it as a custom template for re-use. Here is where you can choose the compression codec to use.
Make sure to set the output style (component) and click on the spanner beside it to choose the codec you want (Cinepak is a good general choice of you want others to see your animation).
(Now is good time to save your file and all its settings again, just in case your PC crashes due to some weird codec bug.)
Hit the Record button on the Parameters Deck to create your output file.
A note about the Moho alpha channel and compositing backgrounds
Note that if you render to the Full Frames (Uncompressed) AVI codec in Moho, the foreground material is masked by an alpha channel, leaving the background unmasked. This means you can animate a character in Moho, draw a single frame background in a paint program (or indeed in Moho), then composite the two in ABC VideoRoll. Note that AVI files rendered using the Full Frames (Uncompressed) AVI codec take up a lot more room on your hard disk than the other codecs, but enable this type of compositing trickery.

Note that you could also do this within Moho, just by loading the background into its own image layer, but for production reasons you may wish to leave this step to the compositing step e.g. you have a friend or colleague preparing the background image while you animate a character in Moho.
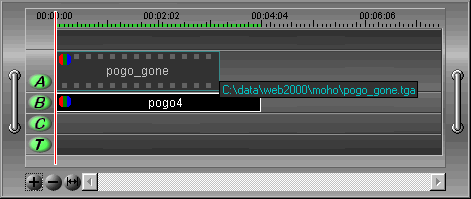
Load the background image in layer A. Load the foreground animation in layer B. Stretch the right-hand edge of the background clip to match the foreground animation length.
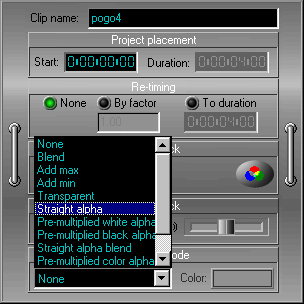
With the foreground animation selected in the Timeline, change the Graphics Mode at the bottom of the Parameters Deck to Straight Alpha
Ta-dah! Your character animated over a separately created background.
You could also use this to put Moho animation on top of a live background (either a still photograph or digital video), to composite animation from other packages onto Moho backgrounds, or to mix animation from different packages e.g Moho and a 3D program, or to mix live action (e.g. digital video of a person shot against a blue or green screen) with computer backgrounds.