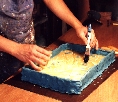
Over the glass, make 7 cm. high wall, forming any closed figure.(the traditional format is a rectangle), inside of wich you will
create your plate. With the brush, grease the surface with oil inside that space.
PARAFIN-WAX PRINTING METHODE.
I really don�t know how old this technnic could be: It was thought to me from Carlos Guzmán, a local printmaker, who learned it from Manuel Pérez Coronado "MAPECO", an artist who founded an art academy in the city of Uruapan, Mexico. The parafin-wax is a technic of mixed intaglio and relief print, because you can work in both senses in a recyclable plate. An interesting feature conserning to it, is that you don�t need a press to print. Instead, you use your hand to register the ink on the paper.
MATERIALS.
-About 1 kg. Of plastiline. |
--A glass or plexiglass piece 6 mm. Thik, of about 50 X 40 cms. |
PROCEDURE:
 |
Over the glass, make 7 cm. high wall, forming any closed figure.(the traditional format is a rectangle), inside of wich you will |
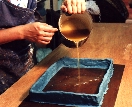
On the other hand, using one of he pans, heat in low fire the wax and the parafine together. When they become liquid and hot but before burnig, pour the conent into the greased surface and leave it to get cool and solid again, wich can last several hours. |
 |
The next step is to take off the plastiline and turn the fase up your solid plate. Thats the negative of the ptinting plate. |
 |
WORKING ON THE PLATE:
Even if you like to work on fine details, this technic performs better when you work with no thin lines.
 |
You can work, as it has been said, in both relief and intaglio methods, so feel free to experiment taking out areas, lines and making textures on the surface, as well as setting on any thing no more than 5 mm. High. |
When your plate is ready, stick again the wall of plastiline agains the
ends of its sides, and grease all the surface with the brush and vegetable oil.
GETTING THE POSITIVE:
Now you are ready to make the positive. In low firw, heat the rabbit sking glue, wich had been previously hydrated with some water (do not use instructions like when preparin a gesso for canvas. In this case we need only to cover with water the dried glue grains). |
 |
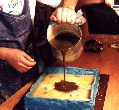
When the solution is in a texture like honey, add the glisserine and 10-20 drops of fenic acid and move well. Then pour it over your negative plate and leave it for at least 12 hours. After that, pull off the glue plate (which should be like a rubber), and set it face up to ink.
PRINTING.
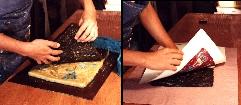
To ink the plate, you can use your favorite method (by roll or a la coupé) , Or just experiment!. Afterwords, place a sheet of paper over the plate and press very gentilly with the open hand, moving iy in circles and eventually peeling out a corner of paper to check the results. You can print the plate in more than one session, just cleaning the plate with vegetable oil of pretroleum gelly and store it in a closed plastic bag inside the refrigerator or in a cool place. |
 |
RECICLE:
One thing I like of this printing method, is that you can practically recycle all the materials. The parafin-wax can be cleaned and heated again, and the rabbit skin glue can be used many times if you take the care of hydrating it before heating, adding a teaspoon of glisserine every time you use it.
Also, I like to use this technic in a mixed way, with watercolor, pastel and inks, to enrich the possibilities it generously offer.
Main Page |
Some Interesting Links |