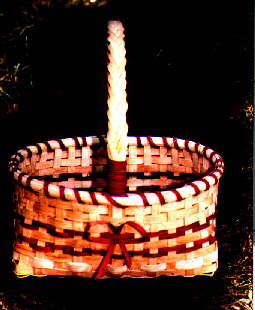

To weave your Market Basket you must get the following supplies needed.
1/2" flat reed
1/4" flat reed
#2 round reed
handle filler....7/8" X 36"
1/2" flat oval for rim of basket
Cut the following pieces:
From 1/2" flat reed cut: 1 - 76" long for handle
7pieces - 28" long of 1/2" flat reed
10 pieces- 22" long of 1/2" flat reed
6 pieces 18" long of 1/2" flat reed
On the rough sides of the cut pieces, mark all the centers.
With the rough sides up, mataching center marks, alternate the 28" and 18" pieces of reed vertically. They should be almost touching. It will be easier if you anchor one of the ends with some books or something that will hold them down while putting them in place.
Starting at the center, weave the handle spoke (over the 28" piece and under the 18" piece). Add 5 of the 22" pieces on each side of the handle. Keep them about 1/2" apart.
Adjust the base to measure 7" x 11". Soak the basket well. At this point, the bottom of your basket should look something like the example below. If it doesn't, or it is not the right size, you will have to adjust it to obtain the correct measurement. It doesn't have to be exact, but try to get it as close as possible.

Twine 2 rows with # 2 round reed around the base.
HANDLE: Insert one end of the handle filler into 2 rows of weaving on inside (pull end through about 4" - 5"). Overlap the other handle piece and insert it outside of the basket in the same manner.
Upset the sides of the basket. Make sure that basket is soaked well, but remember NOT SOGGY. Then bend the reed to make the sides of the basket stand. It will be a bit tough at first, but they will stand better as you add rows of weaving.
Weave a pattern with the 1/2" flat reed and 1/4" flat reed. Use start and stop method of weaving. With this, make sure that you lap your weaving about 4 spokes and hide the ends.
Weave pattern as follows:
2 rows of 1/4" flat reed (dyed to color of choice).
1 row of 1/2" flat reed
2 rows of 1/4" flat reed (dyed to color of choice).
3 rows of 1/2" flat reed
Twine 3 rows of #2 round reed around the top
SOAK. Fold spokes over the top, trim, and tuck in to hide ends.
HANDLE: Trim 3 1/2" off each end of the handle filler. Place the handle filler between the 2 handle pieces and adjust all pieces to fit tight togethher. Wrap handle with 1/4" flat reed (dyed to color of choice).
Using 1/2" flat oval, place rim on inside and on outside of the basket. Overlap about 3". Hold on with cloths pins. The snap clothes pins seem to work well with holding the reed in place.
With a long piece of 1/4" flat reed,(dyed to color of choice) lash the rims on tight.
You can also decorate your basket with a with a bow on each side if the handle. Using hot melt glue will make it easy to attach your bows. The bows will be made if dyed reed and twisted to form a bow.
OPTION:
BRAIDED HANDLES: I will esplain in a different segment the art of braiding handles. It is a bit complicated, but with a bit of practice, you can learn. It is also very attractive on your basket.