
STEP 1: Prepare hoops by locating the splice where the hoop is joined together. Place a pencil mark at the splice. Measure the circumference starting at the mark. Find the half way point and place a pencil mark there too. (Mark both hoops). Fit the two hoops together and line up the marks. Tie the hoops together securely and hold with a twist tie. Do this on one side only. The twist ties will hold the two hoops securely together. This way they will not slip as you are working on them.

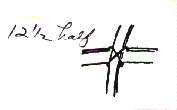
Shown is an example of tying the two hoops together with a twist tie.
Step 2: Weave God's eye. To do this select 2 weavers. Weavers are long pieces of reed. Try to choose those that are at least 8'feet long so you will not run out of reed while making the God's eye. Use 1/4" flat reed for the weavers.
SOAK WEAVERS.... Determine which hoop will be the handle of your basket.
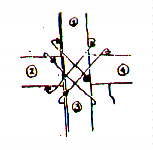
With the right side of the splint facing you, place the weaver on top of the hoop at the pencil mark. Move up and behind (1) diagonal to (2), behind (2) diagonal to (3), etc. From (4) go diagonal to (1) and repeat the entire counterclockwise revolution five more times. The starting point is covered as weaver moves from (2) to (3). DO NOT CUT the weaver off at this time. Secure it with a clothespin. Example of proceedure is below.
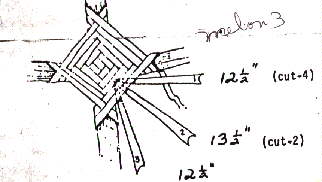
STEP 3: To make the ribs of the basket use #6 round reed. Cut ribs as designated in the diagram below. Sharpen the ends of each rib with a pencil sharpener. Insert the ribs in the pockets formed behind the God's eyes.
STEP 4: To weave the basket begin weaving by going over rib (1) and under rib (2), over rib (3), under lower handle, over and under remaining ribs until you reach the rim. (Weaving should be snug against the God's eye.) Bring weaver up from the back, over rim to the front, against the previous row. Weave 9 rows on each side.
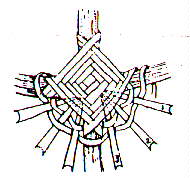
STEP 5: The secondary ribs: Cut 4 ribs at 10" long from the #6 round reed. Insert and conceal the points under weaver. Place 2 on each side, in between the first rib and the third rib. Look at example below to see the placement of the secondary ribs.

Continue weaving over and under pattern.
When joining a new weaver, overlap 2 weavers for 4 spokes. Continue weaving a few rows on one side and then alternate to the other. SO, you will have two weavers going at the same time. One on one side of the basket and one on the other. An example of the stop and start weaving is below.

Continue weaving until you meet in the center. Make sure you end up with over-underpattern on alternating rows. Push weavers out from the center to make room for the last row if necessary.
REMEMBER it is always best to read the pattern instructions a few times before starting your basket. I try to make them as easy as can be, but even then sometimes it gets confusing. I realize that. I have done the same so don't get discouraged.
After completing your basket, you can dye it a color that you would like, or leave it natural. In the future I will have instructions on braiding the handles of your baskets. This adds a lot to the looks of your baskets. It is a bit tricky, but we will also learn how to braid both the handles, and also the edges.