|
|
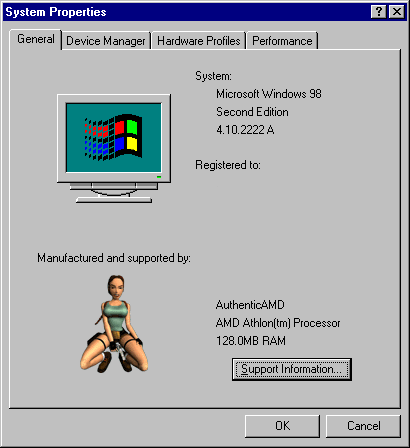
So what is an oemlogo and what does it do? Well, not much actually, it just waits in the System Properties
window for you to find it. The System Properties window (figure 1) is where the desperate Windows user goes to troubleshoot
malfunctioning device-drivers or other mysterious inconveniences that uncle Bill's operating system cooks up
from time to time. Luckily our clearvoyant PC manufacturers have anticipated this and they usually put a small copy
of their company logo - the oemlogo - here to draw our attention. A useful feature linked with the oemlogo is the
'Support Information' button that can provide info like helpdesk telephone numbers, addresses of repair services etcetera
(see figure 2). There are several ways to locate the System Properties window, two of which are given below: |
|
|

figure 1 - your oemlogo could look like this...

figure 2 - click 'Support Information' and this window pops up
|
However, if your PC did not come with a pre-installed Windows version you will look in vain for an oemlogo or 'Support Information'
button. So for those of you who would like to 'activate' the oemlogo or for those who just want to replace their existing one,
I put up this collection. All oemlogos here have transparent backgrounds, which means that if you change the grey Windows standard
color for 3D objects the oemlogo's background will change accordingly. For a quick install simply grab one of the oemlogos and follow the 'How to...' instructions below. |
|
|
|
More info The OEMLOGO.BMP file, as you may have guessed, is a small bitmap image. You can easily make your own oemlogos if you have some experience with graphics software. You must keep the dimensions within the 180 x 114 pixels range to make it fit. The oemlogo will only show up if both OEMLOGO.BMP and OEMINFO.INI are present in the SYSTEM directory (see 'How to...' section above). OEMINFO.INI is an ASCII (DOS text) file, which you can edit with Windows Notepad. It must contain the following lines: [General] Manufacturer=Your company name Model= [Support Information] Line1= Line2= Line3= Line4= Line5= Line6= Line7= Line8= 'Manufacturer' is a required field, but you can leave the other fields blank. The [Support Information] section is optional. Include it only if you would like to make the 'Support Information' button appear. Any text you add after Line1=, Line2=, Line3= etcetera will be visible in the window that pops up when the button is clicked. Creating a transparent oemlogo Unfortunately most graphics software does not offer any options for creating transparent bmp files. But wait... what kind of image is often transparent? That's right, a gif file! So the trick here is to create a transparent gif first and then convert - not rename! - it to bmp. Whether that works will depend largely on your graphics software. Note that there is one restriction for a transparent oemlogo. The color palette can only have a maximum of 256 colors (aka 8 bits)! However, editing in 256 colors will always produce poor quality images. So I recommend doing all the editing, and especially resizing, in true color. Then change to 256 colors right before you save. You may have to experiment a little with the options in your graphics software to keep the inevitable quality loss during this process within reasonable limits. |
|


