 I was Born January '51, in Halifax N.S. I was using a camera by the time I was 15 years old, and have never really stopped. I did some commercial photography in my early 20's doing weddings, group shots, and some portraits. I did some figure and nude studies as well but sorry to say most of them were destroyed. A long time ago I gave up doing commercial work and now shoot , as Freeman Patterson would say, for the Joy of it. One of my main tricks to get lots of depth of field in my close up shots is to use a bellows in conjunction with a zoom lense. As time goes on, I will be offering the images on my main page as Limited Edition Prints, and will be adding to these images as well.
I am now working at a fine art reproduction business (Altron Color Imaging Ltd. - link at bottom of main page.) as a scanner operator. I see a lot of excellent paintings and photographs done by artists from all over North America. I only wish I had the space to show you some of them. I am now in the midst of getting the photos you saw on the previous page ready to be printed as "Limited Edition Gicl�es" (pronounced zee-clay) and I hope to have them ready for sale in the next little while.
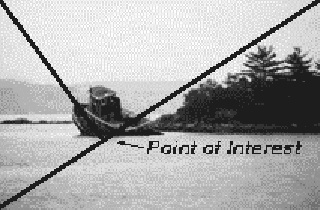
For me, the art of photography is more the "Art of Seeing". Many more people could be great photographers if they could only see what the camera and film are seeing. Where the film has a limited range to expose it, one has to be aware of its deficiencies and strengths. A good example is someone taking an image of a person standing in a room in front of a window. For the amature photographer, this usually results in an overexposed image of the outdoors and an underexposed image of the subject. To get a good image you have to either (a) expose for either the outdoors or for the subject or (b) use fill in flash. Another comman fault is to place the point of interest right in the center of the picture. This can work, but, many, many times it is better to have this point of interest a little to one side or the other and a little towards the top or bottom. One of my rules of thumb I usually use is to draw an imaginary line from the top left to bottom right or from top right ot bottom left. I then draw another imagimary line from this line at 90 degrees to intersect at another corner and place my point of interest near where the two lines meet. The image below will give you a better idea of what I am trying to explain.


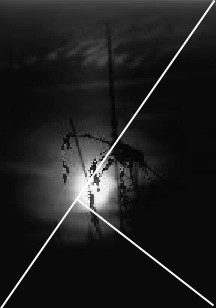
By croping in this method you may find the image you were trying to photograph. One way to do this cropping after the photo is taken is to use two "L shapped" pieces of white paper to do your cropping with. You will be surprised that many a photorgaph can hold more than one complete image within. A couple of examples will follow on my next upload.
Another trick?--- If you are interested in portraiture, study the images used in magazines. Look at the highlights in the eyes and other reflective areas to see where the lights were placed and what types of lighting was used. You won't see where they placed all the lighting, expecially the ones used for hi-lighting, but you can get a good idea of what they did to get what they wanted. I learned most of my tricks by working in B&W in my own darkroom while I was a teenager and from my Dad, who was a Fine Arts Painter and Graphic Artist.
Do you have a trick or two that you would like to share? Send your hints to me along with examples if you have them and I'll put the best of them on this page.
 I was Born January '51, in Halifax N.S. I was using a camera by the time I was 15 years old, and have never really stopped. I did some commercial photography in my early 20's doing weddings, group shots, and some portraits. I did some figure and nude studies as well but sorry to say most of them were destroyed. A long time ago I gave up doing commercial work and now shoot , as Freeman Patterson would say, for the Joy of it. One of my main tricks to get lots of depth of field in my close up shots is to use a bellows in conjunction with a zoom lense. As time goes on, I will be offering the images on my main page as Limited Edition Prints, and will be adding to these images as well.

