Copyright 2000, Mark Tharp
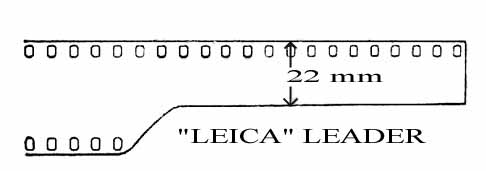
Bottom loading 35 mm cameras based on the Leica screwmount series require special loading techniques. One of the most critical is the proper preparation of the film leader. Look at the illustration below:
Note these features particularly:
1. The leader is cut approximately 110 mm long.
2. The leader is cut to a width of 22 mm.
3. The leader is cut with a radius edge between the sprocket holes.
The importance of item three cannot be overstated. You must avoid providing a sharp corner to catch in the film advance mechanism. Small shards of film will inevitably work themselves into some inaccessable gear train leading to expensive repairs.
SOME NOTES BY KEVIN KALSBEEK
Taken from his Fed-1/Zorki-1 Manual.
Film Loading
To load these cameras, a long thin Leica style leader is required, which is 18 to 22 mm wide, and 10 cm long. [Ed. note: Maizenberg says "minimum" 22mm wide. This must be a poor translation of the original idea, which would have been in Russian. One or two millimeters one way or another is surely not life threatening.] It is straight for 85mm, and then curves sharply upward for a total length of 10cm. The upper edge of the curved cut MUST fall between the sprocket holes so that there will be no sharp edges that can catch on the shutter curtains, and believe me, they will.
Leader cutting templates can be had to cut the above leader, and are very desirable as they index the film sprocket holes so that the leader cut ends correctly between the sprocket holes.
The baseplate must first be removed. To accomplish this, unfold the locking key on the left end of the body, and rotate it 1/2 turn to the left, until it stops. Using the key as a handle, pull up on the baseplate until it hinges off the retaining pin on the right end of the body. The rewind selector should be placed in the rewind position, which means that it must be rotated counter clockwise until it covers the "B".
With the lens pointing at your body, you will find the takeup spool located to your right. Reach in, and pull the spool off the spindle.
Attach the film leader to the takeup spool by slipping the end under the metal clip on the takeup spool (which rotates counterclockwise),and pull enough film out of the cassette so that 4 sprocket holes on the uncut film behind the leader are protruding from the lips of the cassette. Start the feed cassette and takeup spool into their recesses. Making sure that the leader enters the slot behind the shutter assembly smoothly. With the cassette and takeup spool inserted approximately halfway into the camera, make sure that there is enough slack in the film, so that when it comes out of the shutter slot, it makes a 90 degree turn and goes straight down into the the clip on the takeup spool. This is VERY important, as it prevents the film from catching on the film advance sprocket, which is located right next to the takeup spool, as you are pressing the cassette and spool into position.
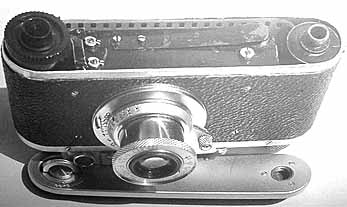
| 1937/38 Fed-1c. Note the sharp turn the film makes toward the takeup spool allowing it to miss the advance sprocket. |
 |
Press the cassette and takeup spool fully into the camera, making sure that the cassette is fully seated into the feed side by turning the rewind knob slightly to verify that the rewind knob has engaged the feed cassette spool properly.
While watching the leader and film advance sprocket teeth, turn the winding knob slowly to engage the sprocket holes on the leader with the teeth on the sprocket- NO FARTHER. If the film has not engaged the sprocket teeth, turn the the rewind knob clockwise a bit to remove excess slack, and engage the teeth on the sprocket.
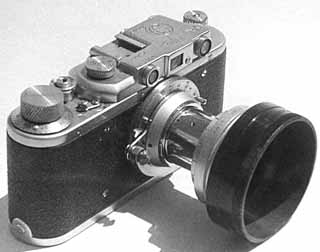
| Zorki 1c with series 6 36mm slip-on adapter ring, filter, and lens shade. A classic bottom loading camera. |
 |
When the sprocket teeth have engaged the holes in the film, reinstall the baseplate, and turn the locking key as far as it will go clockwise, and fold down the key. Reset the rewind selector to the film advance position- pointing towards the cocking knob.
Cock the shutter, and manually rotate the frame counter dial so that frame "38" is adjacent to the small arrow engraved next to the dial. Fire and recock the shutter a total of 3 times, and recock the shutter, which will put the frame counter on frame "1". You are now ready to make photographs.