
Castel Software
Center Screen Shot
To get help for the ToolKit for My Screen Saver, click the area in the pictures
in which you are interested.
Or click the links to the left of the pictures.
 Top
Top
Go to Screen Shot
"File Menu"
-
"New" Clears the Image Box and sets the name to UnNamed
to start a new package definition.
-
"Open" Presents a dialog to select a previously saved
package definition.
-
"Make" This actually takes the current package definition
and creates the setup files for distribution.
-
The ToolKit requires the setup files for My Screen Saver v5.0 or higher.
If they have not yet been copied, this menu item will say "Base Files".
-
If it says "Base Files", you cannot MAKE a package until
the MySS setup files have been copied.
-
If you have the setup files on your hard drive, click this and if the ToolKit
can find them it will simply copy them and the menu item will change to
"Make". If the ToolKit cannot find them, it will
prompt you to locate them. Simply navigate to the folder that contains
the file that it is looking for and click OK.
-
If the setup files for My Screen Saver v5.0 or higher are not on your hard
drive, then download the trial version of Myss from my web site at
http:\\www.members.home.net\jcastell1. Then run the .exe. This
will put the setup files on your hard drive. MySS does not have to
be installed. In other words, you do not have to run the setup file
for MySS.
-
Once this menu item says "Make", you are free to delete
the setup files from the folders where the .exe unzipped the setup files.
-
"Save" Saves the current package definition. If
it is UnNamed, it will prompt you for a file name.
-
"Save As" Prompts you for a file name. You can
type a new file name or select a previously saved file to overwrite. If
the file name already exists, you will be prompted to confirm the overwrite
of that file.
-
"Exit" Quit the ToolKit. If you have done anything
with the current package definition since it was last saved, it will prompt
you to save it.
"Help Menu"
-
"Help" Displays this Help file.
-
"About" Displays information about the ToolKit. My
email address and web site are also on this screen.
Go to Screen Shot
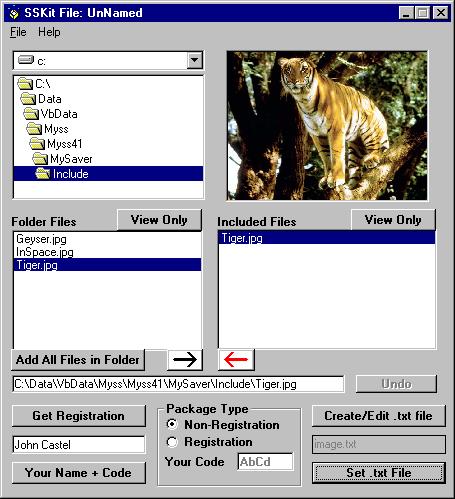
"General"
-
"Drive Box" You can select image files from anywhere
on your system. Use this to change the drive.
-
"Directory Box" Double click a folder to make it
the current folder. The parent folders and sub-folders of the current
folder are automatically displayed.
-
"View Only -- 'Folder Files'" Click this button to display
the image of the highlighted file in the File Box below it. If the
file is not a valid image file, then it will not display and a message will
appear in the Message Box.
-
"File Box" Displays all of the image files in the current
folder. Double click a file to add it to the Included
Files Box and display it in the Image Box.
-
"Image Box" Displays the selected image.
-
"View Only -- 'Included Files'" Click this button
to display the image of the highlighted file in the
Included Box below it. If the file is not a
valid image file, then it will not display and a message will appear in the
Message Box.
-
"Included Files" These are the files that will be
included when you MAKE a package.
-
"Add All Files" Adds all of the image files in the current
folder to the Included Files Box. Will not
add duplicates.
-
"Right Arrow (Black)" Adds the highlighted file to the
Included Files Box.
-
"Left Arrow (Red)" Removes the highlighted file from the
Included Files Box. Activates the "Undo" button.
-
"Message Box" Displays variuos messages and usually
contains the name of the selected file.
-
"Undo" When you remove a file from the
Included Files Box, this button allows you to put
it back. Only the last file removed is available.
Go to Screen Shot
"Miscellaneous"
-
"Get Registration" Displays the Registration
Code screen.
-
"Enter Your Name" This name will be displayed on the
setup screen of the My Screen Saver package that you
MAKE.
-
"Your Name + Code" Information about Your name and Code.
-
"Create/Edit Text File" Create or edit the text file
that will be distributed along with your package. This is the file
that will be displayed when the user clicks the Image Info button on the
Images tab in the My Screen Saver setup screen. You can create as many
files as you need.
-
"Selected Text File" Displays the text file name that
will be included if you MAKE a package at this time.
-
"Set Text File" Prompts you to select one of the text files
that you have created as the Selected Text File.
Go to Screen Shot
"Package Type"
-
"Non-Registration" If this option is checked, your image
files will not be encrypted and will be available to the person to whom you
distribute a package.
-
"Registration" If this option is checked, your
image files will be encrypted and will not be directly available to the person
to whom you distribute a package. For the 30 day trial period, they
will be able to see the images by using My Screen Saver. When
the user registers with you and you give them their Registration
Code, the image files will be decrypted and will be available to the
user even if they do not register MySS. If they register MySS but not
your images, after the 30 day trial, they will no longer be able to see your
images. After the 30 day trial period, they will still be able to register
your images, even though MySS will not display them. The setup screen
remains active after the 30 day trial period, even if they do not register
MySS.
-
"Your Code" This code plus the users name is used
to generate a unique Registration Code, that will decrypt
the image files in a registrable package that you distribute. Once
you distribute a registrable package, this code will be frozen. You
will not be able to change it.
Go to Screen Shot
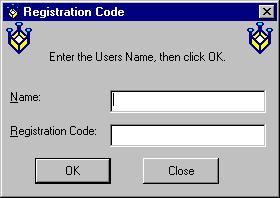
"Registration Code" For your customers:
-
"Name" Enter the users name here.
-
"Registration Code" The unique 12 digit registration code
will be displayed here. Give this code to the user and he will be able
to decrypt your image files.
-
"OK Button" Click this after you enter the users name.
-
"Close Button" Close this screen when you are finished.
Top
Copyright 1999 John Castelluccio