Hard Drive Installation
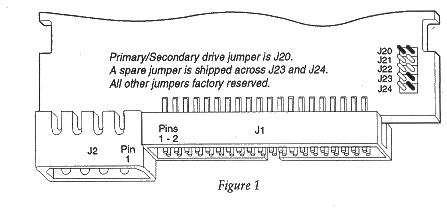
1. Set jumper, on the drive for Primary/Secondary configuration. See Figure 1.
NOTE: If this drive will
coexist with another Maxtor or manufacturers' hard drive, make sure to
check the Primary/Secondary jumperconfiguration of the other hard drive.
| Primary/Secondary Drive | OptionJ20 |
| Only drive in single drive system | Jumper installed |
| Primary drive in dual drive system | Jumper installed |
| Secondary drive in dual drive system | jumper removed |

2. Secure the drive in a suitable drive bay with 6-32 x 1/4" screws.
3. Attach a 40-pin ribbon connector. The striped edge of this cable indicates pin 1 and must be oriented towards pin 1 at the drive connector and at the host connector.
4. Attach a DC power connector.
Format Option A - MS-DOS
Proceed to 'Format Option B' and use Max.Blast installation software to format
the 7540AV to its full
capacity if AT BIOS does not support drive type capacities greater than
528 million bytes. Max.Blast installation software does not ship on the
7420AV, 7270AV or, 7135AV and isn't necessary to obtain their, full capacity.
| 1a. | 7540AV | If AT BIOS or the IDE adapter supports Logical Block Addressing(LBA) | ||
| and drive type capacities greater than 528 million bytes, | ||||
| program the BIOS with 1046 cylinders, 16 heads and 63 spt. | ||||
| 1b. | 7420AV | Program the BIOS with 986 cylinders, 16 heads and 52 spt. | ||
| 1e. | 7270AV | Program the BIOS with 959 cylinders, 11 heads and 50 spt. | ||
| 1d. | 7135AV | Program the BIOS with 966 cylinders, 13 heads and 21 spt. |
NOTE: Drives are shipped from Maxtor with a low level format. DO NOT use a low level formatting program on this hard drive.
2. Partition the drive I using the FDISK command from MS-DOS ,version 5.0 or greater. Refer to your DOS user guide for more information.
3. High-level format the drive using the FORMAT command from MS-DOS version 5.0 or greater. Refer to your DOS user guide for more information.
Format Option B - Max*Blast
Downloading Max.Blast
To install the 7540AV to its fullest capacity, you must first download Max.Blast software from the hard drive. Before doing any partitioning or formatting, it is important that the Max.Blast software he copied onto a blank diskette (720k). Max.Blast is pre-loaded on the hard drive by Maxtor.
Setting System BIOS
Set the system BIOS using Type 9. Type 9 should equal 900 cylinders 15 heads, and 17 sectors per track.
If BIOS Type 9 does not match these parameters, select a user-definable drive type and program the BIOS with 900 cylinders I5 heads, and 17 sectors per track. If you don't have a definable drive type, select a fixed drive type that has 15 heads and 17 sectors per track.
This will allow you to boot your system to the A or, C drive and download the Max.Blast software without any conflicts. Save the changes and continue with the steps below to make a working disk for the Max.Blast installation software.
NOTE- Consult your system's user guide for further help on enabling and programming system CMOS BIOS.
To complete the hard dive installation, copy the Disk Man , files from the hard drive onto a formatted bootable system disk. (For, more help on creating a bootable system disk, refer to your DOS user guide).
1. Boot the system to disk drive A:>.
2. Change to the Maxtor, drive. For, example, type C: or, D: and press [ENTER].
3. At the DOS prompt type [MAXI and press [ENTER].
When the copy is completed, you will have a working copy of the Max.Blast installation software. Depending on your hard drive configuration, proceed with either the single or, two-drive formatting steps.
Single Drive Format
1. Boot to the DOS system diskette with Max-Blast.
2. At the A:> prompt type [DM] and press [ENTER] for, automatic installation. Advanced users can type [DM/M] for the manual installation if desired. Maxtor recommends the automatic installation.
3. Follow the on-screen prompts to configure the Maxtor, hard drive to the computer system.
NOTE: During the installation, Max.Blast software will indicate that a previous partition has been discovered. This is the Maxtor factory installed partition that can now be erased. When you press [Alt-C, this pre-configured partition and data will be erased. A single new partition will be created using the full capacity of the hard drive.
4. After the drive has been installed with Max.Blast, install DOS. Boot the system to the drive and press the [SPACE BAR] before inserting the DOS system 1 disk.
Two Drive Format
When downloading Max.Blast software to the secondary drive, follow the steps outlined in the Single Drive Format procedure from above in addition to:
1. As primary drive boot system to the A:> drive.
2. As secondary drive, boot to the A:> or C:> drive.
3. In both cases, configure the system BIOS to drive Type 9.
NOTE: During the installation,
Max.Blast software will indicate that a previous partition has been discovered.
This is the Maxtor, factory installed partition that can now be erased.
When you press [Alt-C, this pre-configured partition and data will be erased.
A single new partition will be created using the full capacity of the hard
drive.
Page updated 98/07/14