|
Navigation Bar | |
|
III. Manipulating a Navigation Bar
The methods below apply to a NavBar object. Some only affect a bar when used after is has been created while others will work either before or after (these are marked with an asterisk).
Using Navigation Bars in Frames Frames are treated as individual windows by the browser. The bar and drop down menus cannot cross over the boundaries between frames, any more than an image on a page can be made to stick outside of the browser window. Likewise, you cannot have a drop down appear in a different frame. To make a menu link load in a different frame or window you must use JavaScript code instead of just the URL. See the notes on Setting Item Links for details. An example demonstrates the technique. Positioning a Navigation Bar The bars and menus are dynamically positioned objects which float on top of the normal page contents. That means that if you want one to appear in a particular location on your page you'll have to guess or calculate the coordinates of that spot and use the moveTo() method to place it there. In a simple case, like placing the bar below a logo or banner image at the top of the page, you can estimate the position. Say your image is 50 pixels high. You might move the bar to the coordinates (0,60) to account for the page margin and still leave a little spacing between it and the graphic. For more complex layouts, guessing the proper coordinates may not be suitable. Varying browser widths, differences in margin settings, changes to the content, etc. can easily cause problems. In this case you might want to use the position of an object on the base page as a reference point. One easy way to do this is by embedding a transparent image within the page content. This reserves space for the bar and the image's coordinates can be found using some functions provided by the same DHTML Library code used by the bar script. A working example demonstrates this best.
Note that when the menus overlap elements such as form input boxes, buttons,
applets or plugins on a page, the element underneath may bleed thru. This is
due to the way the browser renders these elements and will vary depending on
the browser. There is no fix for this so you must either try to avoid placing
such elements near the menu or be willing to accept the unusual appearance.
For an excellent discussion of this problem and details of which elements
affect which browsers see the Webreference.com article entitled
Positioned Elements
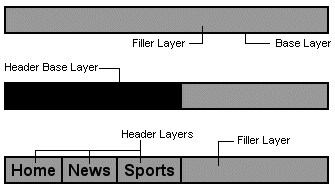
and OS Controls, Applets and Plug-ins Another factor to consider is the stacking order of the bar relative to any other positioned elements you may have, including other navigation bars. The getzIndex() and setzIndex() methods allow you to alter that value and control which element appears on top when two overlap. The old version of the script had an option to automatically move the bar as the page was scrolled, keeping it in the same position relative to the window. That has been dropped in this version but you can easily create the same effect with a few lines of code. Another example demonstrates the basic technique. How It Works The navigation bars and drop down menus are composed of several layers which are built and added to the page dynamically based on the given NavBar object when the create() method is called for it. Mouse events are captured for certain layer components to control the highlighting of items, the display of the drop down menus and to handle the link associated with each item when clicked on. Layer Layout First a base layer is created, using the border color. This acts as a container allowing the entire bar to be positioned and hidden or made visible. A filler layer is added, using the normal header background color. It's set to cover the base layer except for the surrounding border. Then a layer is added to contain the headers. It acts much like the bar's base layer, providing a border around each header and allowing them to be moved as a group. This allows the headers to be easily aligned to the left, center, right or some other position relative to the bar.
 Each header is made up of three layers, all the same size and stacked directly on top of each other. The first has the header text in it's normal foreground and background colors. The second also has the header text but in it's highlighted foreground and background colors. This highlighted layer is initially set invisible so the normal layer can be seen. The topmost layer is transparent and is used solely to capture mouse events for the header.

Event Capturing First, the mousemove event is captured for the entire page. This allows the current mouse position to be tracked at all times. The mouse coordinates are stored in two global variables, mouseX and mouseY. These are used when the user mouses off a header or drop down menu as described below. The transparent layer over each header and menu item captures three events, mouseover, mouseout and mouse click (IE) or mouseup (NS). On a mouseover, the highlight layer for the header or menu item is made visible, on a mouseout it is made invisible again, creating the highlight effect. Controlling the Drop Down Menus Additionally, when a header is moused over, the drop down menu associated with it is moved into position just below the header and made visible. The menu is aligned horizontally with the left edge of the header unless that would place the right edge of the menu past the end of the navigation bar. In that case, it is aligned with the right edge of the header.
 This keeps the whole display within the left and right boundaries of the navigation bar while allowing longer text strings in the items. By overlapping the menus, more information can be placed in a given area without cluttering it since only one menu can be active at a given time. Whenever a mouseout occurs on a header, we first have to check to see if the mouse has moved onto the drop down menu. If not, the menu and header can be deactivated. That's where the mouseX and mouseY variables come into play. When a menu is activated, it's position on the page is saved so it can be compared to the current mouse coordinates.
 The mouseout event for each menu's base layer is likewise captured, so that when the user moves the mouse off a menu, it and its associated header can be deactivated. Links When an item or header is clicked on, the associated link string is checked. If it's a null string, nothing is done. If the string starts with "javascript:" the built-in eval() function is called with the string as an argument, causing the code to be executed. For anything else, the string is taken to be a URL and the window's location is set to that value, causing the link to be followed. Window Resizing Netscape browsers have a bug that causes all DHTML information to be lost when the browser is resized. To correct this, the window resize event is captured so that the page can be reloaded after being resized. This rebuilds any and all navigation bars. Note that some early releases of Netscape 4 have a bug that can cause a resize event to fire even when the window has not be resized. To correct this, the width and height of the window is saved at load time. On a resize, these are checked against the current width and height and a reload occurs only if the size has indeed changed. To keep the behavior consistent with IE, resizes are handled the same way. However, when resizing an IE browser by dragging the window border, the 'Show window contents while dragging' display option on Windows platforms will cause the event to fire before the window can be resized, canceling the drag. This means the user would be unable to resize the browser via dragging. To prevent this, a setTimeout() is used to reload the page. This allows the user a couple of seconds to resize the browser before the page gets refreshed and cancels the user drag action. Documentation
The script is fairly large, so if you are concerned about download time use the condensed navcond.js version which can be used in place of the dhtmllib.js and navbar.js files (25K vs. 40K). It contains all the code in the other two files but has been stripped of most comments and formatting. You can also download navbar.zip (58K) which contains all the JavaScript code files, documentation and examples. Page 1 - Page 2
|
|
|
Home | |

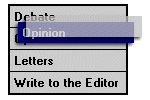
 Each drop down menu is constructed separately. Again a single base layer is used
to create the borders and act as a container for all the menu items. Just like
the headers, each menu item also consists of three layers, the only difference
being the colors and fonts used. The menu base layer is initially made
invisible, hiding it and the child layers making up the items.