All photos © 2003 John Gosselin
Update: 9 November 2004
Assembly:
Okay... It's been months since I've updated anything here. As of right now I've got about a half hour's work left to do on the model before it's done.
But to continue from the last page: I from that point on, major assembly went as per the instructions. The resin engine cowling from the Belcher set was very well-made and fit quite well, though I still had to use lots of gap-filling CA glue and Squadron putty.
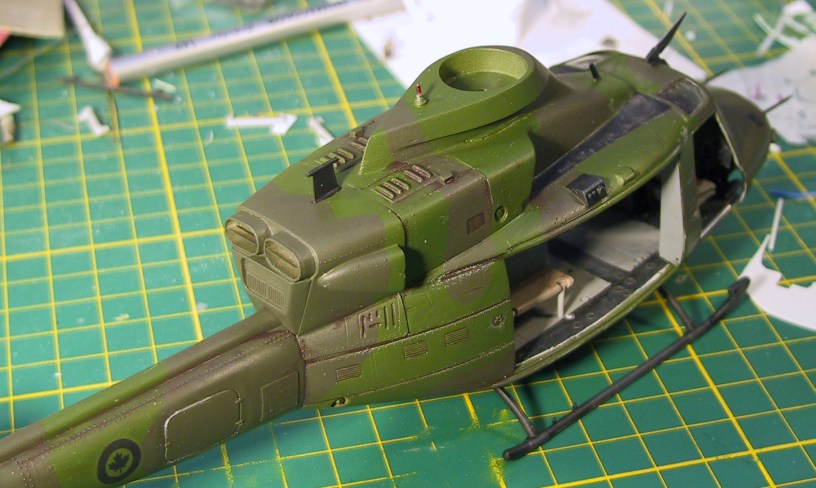
Once I was done with lost of the sanding and filling, I added the various antennae and wire cutters. The Belcher set includes a piece of styrene to be used as a reinforcing ridge on the windscreen to guide a wire or cable to the wire cutters above the windscreen. I attached that and cut it to lead into the top cutter, as it should.
On top of the transmission fairing, there's a red beacon light, which you can see in the above photo behind where the rotor will go. I made it by find the base for it in my spares box, and gluing it on. Then for the actual light portion, I took some clear sprue and sanded it to shape then polished it, while still on the sprue. I then put some Future in a small cup, and tinted it with red food colouring. I dipped the part in the coloured Future and got my self a nice red beacon light.
The other antennae (visible in the photo) were made from spares and some styrene rod.
After it was all attached, I gave the whole thing a coat of Model Master primer, fixed a few imperfections here and there, then began painting. Belcher's instructions say that the colours should be green FS34084 (the darker of the two shades) over green FS34095. I found Model Master Medium Field Green FS34095, but not FS34084. I settled on FS34086 Green Drab. This was my most involved masking job ever. Ever. Don't ever make me do that again.
Once I was satisfied with the paint, I shot it with some Future and applied the decals. I had the standard marking decals from Belcher, and had custom SFOR stencils and squadron flash decals made by Mike Grant and bought a Leading Edge CF-18 sheet to steal some of the stencils, but I ended up not using them because their shade was too light. I used Solvaset throughout, and it worked like a dream. Mike Grant says not to use Solvaset with his ALPS-printed decals, but I had no problems at all with it. I was especially impressed with Mike Grant's 427 Sqn logo for the tail that he made me.
Once the decals were done, I sprayed everything with Testors Dullcote and began weathering. I started with a sludge wash of gray-brown acrylic paint. Unlike Swanny's article, I like to apply the sludge over a dull finish so that it not only darkens panel lines, but also leaves a bit of a dingy "halo" around details, almost like preshading. Also, by wiping the sludge away in different directions, you can create different effects. I finished by chipping here and there with a Prismacolor silver pencil. I know the weathering is quite heavy, but I'm trying to represent and aircraft on deployment overseas. And even if it's not very accurate, weathering is fun. There, I said it.
From here, I finished the interior by adding the rest of the benches, adding belts and adding small orange box to represent the ELT in the cabin. I painted the tailrotor and completed the landing skids.
Also by this point I've decided to hold off on the flare dispensers until I can either find a suitable substitute or learn to photoetch myself. Next update will have some of the final details to finish, and hopefully the next update will be the finished product.
HOME | BLOG | I CAN'T BELIEVE IT'S NOT UGANDA | BACON FORTRESS