[ Main Page ] [
Links ] [ Newsgroup
Questions ] [ Tutorials ] [ Submit
Info. ] [ Downloads ]

Using & Editing with EM Editor
|
|
|
Okay, so you have Em Editor installed and now you want to START MAKING STATIONERY! You chose to make EM Editor part of your right click options. First you will need to copy an original script and paste is somewhere new (remember) you never want to work on the original. If you choose to print these instructions out, then highlight them and then send them to the printer. When the printer comes up look for the area that says Print Selection. That way it will only print out the highlighted areas. |
|
If you would like to follow along in this tutorial, then you
can download these files
|


|
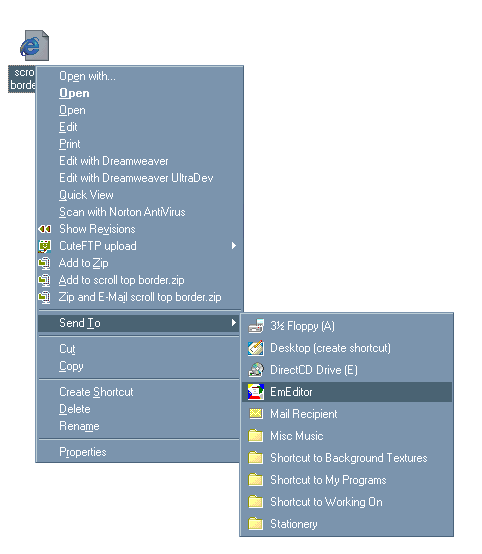
Once you have your script in a new place then right click on it and go to "SEND TO" and then over to EM Editor. It should look like this -
|
|
It will then open up and look like this - Click
Here For this stationery, I have highlighted (in red) the parts you will be using. I will explain what each red setcion means. 1. Font Name - remember to chose a font that came with your comptuer, unless other people have the same font on their computer - they won't be able to see the fancy font. It will revert to their default font. 2. Font Size - Generally 10-14 works great. 12 is the general size you will see. 3. Margin Left & Margin Right - just what it says. On stationery like this you really don't ever change that, but you could if you wanted to. 4. Background color - Let me say this first -- you can change the background color here, but I have gotten used to adding in my own background color tag. I don't ever use this area as I like to keep it in inside my <body> tag. Go look at the image again... See the <BODY> tag? I like to use this spot. So I would change it to look like this - <Body bgcolor="000000"> Very simple. I choose to use this area as if I want to add my own background image to a stationery that doesn't come with that choice then I can alter the <BODY> tag again to look like this <body background ="IMAGE.gif"> -- of course I would have to check to make sure it didn't need a full path. *We will talk about "full path" on the next page. You can change the background color (and font) to be whatever you want. This is where learning a little bit about Paint Shop comes in. You can find out the code number for any color you want. 1. Simply open an image in Paint Shop Pro Just for basics - white = "ffffff" and black = "000000" - don't forget to add the quotes. If you would like to see pictures doing this, then - Click Here
5. Font Color - Again, you can choose ANY color you want - just put in the right code. Okay, you will find those options in every stationery. They may be laid out a little differently, but they will always be at the top of the script and they will always have "close to" the same selections. Let's move on to the next section, this is where will be looking to insert our images. I usually wait to start messing with the font and margins until I have stuck my images in and I can see what they look like and then decide what I might like to use with them. |