[ Main Page ] [
Links ] [ Newsgroup
Questions ] [ Tutorials ] [
Submit Info. ] [ Downloads ]

Using & Editing with EM Editor
|
We are so close to being finished with this stationery! Now that we have our main image set in place, let's insert the blue seamless tile for the background. You might be wondering how that little blue picture that you saved will work for a background. When you specify an image for a background it will tile itself to fit on the entire page. There is a trick to doing this though. You cannot just insert any image and expect it to look good. If you want to use a background image, then you should make it into a "seamless tile" - simply put, that means you won't see any seams in the image as it tiles. You have probably seen either a web site or a stationery that did not use a seamless tile (and it looks horrible!) There are tutorials for creating seamless tiles. There is even one from Darlene on the Paint Shop Pro tutorials within this site. The blue image you saved earier is a seamless tile. So, it will look fine. Let's get busy inserting it - Going back into the script, I am going to insert the seamless
tile where the creator said I could use an additional image,
but it wouldn't scroll. Now, if this option wasn't here, then
I would simply look for the first Each script is a little different. You will get used to what you should be doing with practice. While you are working and you just can't figure something out, then go to the Newsgroup and just post a question. Someone will answer you. Okay, so this is what it looks like -
Oops, hopefully you saw that my path pointing to my image was
incorrect. See how it says Here is what the correct version looks like -
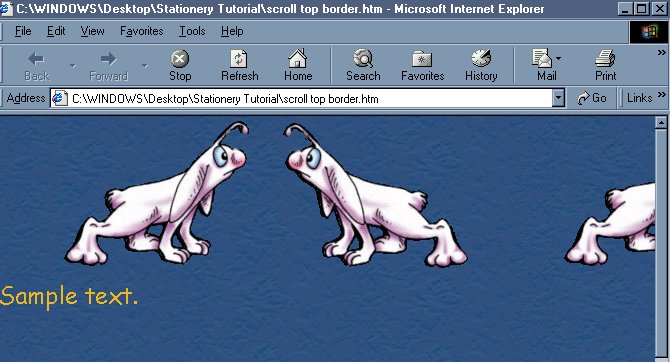
And here is what it looks like now -
So now we only have to add a few touches and we are done. One of those is inserting the music file. I chose "you're my best friend". That seemed appropriate for these two little creatures. So here is what the code looks like before I add the right path -
And here is what it looks like after -
I am now going to go preview it and make sure I can hear the
music. -- So now I want to change my font to something that will match. I am going to change the color to white ("ffffff") and make it a little smaller. This is what it looked like before -
And this is what it looked like after -
That is it - WE DID IT!! *In case you think the words are too close to the image - you can move the words down a little by increasing the height of the scrolling image. This type of information just comes from practice and learning the hard way. So, if you want to move the words down a little, then just increase the height and then go preview it and keep doing that until you get it where you want it. * The creature image had a transparent background. If I didn't make the background of that image transparent then the creatures would have been on a white background. I wanted to see the blue background behind them and make it look like they were floating alone, so I just made the white background they were sitting on transparent. You will use transparency A LOT, I suggest to look for a tutorial on that as one of your first priorities.
|