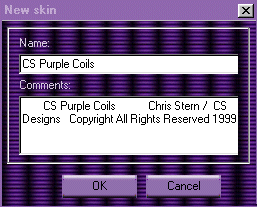
|
courtesy of CS Designs |
|||
If you wish to
change this information or add to it later, you can do so by selecting
the |
|||
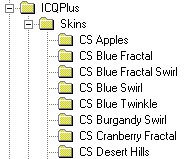
| The Images for your new Skinz | |||
| When you give your Skinz a name. I CQ Plus creates a directory with that name under your Skins folder of ICQ Plus. If you don't remember where you installed ICQ, now might be a good time to look for it. Once you have found it look at the sub-folders listed under the Skins . folder. You should find a folder with the same name you just gave your new skin. It is to that folder that you will now want to copy the image or images you want to use for this theme. Once all your files are in place, go back to your ICQ Plus and continue with the creation of your new skinz. |
 |
||
|
The Dialog Box |
|||
| Now
that you have copied your images to the folder ICQ Plus created for you,
You will want to tell it what to do with these files. To start click on
the EDIT button next to the Dialog
Box. There are two selections listed here:
The Main dialog and the Other dialogs. The Main dialog handles many of the features of your Main ICQ console while the Other dialog handles other features as well as that of your ICQ Plus console. |

|
||
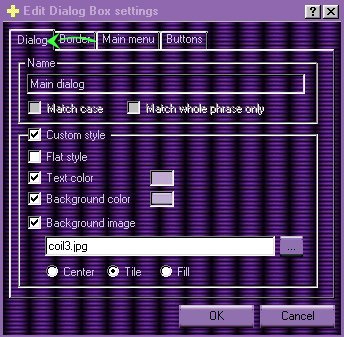 |
Choosing
to EDIT the Main dialog, will give you
the screen on the right. The selections along the top include Dialog,
Border, Main Menu and Buttons.
1.) Start by putting a check in the custom style. This opens the Flat Style, Text Color, Background color and Background image so you can configure them. 2.) Select Background image and typethe name of the image we want to use as a background for our main ICQ console. 3.) Check the Text Color and the Background color. You will be presented the color chart that allows you to pick the color of your choice. |
||
|
PREVIOUS
PAGE NEXT PAGE
Any inquiries
or comments about this page can be sent to:E-Mail
|
|||