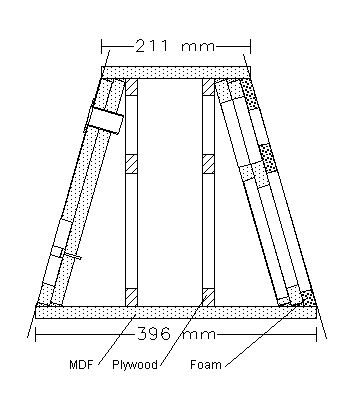
The original Watt has a Cabinet that is sadly outside almost any DIY'ers ability to copy. It is cast from Corian in one piece apart from the Bottom-plate. This obviously ensures excelent Finish, freedom from panel resonances and a pretty serious weight. Not being able myself to replicate this, I decided to use MDF of 18mm thickness with extensive bracing and double thickness Front and rear walls.
This is nowhere near the level of rigidity and lack of resonance the originals have, but at the same time it is much better than almost any other commercial Speaker I have encountered so far. The two braces are made like the Ribs of a boat or (model) plane. Thus they support all panels but front and rear.
The original Watt has the Drivers mounted slightly recessed and uses a layer of accoustic absorbant foam on the Front-panel to control dispersion and to eliminate diffraction effects around the tweeter and on the Cabinet edges. I replicated this to a degree. In my case the Front-baffle is recessed and a Layer of acousticly absorbent foam (salvaged from a printer silencer hood for dot matrix Printers) with suitable cutouts is used to a similar effect.
The Drawings to the left shows the technique of construction quite well. Due to the non-rectangular shape of the Box it is somewhat difficult to assemble. I first fitted the two ribs to the Bottom-panel and let everything settle well. Placing the two front pannel pieces and fixing them temporarily I determined the position for the woofers center and drilled a guide-hole to allow cutting the holes for the woofer. The hole in the panel on the inside of the box was cut larger. A similar technique was applied forthe holes needed for the tweeter and the port.
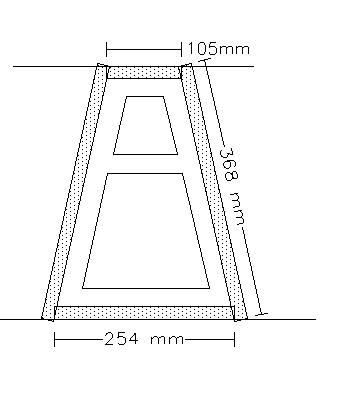
Following this I fitted the first layer of the Front-rear panel with plenty of Filler/Glue to make a solid connection between front/rear and bottom panel as well as the rib. After again a prolonged period of drying the second layer of the front/rear panel was fitted. I forgot to insert the blind-nuts for fixing the driver and port at this stage and was cursing black strings later, so fit the Blind-nuts for mounting all Drivers and Ports BEFORE fitting the outer front/rear pannel.
After filling in any voids on the top the whole top was sanded with an orbital-sander to make perfectly flat contact surfaces for the Top panel. With that in place and well dry, the sander was again empoloyed to flatten out the Sides. This is done with the ribs as guides. Both bottom and top panel as well as front/rear panel will stand somewhat proud of the surface defined by the ribs. This needs to be eliminated. I suppose a planer could also be used.
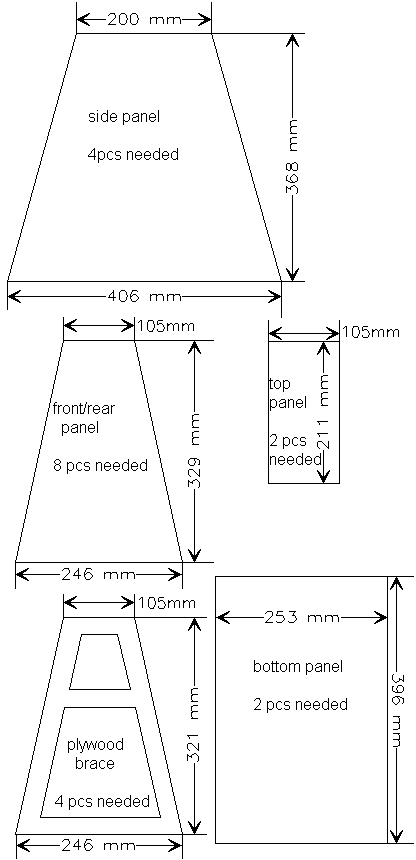
On the left you find a drawing showing all the panels needed to complete a pair of the satellites. The final shape is really applied using a planer or a sander. After filling in all remaining voids, holes and sanding all surfaces perfectly flat so on in the cabinets surface, I first sprayed on primer. Several layers of acrylic high gloss black laquer where sprayed and sanded until the Finish was considered okay.
The inside of all larger surfaces in the Cabinet was coverd with self-adheasive bitumen pads. A loose filling of Dacron was used inside the speaker. The Tuning-port is 35 mm inner diameter and 120 mm long. The X-Over has its own small enclosure. It is held in place with double-sided adheasive foam tape which offers a measure of insulation from cabinet resonances.